Network devices, like your home devices, need to share the same time across the network. Routers and switches have internal clocks, but those clocks can drift. After days or weeks, different devices might show different times.
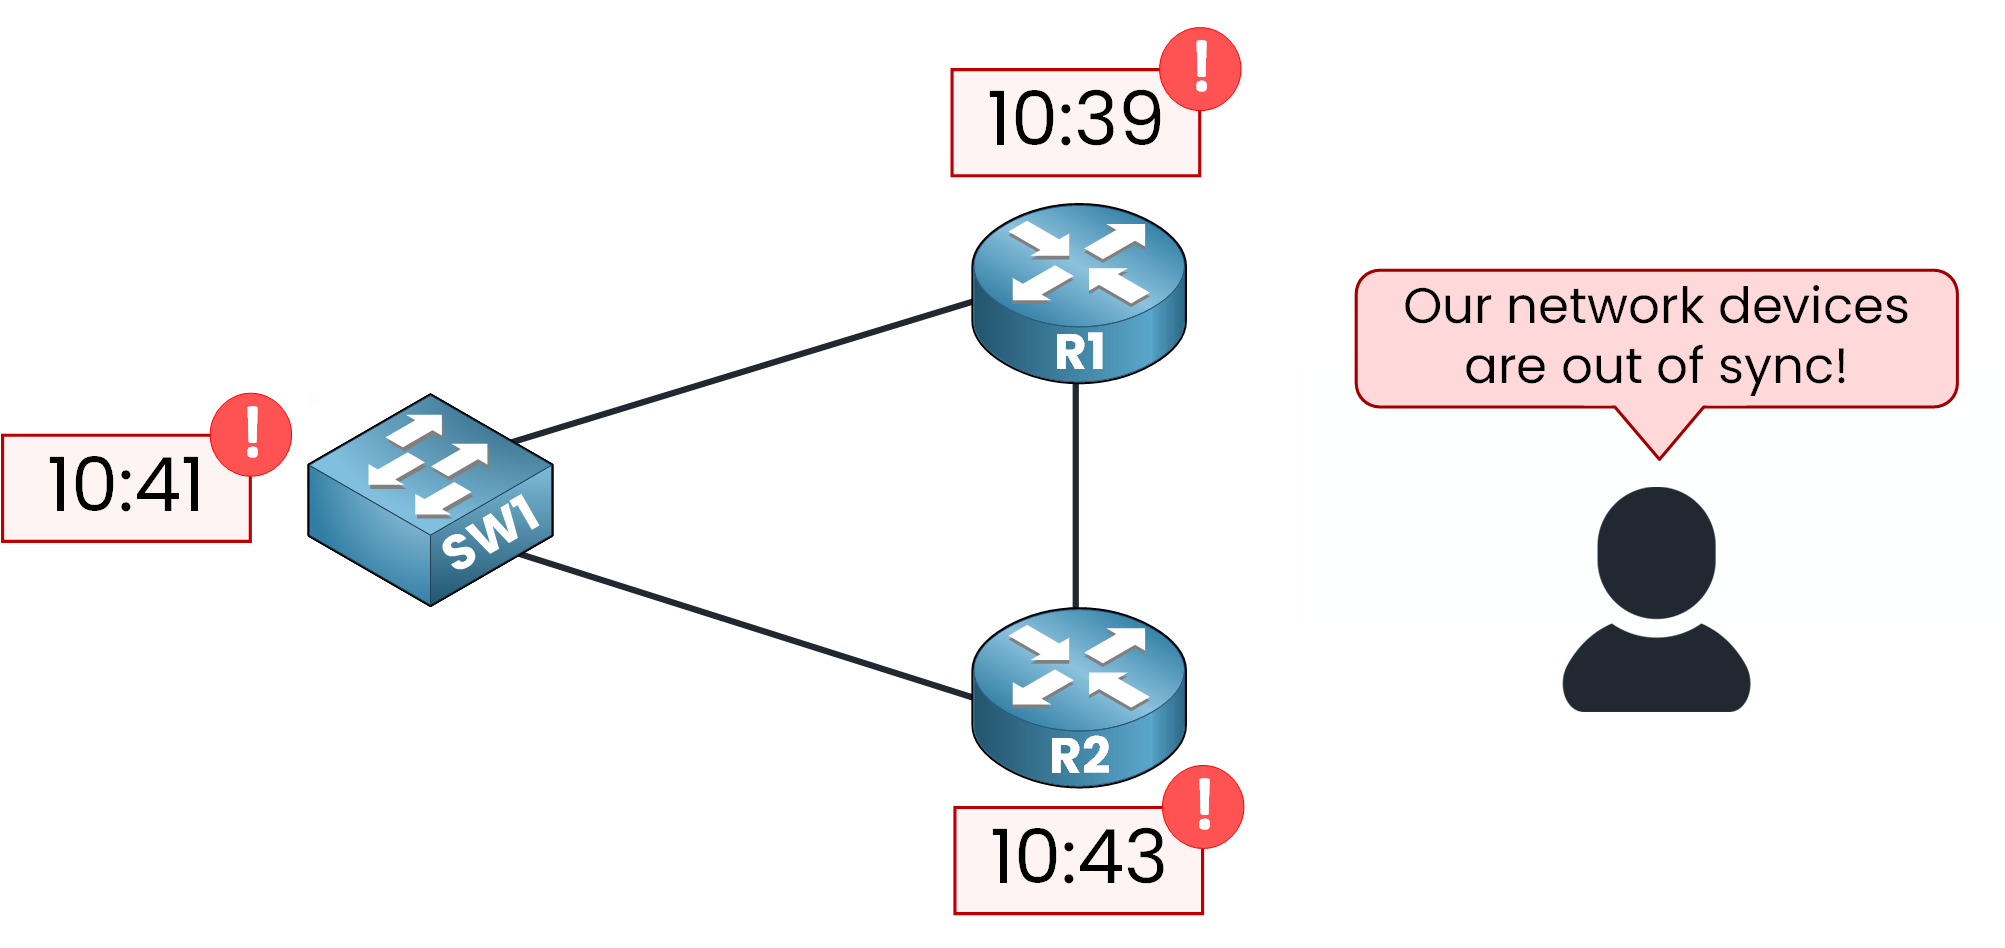
Figure 1 – Time out of sync before Network Time Protocol
Network Time Protocol (NTP) keeps all devices in sync with a common, accurate time source. With NTP in place, the whole network stays aligned.
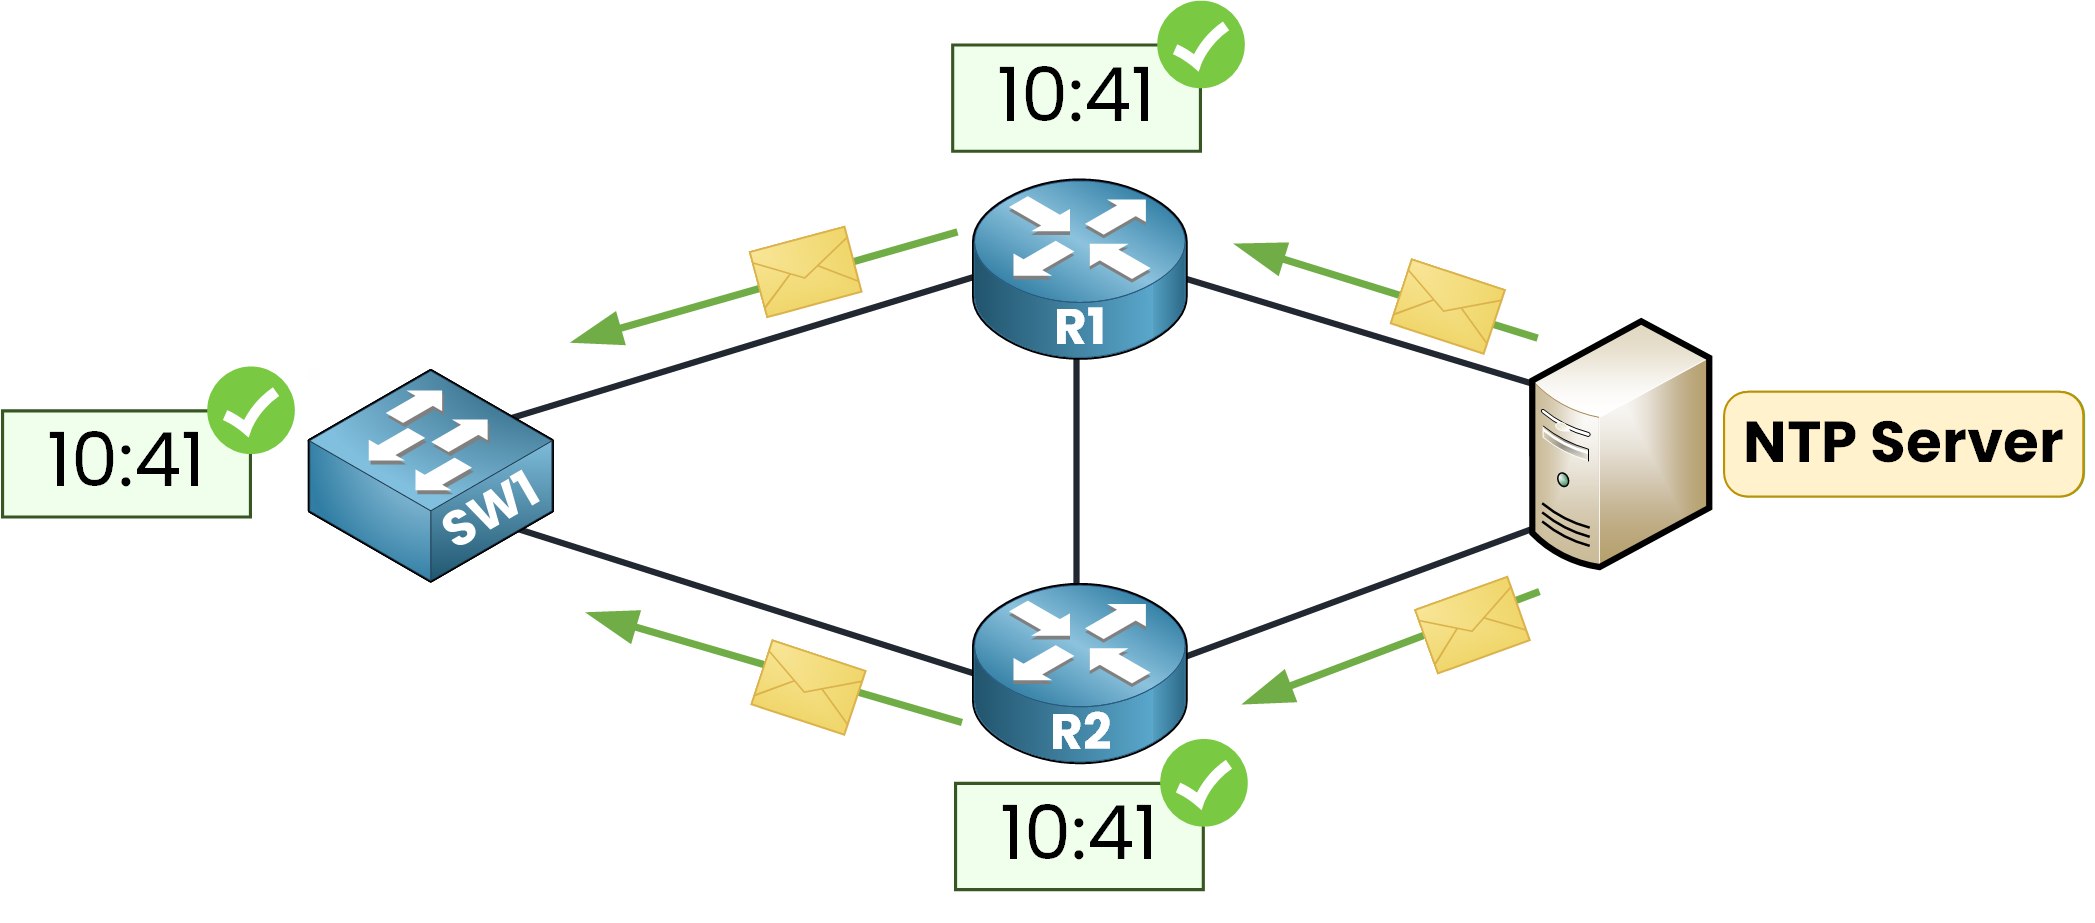
Figure 2 – Time synchronized with Network Time Protocol
The IETF standardized NTP in in RFC 5905, with NTPv4 being the current version. It’s widely used in enterprise networks to keep devices synchronized in time.
Why do we need synchronized time?
Log correlation (Syslog): Sync device timestamps. This helps accurately link events during troubleshooting or security issues.
Security & certificates: Many mechanisms rely on accurate time. For example, certificate validity and time-sensitive handshakes in IPsec/TLS depend on it.
Time-based policies & jobs:
Enforce time-based ACLs.
Run backups, scripts, and automations at the right times.
Meet auditing and compliance needs.
In short, synchronized clocks make the network easier to troubleshoot, more secure, and more reliable.
Answer the question below
NTP uses a simple Client–Server Model. In this model, an NTP Server is connected to a reliable time source and periodically sends timestamps to its clients. These timestamps are numeric values that represent the current time.
When the clients receive the information, they compare it with their own local clock and then adjust their time in small steps.
All exchanges are lightweight, and they use UDP port 123 for communication.
Reference Clock
An NTP Server doesn’t invent the time. It relies on a reference clock a highly accurate source such as a GPS receiver tied to atomic clocks, or a ground-based atomic/radio clock.
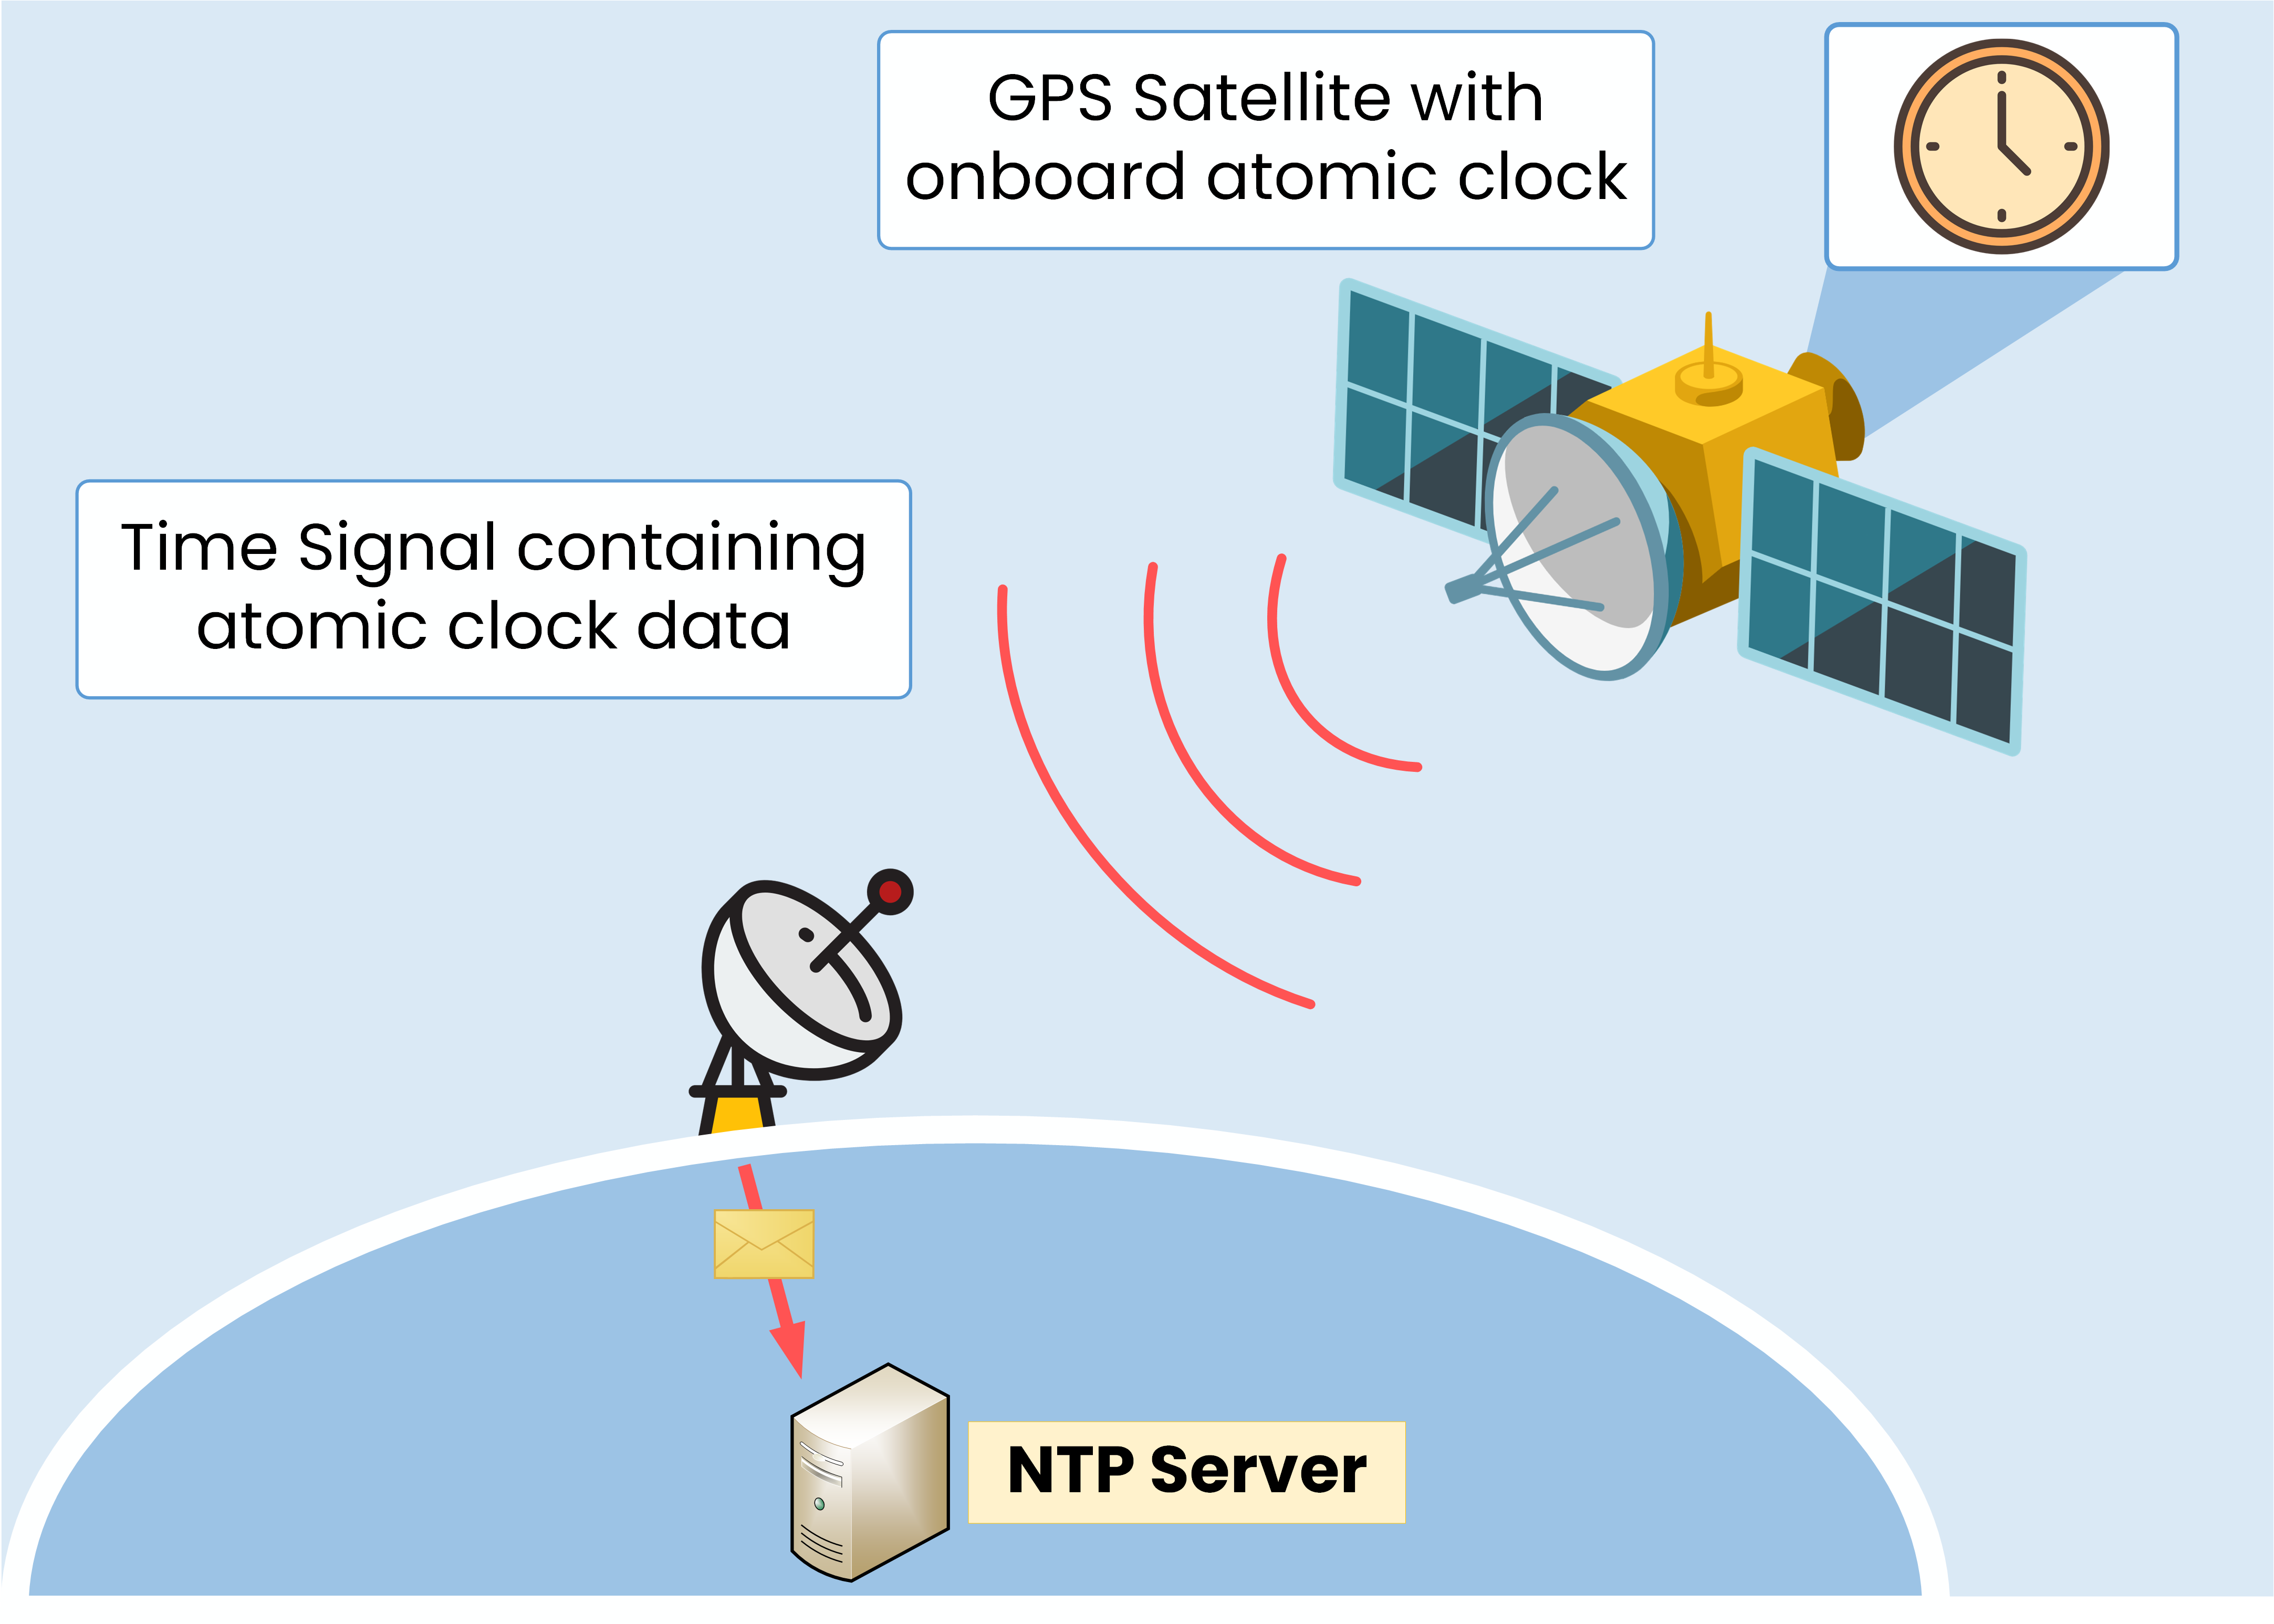
Figure 3 – Authoritative time source using onboard atomic clock
Traditionally, GPS satellites carry atomic clocks that provide extremely precise time. A ground antenna/dish receives the time signal, the NTP Server ingests those timestamps, and then distributes them to the rest of the network.
NTP Stratums
When using Network Time Protocol, remember that NTP networks are arranged in levels called stratums (from the Latin word for layer).
In NTP, a device’s stratum indicates how far it is from the most accurate time source, the reference clock.
In the case below, Stratum 0 is the GPS system acting as the reference clock.
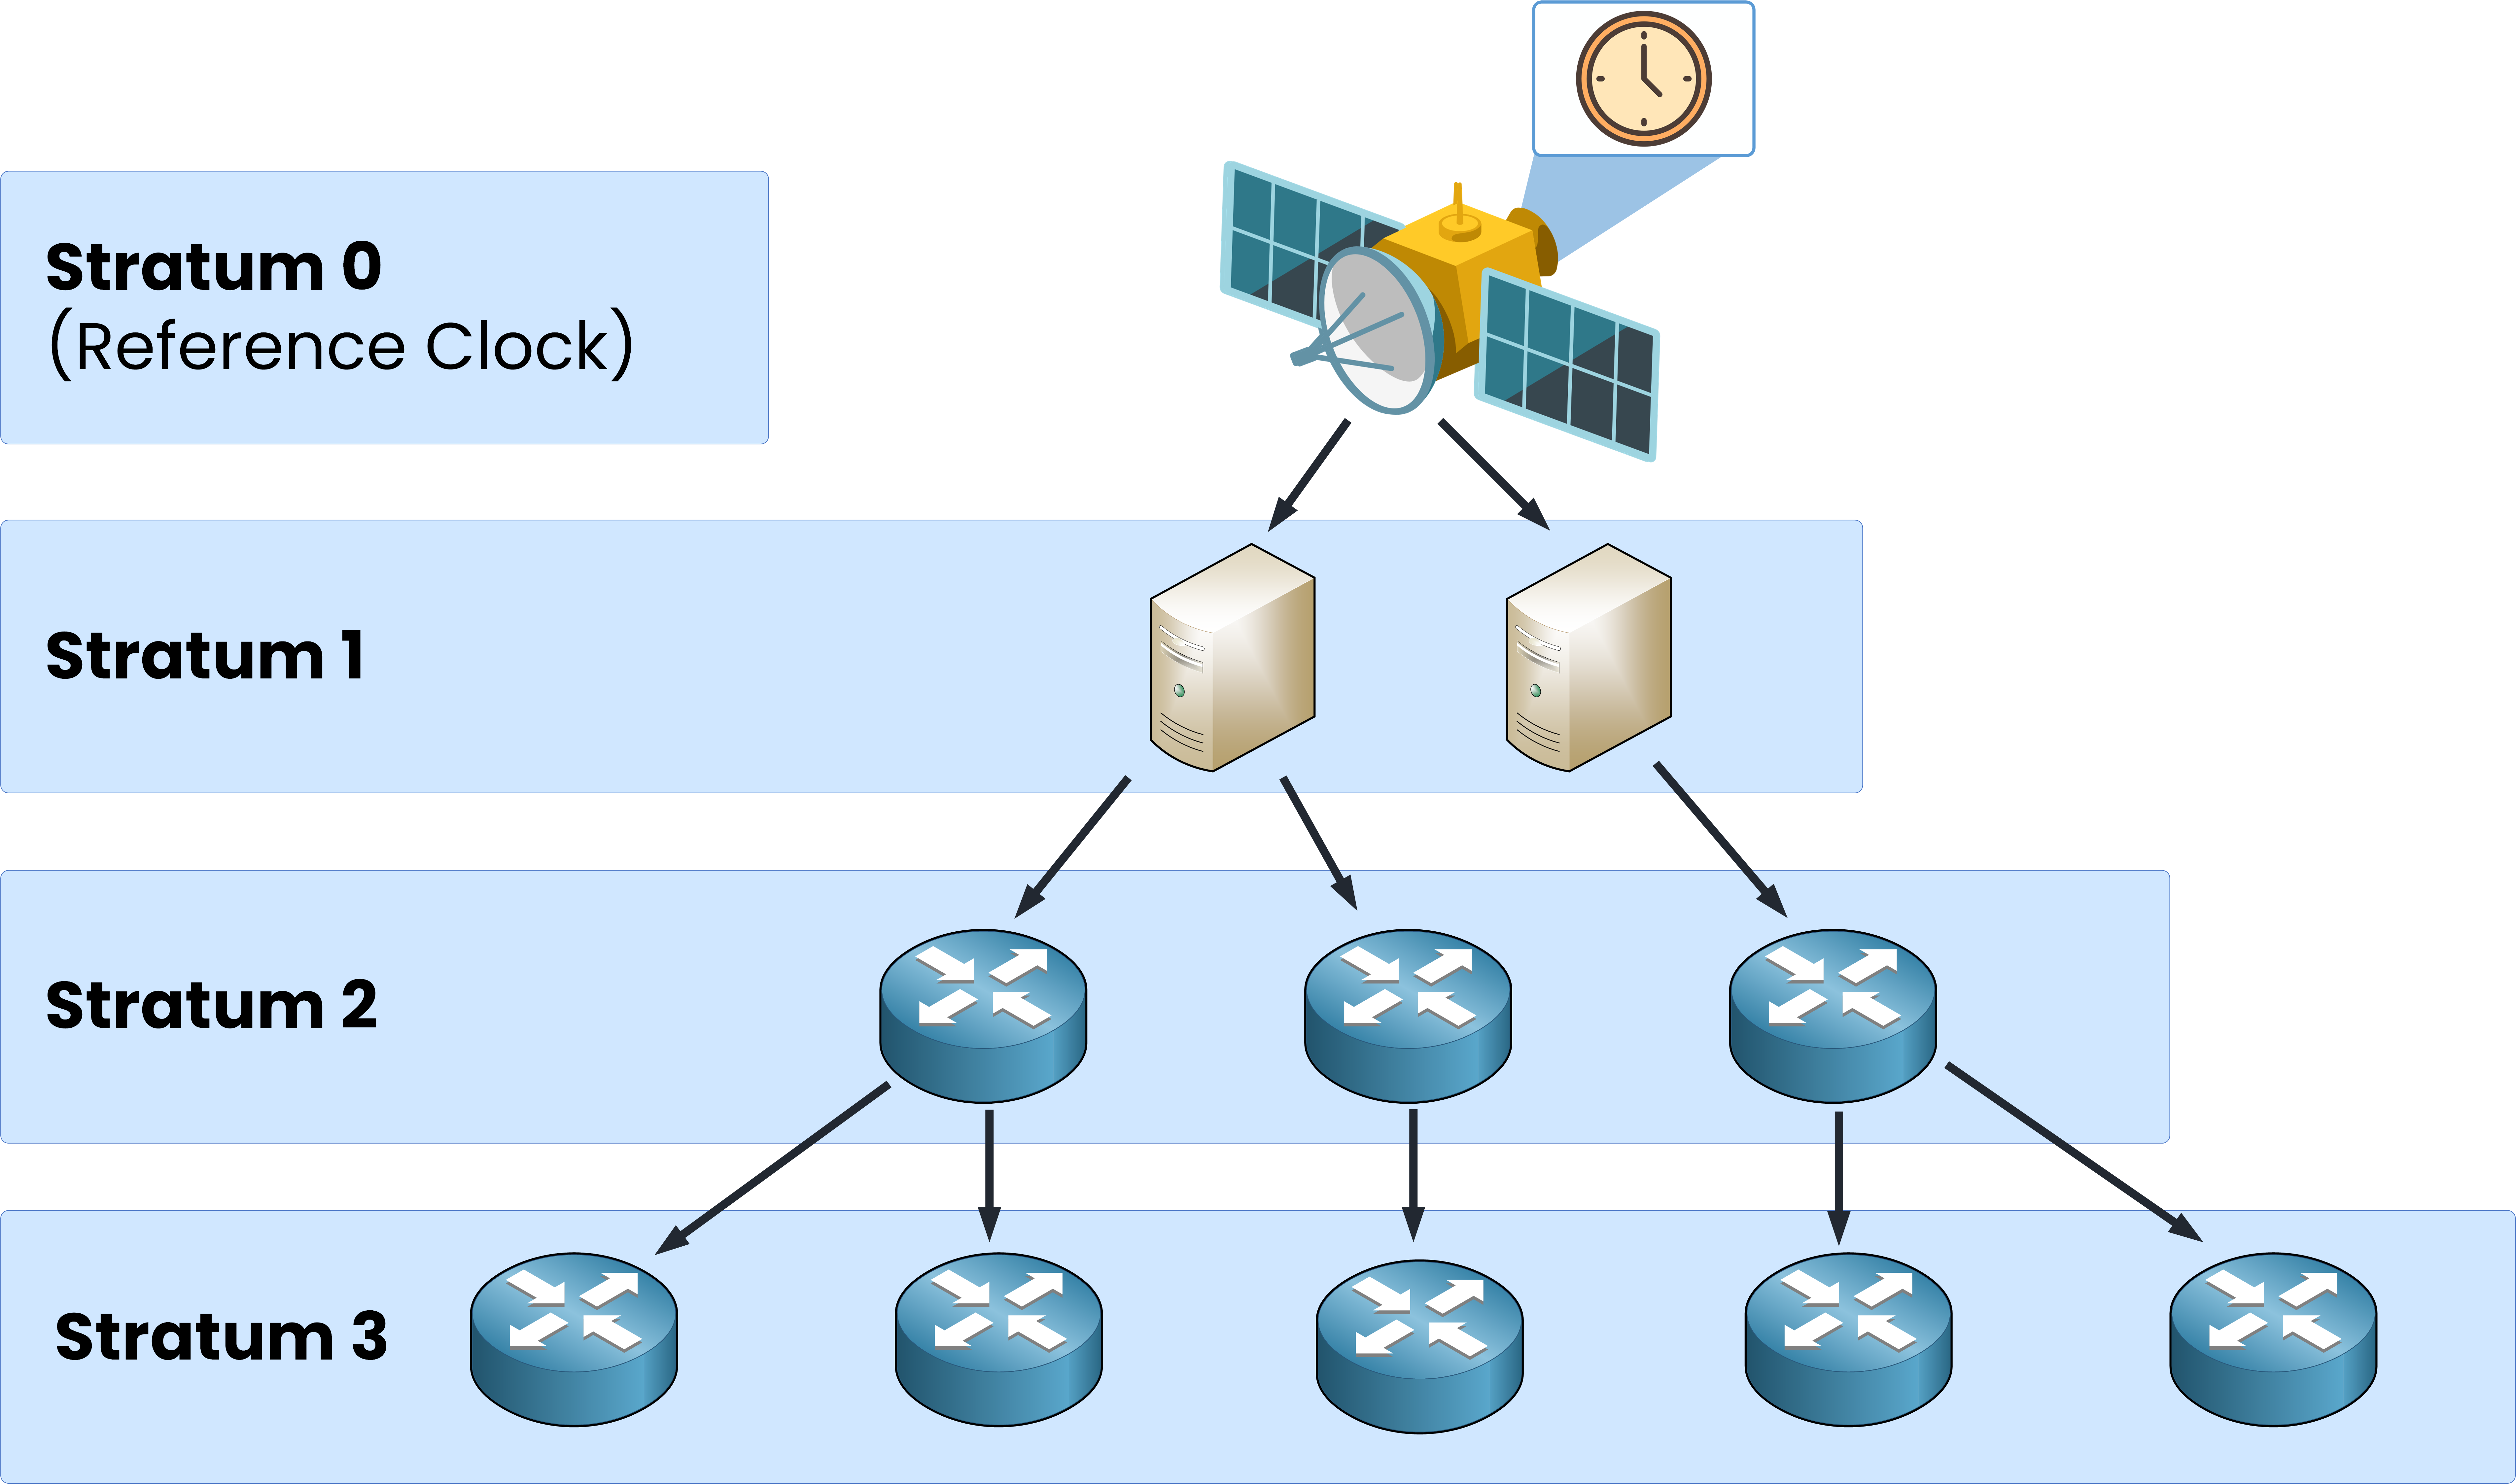
Figure 4 – Network Time Protocol stratum hierarchy
As you go down the layers, the stratum number increases. Usable levels are 1 to 15; Stratum 16 means the device is unsynchronized.
In a typical NTP network, a Stratum 1 Server is directly connected to the reference clock.
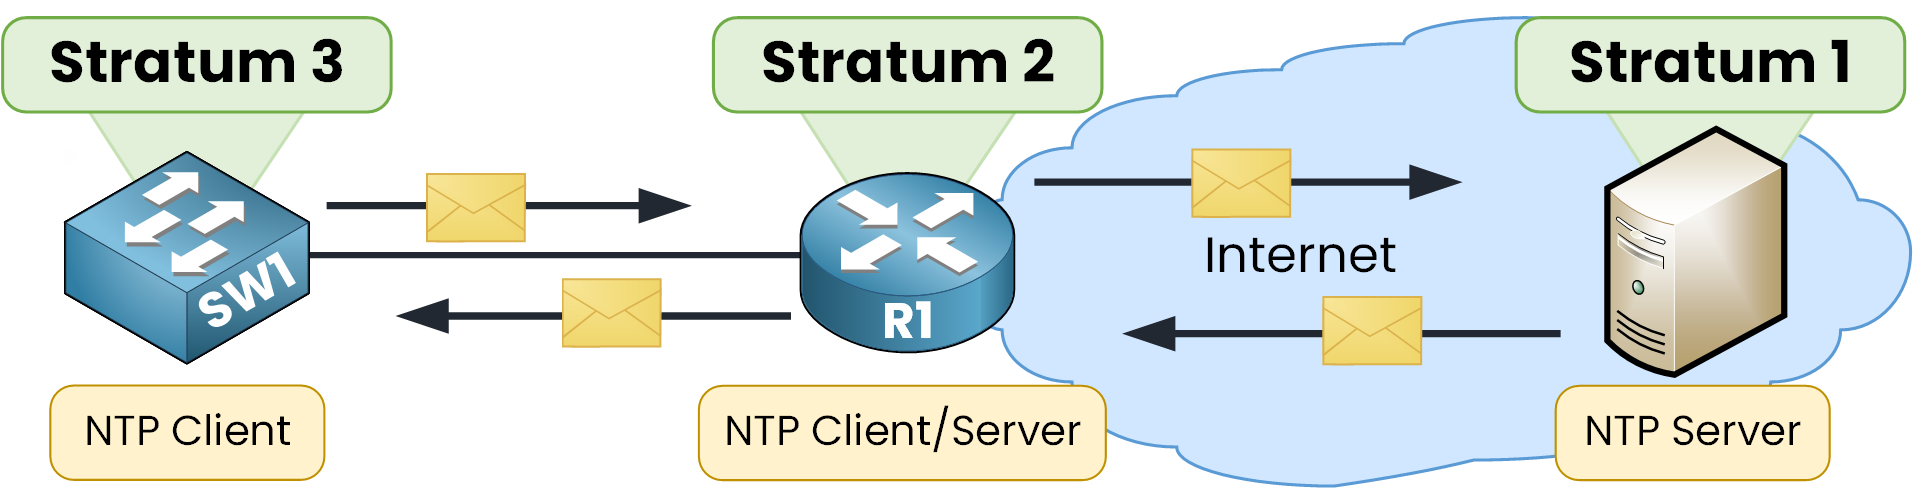
Figure 5 – NTP Client-Server Communication by Stratum
Then a Stratum 2 device synchronizes to Stratum 1 (client role) and can serve time to lower levels. A Stratum 3 device is usually client-only, learning time from Stratum 2.
It’s a hierarchy: as the stratum increases, accuracy decreases slightly due to added delay. Clients therefore prefer the lowest-stratum reachable server.
Answer the question below
Which UDP port does NTP use?
Before using Network Time Protocol, we need to sure you can set and verify the local clock on Cisco Devices. We’ll then point the devices to an NTP Server and interpret the verification outputs.
For the CCNA you don't need to know a lot of commands, so I'll show you the essentials you'll need to know.
Local Time
You can manually set the time zone and local clock on your network device.
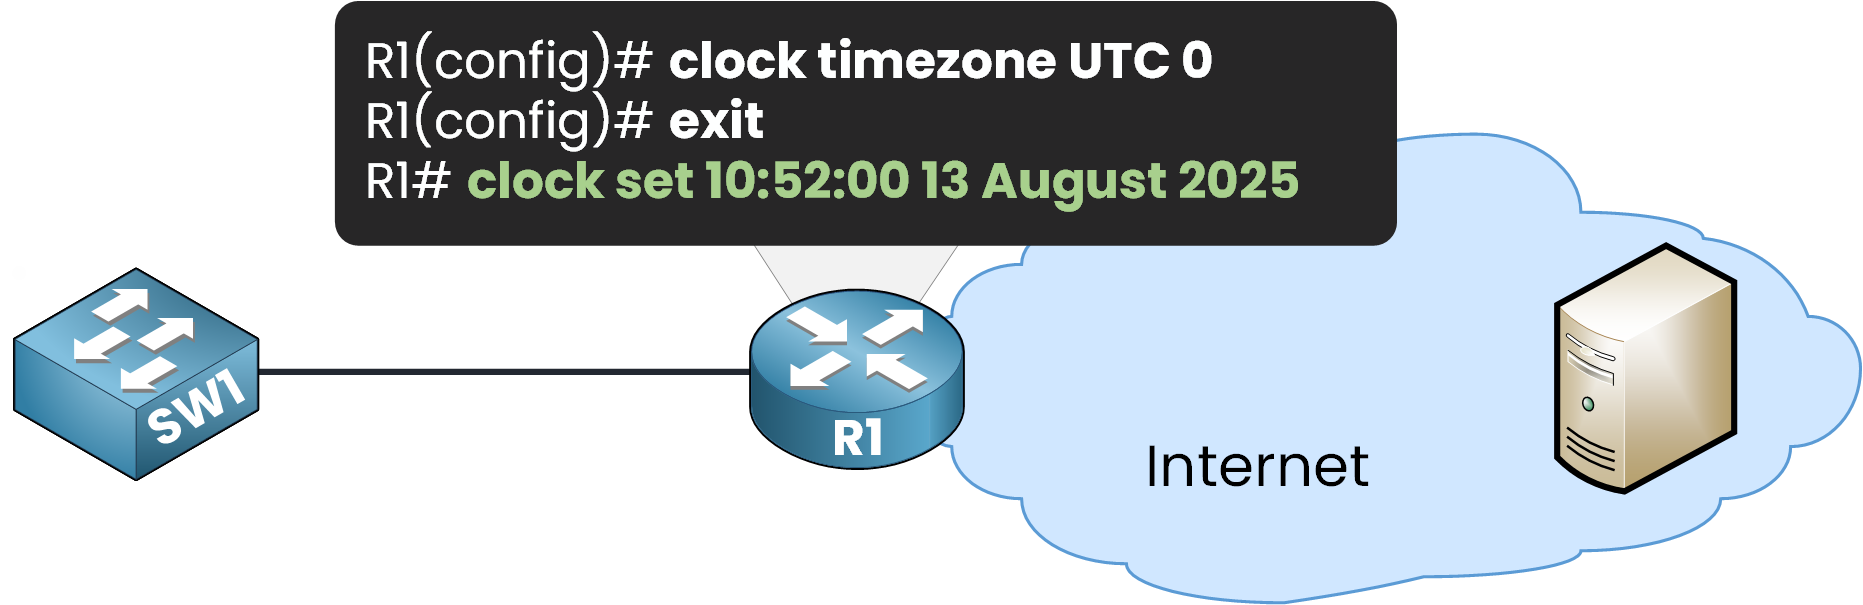
Figure 6 – Setting local time on a Cisco router
To verify that the clock has been updated, use
show clock detailR1# show clock detail 10:52:5.540 UTC Wed Aug 13 2025 Time source is user configurationYou can see the configured time, with a few seconds difference because the command was run shortly after setting it. The line Time source is user configuration confirms the clock was set manually.
In an enterprise network, manually setting the time on each device takes a lot of time. Plus, clocks can still drift apart. This is where NTP becomes essential.
Configure NTP Server
Now that we understand why NTP is useful, let’s configure a device to use an NTP Server for automatic time synchronization.
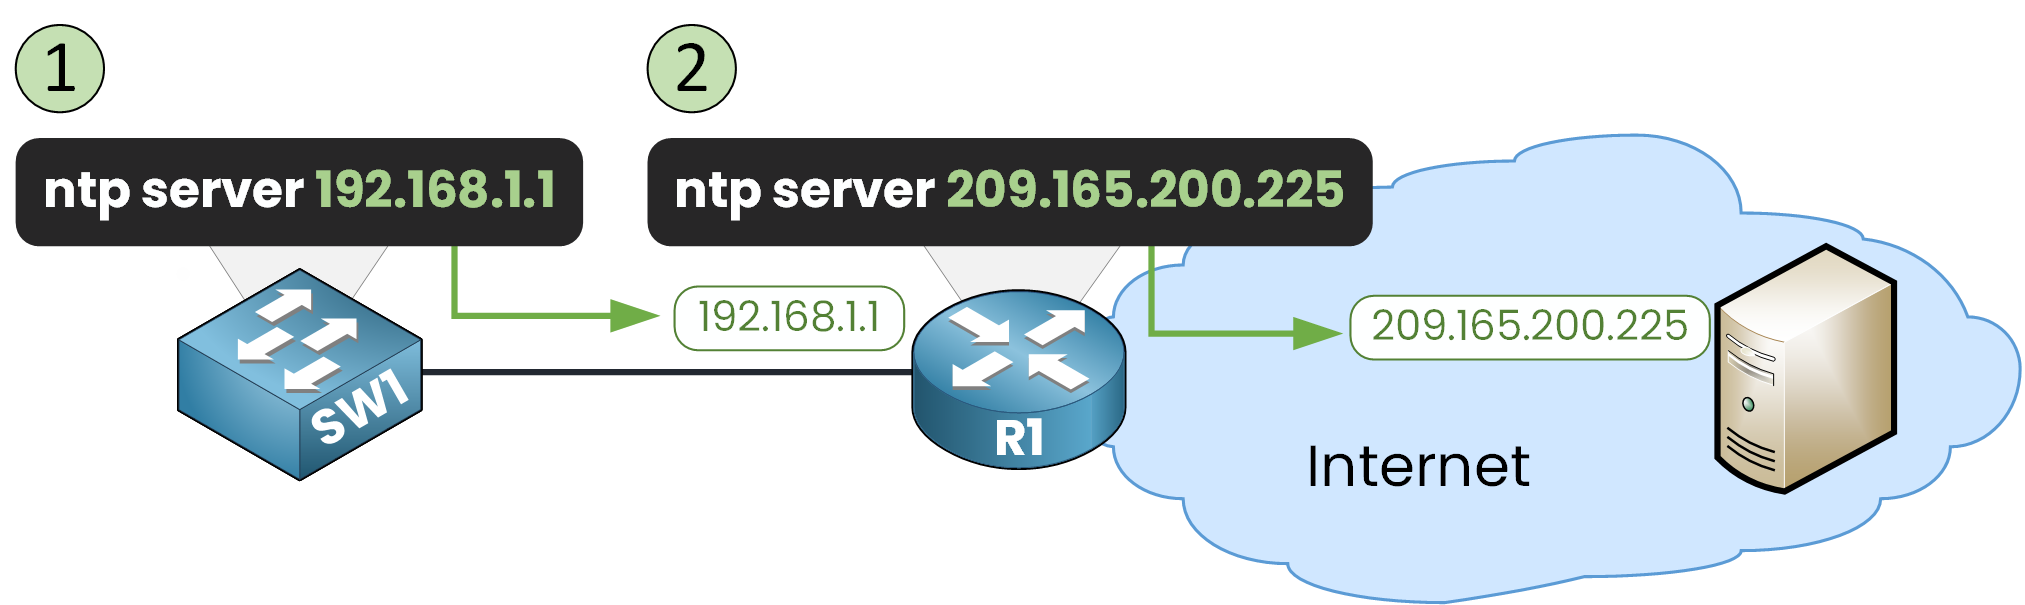
Figure 7 – NTP Server configuration steps
The basic command is
ntp server ip addressStep 1 – Point SW1 to the Internal NTP Server (R1)
In our example, SW1 will get its time from the NTP Server 209.165.200.225.
However, that Server is reachable only through R1’s interface 192.168.1.1, so SW1 will be configured to use R1 as its NTP source:SW1(config)# ntp server 192.168.1.1This tells SW1 to request time from R1.
40 % Complete: you’re making great progress
Unlock the rest of this lesson
If you’d like to continue your CCNA journey, create your free account now.
Access all free CCNA lessons
Practice with quizzes and level test
Progress tracking in your dashboard
Made by network engineers - CCNP certified
Create your Free Account1151 learners continued their CCNA journey this month