Imagine you’ve just joined a mid-sized company as the network administrator.
Your first mission is to separate the Sales and Tech teams into different VLANs to improve security and network efficiency.
Right now, everyone is connected to the same physical switch, meaning broadcast traffic from one team reaches every device on the network.
Figure 1 – Topology used to configure VLANs
To fix this, you’ll create two VLANs:
one for the Sales department (VLAN 10) and one for the Tech department (VLAN 20).
This logical segmentation isolates both teams at Layer 2, even though they still share the same physical infrastructure.In this topology:
PC1 and PC2 (Sales) belong to VLAN 10.
PC3 and PC4 (Tech) belong to VLAN 20.
By assigning each group to its own VLAN, you’ll reduce unnecessary broadcasts and make the network easier to manage.
This simple change improves performance, security, and scalability without adding new hardware.Transition to Configuration
Now that you understand the scenario and the goal,
let’s move to the first practical step, creating VLANs on your Cisco switch.Answer the question below
Let’s now move from theory to practice.
Your goal is to create two VLANs, one for the Sales team (VLAN 10) and one for the Tech team (VLAN 20).
Each VLAN will represent a separate broadcast domain, even though both teams share the same physical switch.Once logged in, enter global configuration mode to start defining VLANs.
Entering Configuration Mode
SW1# configure terminalThis command switches you from
user EXEC modeinto the configuration environment, where you can modify VLANs, interfaces, and other switch settings.Create VLAN 10 (Sales)
SW1(config)# vlan 10
SW1(config-vlan)# name Sales
SW1(config-vlan)# exit
You’ve just added VLAN 10 to the switch’s internal VLAN database.
It now exists, but no ports are assigned to it yet.Creating VLAN 20 (Tech)
Repeat the process for the Tech department.
SW1(config)# vlan 20
SW1(config-vlan)# name Tech
SW1(config-vlan)# exit
At this stage, both VLANs exist, but they don’t affect any interfaces yet.
They’re simply definitions stored in the switch’s VLAN table.Verifying VLAN Creation
Before moving forward, let’s verify the VLANs have been created successfully.
Use the command below to display all VLANs on the switch.SW1# show vlan brief VLAN Name Status Ports ---- -------------------------------- --------- ------------------------------- 1 default active G0/0, G0/1, G0/2, G0/3 10 Sales active 20 Tech active 1002 fddi-default act/unsup 1003 token-ring-default act/unsupUnderstanding the Output
You can now see that VLAN 10 and VLAN 20 exist on the switch.
However, all ports are still part of VLAN 1, which is the default VLAN for all interfaces.
This means that traffic from Sales and Tech is still mixed together? there’s no isolation yet.Quick Recap
So far, you’ve learned how to:
Enter configuration mode on a Cisco switch.
Create VLANs and name them appropriately.
Verify their existence using
show vlan brief.
In the next section, we’ll assign specific switch ports to each VLAN so that Sales and Tech devices are properly separated.
Answer the question below
Now that your VLANs exist on the switch, it’s time to assign the right interfaces to each VLAN.
This is the step where logical separation becomes real.
You’ll map physical ports to specific VLANs so that the Sales and Tech teams no longer share the same broadcast domain.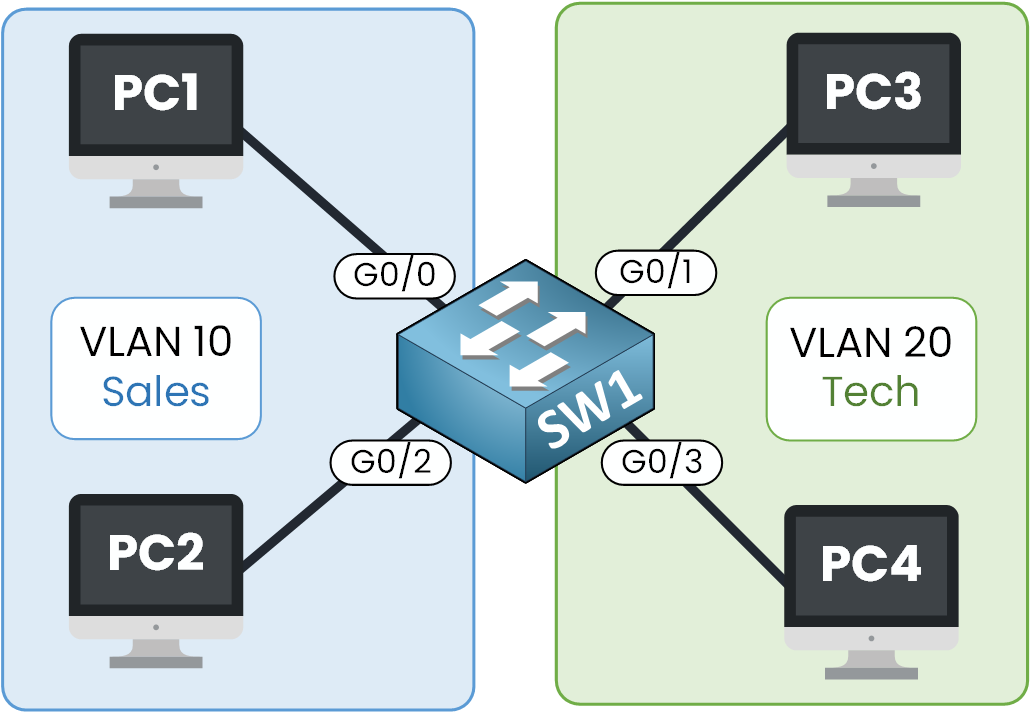
Figure 2 – VLAN topology with device assignments
We’ll use two main commands:
switchport mode accessandswitchport access vlan X.Assigning Sales Ports (VLAN 10)
Let’s begin with the Sales team devices, which are connected to interfaces G0/0 and G0/2.
SW1(config)# interface G0/0
SW1(config-if-range)# switchport mode access
SW1(config-if-range)# switchport access vlan 10
SW1(config-if-range)# exit

SW1(config)# interface G0/2
SW1(config-if-range)# switchport mode access
SW1(config-if-range)# switchport access vlan 10
These commands do two things:
switchport mode accessforces the port into access mode, meaning it will belong to only one VLAN.switchport access vlan 10assigns the interface to VLAN 10 (Sales).
Assigning Tech Ports (VLAN 20)
Now, let’s do the same for the Tech team, connected on interfaces G0/1 and G0/3.
SW1(config)# interface G0/1
SW1(config-if-range)# switchport mode access
SW1(config-if-range)# switchport access vlan 20
SW1(config-if-range)# exit

SW1(config)# interface G0/3
SW1(config-if-range)# switchport mode access
SW1(config-if-range)# switchport access vlan 20
The process is identical, except the VLAN ID is 20.
Once done, both teams are completely isolated at Layer 2, but we’ll confirm that in the next step.Verifying Port Assignments
Use the command below to check that the interfaces are now correctly associated with their VLANs.
SW1# show vlan brief
VLAN Name                             Status    Ports
---- -------------------------------- --------- -------------------------------
1    default                          active    none
10   Sales                            active    G0/0, G0/2
20   Tech                             active    G0/1, G0/3
1002 fddi-default                     act/unsup
1003 token-ring-default               act/unsup
You can now clearly see that each port has been assigned to the right VLAN.
The default VLAN (VLAN 1) no longer contains any active ports.Key Takeaway
You’ve now connected theory to practice:
VLANs are logical, but they only become effective when you assign real interfaces.
At this point, the Sales and Tech teams are fully isolated at Layer 2, even though they share the same physical switch.Answer the question below
Now that your VLANs are configured and ports assigned, let’s take a closer look at how VLAN information is stored and managed on a Cisco switch.
Understanding this is essential because VLAN data behaves differently from most configuration settings, it’s not saved in the usual configuration files.Where VLANs Are Stored?
When you create VLANs on a Cisco switch, they are not saved in the running or startup configuration.
Instead, they are stored in a separate file called vlan.dat, located in the switch’s flash memory.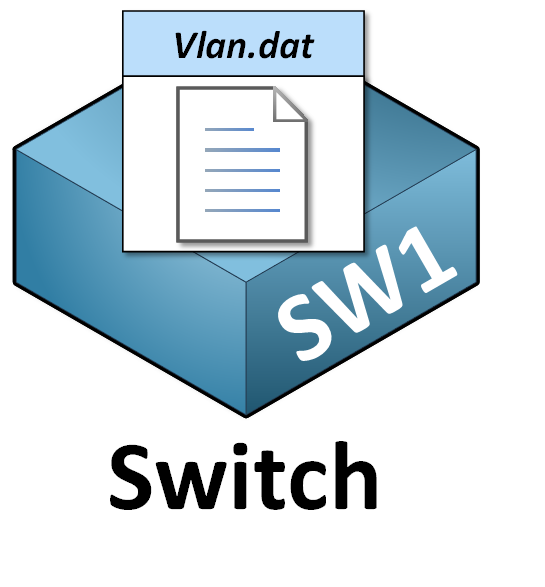
Figure 3 – Vlan.dat file in Cisco switch
This design prevents VLAN information from being lost during reboots and allows faster loading during startup.
Renaming a VLAN
You can easily rename a VLAN without affecting its configuration or port assignments.
Let’s rename VLAN 10 from Sales to Sales_Department.SW1# configure terminal SW1(config)# vlan 10 SW1(config-vlan)# name Sales_Department SW1(config-vlan)# exitTo confirm the change, use:
SW1# show vlan brief
VLAN Name                             Status    Ports
---- -------------------------------- --------- -------------------------------
1    default                          active    none
10   Sales_Department                 active    G0/0, G0/2
20   Tech                             active    G0/1, G0/3
1002 fddi-default                     act/unsup
1003 token-ring-default               act/unsup
The VLAN name is now updated in the vlan.dat file automatically.
However, it’s still good practice to save the running configuration so that any other switch settings (like port modes or interface descriptions) are preserved after a reboot.SW1# copy running-config startup-configHow to Completely Remove VLANs
Here’s how you can completely reset VLANs on a Cisco switch.
Step 1 – Delete the VLAN database:
SW1# delete flash:vlan.dat
Delete filename [vlan.dat]? [confirm]
Step 2 – Reload the switch:
SW1# reloadThe switch will reboot and return to its default VLAN configuration, containing only VLAN 1.
Verifying the Reset
Once the switch is back online, run the following command to confirm:
SW1# show vlan brief

VLAN Name                             Status    Ports
---- -------------------------------- --------- -------------------------------
1    default                          active    G0/0, G0/1, G0/2, G0/3
1002 fddi-default                     act/unsup
1003 token-ring-default               act/unsup
As you can see, VLAN 10 and VLAN 20 have been erased, the switch is now back to its factory VLAN state.
This operation is useful when reusing equipment in a new network.Answer the question below
In this lesson, you’ve learned how to configure VLANs on a Cisco switch from start to finish.
You now understand not just how to create VLANs, but also how to assign interfaces, verify configurations, and manage VLAN data stored in the switch’s flash memory.They reduce unnecessary broadcasts, improve security, and make your network easier to scale and troubleshoot.
By mastering this step, you’ve built the groundwork for more advanced Layer 2 concepts.Next, you’ll discover how 802.1Q Trunking allows multiple VLANs to travel across a single link, enabling VLANs to extend seamlessly between switches and across the entire network.
Answer the question below
VLAN Configuration
Knowing VLAN theory isn’t enough, you must be able to apply it. In this lesson, you’ll configure VLANs step-by-step on a Cisco switch to isolate Sales and Tech teams.