Named ACL configuration is essential when you want more control over network traffic using readable and organized access lists on Cisco routers.
When you're looking at a router configuration and you see something like:
access-list 101 permit tcp 192.168.1.0 0.0.0.255 192.168.3.0 0.0.0.255 eq 443…it's hard to tell what that rule is for.
That's the problem with numbered ACLs.
In a real network, you might have dozens of access lists. And when they're all identified by numbers, it becomes difficult to know which rule does what, especially when you're troubleshooting or reviewing someone else's configuration.
Using a name instead of a number gives immediate context to your configuration.
For example:
ip access-list extended ALLOW_HTTPS_TRAFFICJust by reading the name, you immediately know this ACL is designed to allow HTTPS access to the Legal Server, even before checking the rule itself.
Back to the Basics
To understand how Named ACLs work, you first need to understand how ACLs are structured.
There are two types of ACLs:
Standard ACLs: which filter traffic based only on the source IP address.
Extended ACLs: which can filter based on source, destination, protocol, and port.
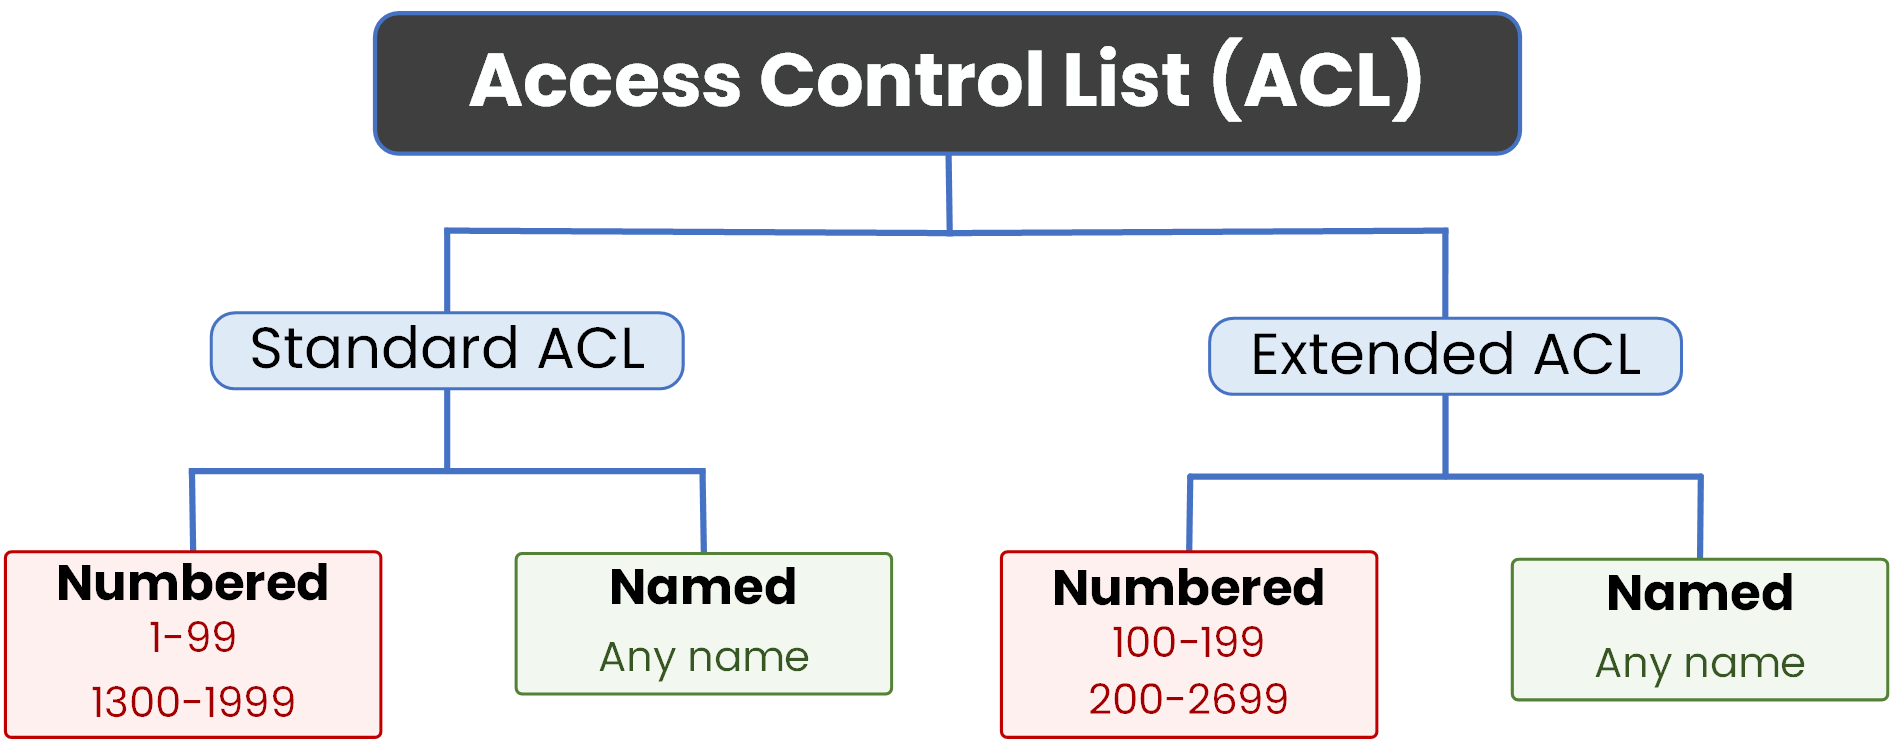
Figure 1 – ACL Types and Naming Options
Each type can be configured in two different ways:
Using a number: like access-list 10
Using a name: like ip access-list standard BLOCK_HR_ACCESS
In this lesson, we'll focus on how to create access lists using names instead of numbers.
Let's begin with the first case: the Named Standard ACL.
Answer the question below
What does a named ACL use instead of a number?
Let's now see how to create a standard ACL, but this time using a name instead of a number.
Scenario
You have two departments in your network:
The Legal department uses the 192.168.1.0/24 network
The HR department uses the 192.168.2.0/24 network
A Legal server is located in 192.168.3.0/24
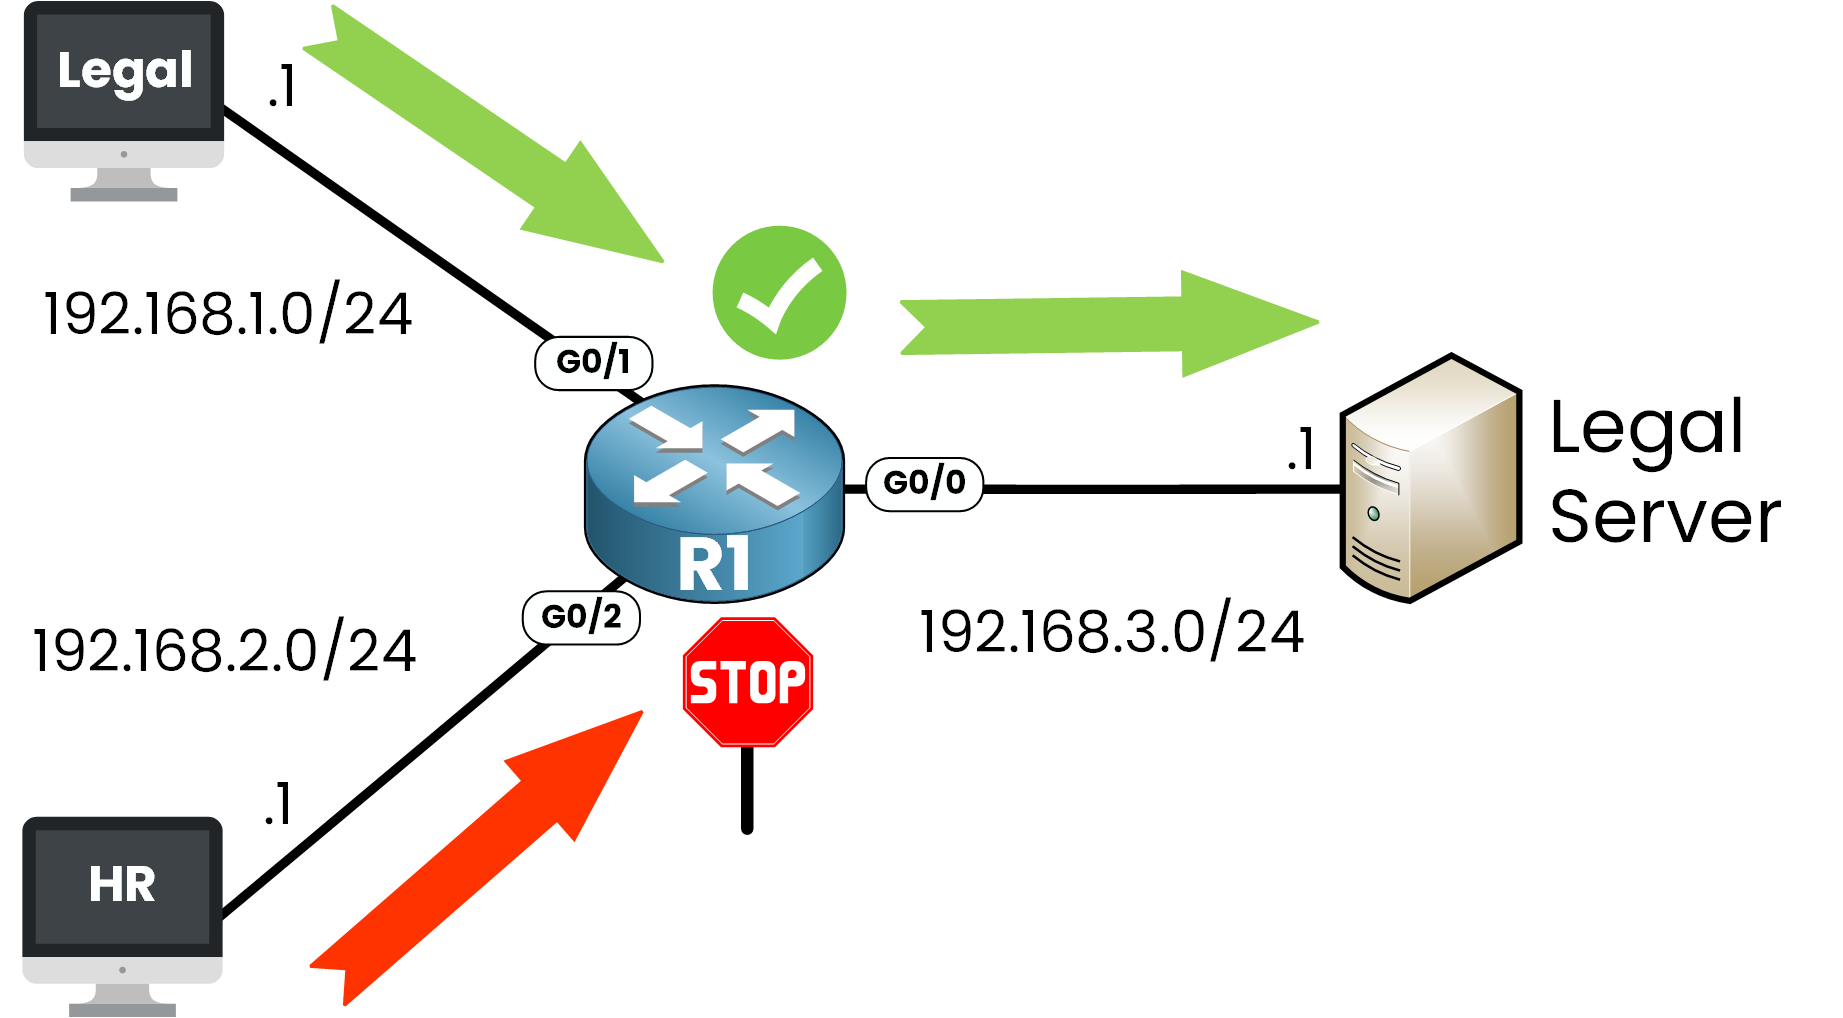
Figure 2 – Named Standard ACL Scenario
The goal is simple:
Allow the Legal department to access the server and deny access to the HR department.This time, instead of using something like access-list 10, we'll create a Named Standard ACL called ALLOW_LEGAL_DENY_HR so its purpose is immediately clear.
Step 1 — Enter global configuration mode
Start by creating a standard named ACL in configuration mode:
R1# conf t
Enter configuration commands, one per line.  End with CNTL/Z.
R1(config)# ip access-list standard ALLOW_LEGAL_DENY_HR
This command creates an ACL in named standard configuration mode. Now we can define the rules inside.
Step 2 — Define the Rules
Allow the Legal department and deny the HR department:
R1(config-std-nacl)# permit 192.168.1.0 0.0.0.255
R1(config-std-nacl)# deny 192.168.2.0 0.0.0.255
R1(config-std-nacl)# exit
This named ACL does the same thing as a traditional numbered ACL, but its name clearly shows the intent.
The permit rule allows access for Legal, while the deny rule blocks HR.Answer the question below
What name is used for the named standard ACL in this example?
Just like numbered ACLs, a named ACL won't have any effect unless it's applied to an interface.
Standard ACLs should be placed as close as possible to the destination, since they only filter on the source IP address. Placing them too close to the source could unintentionally block traffic to multiple destinations.
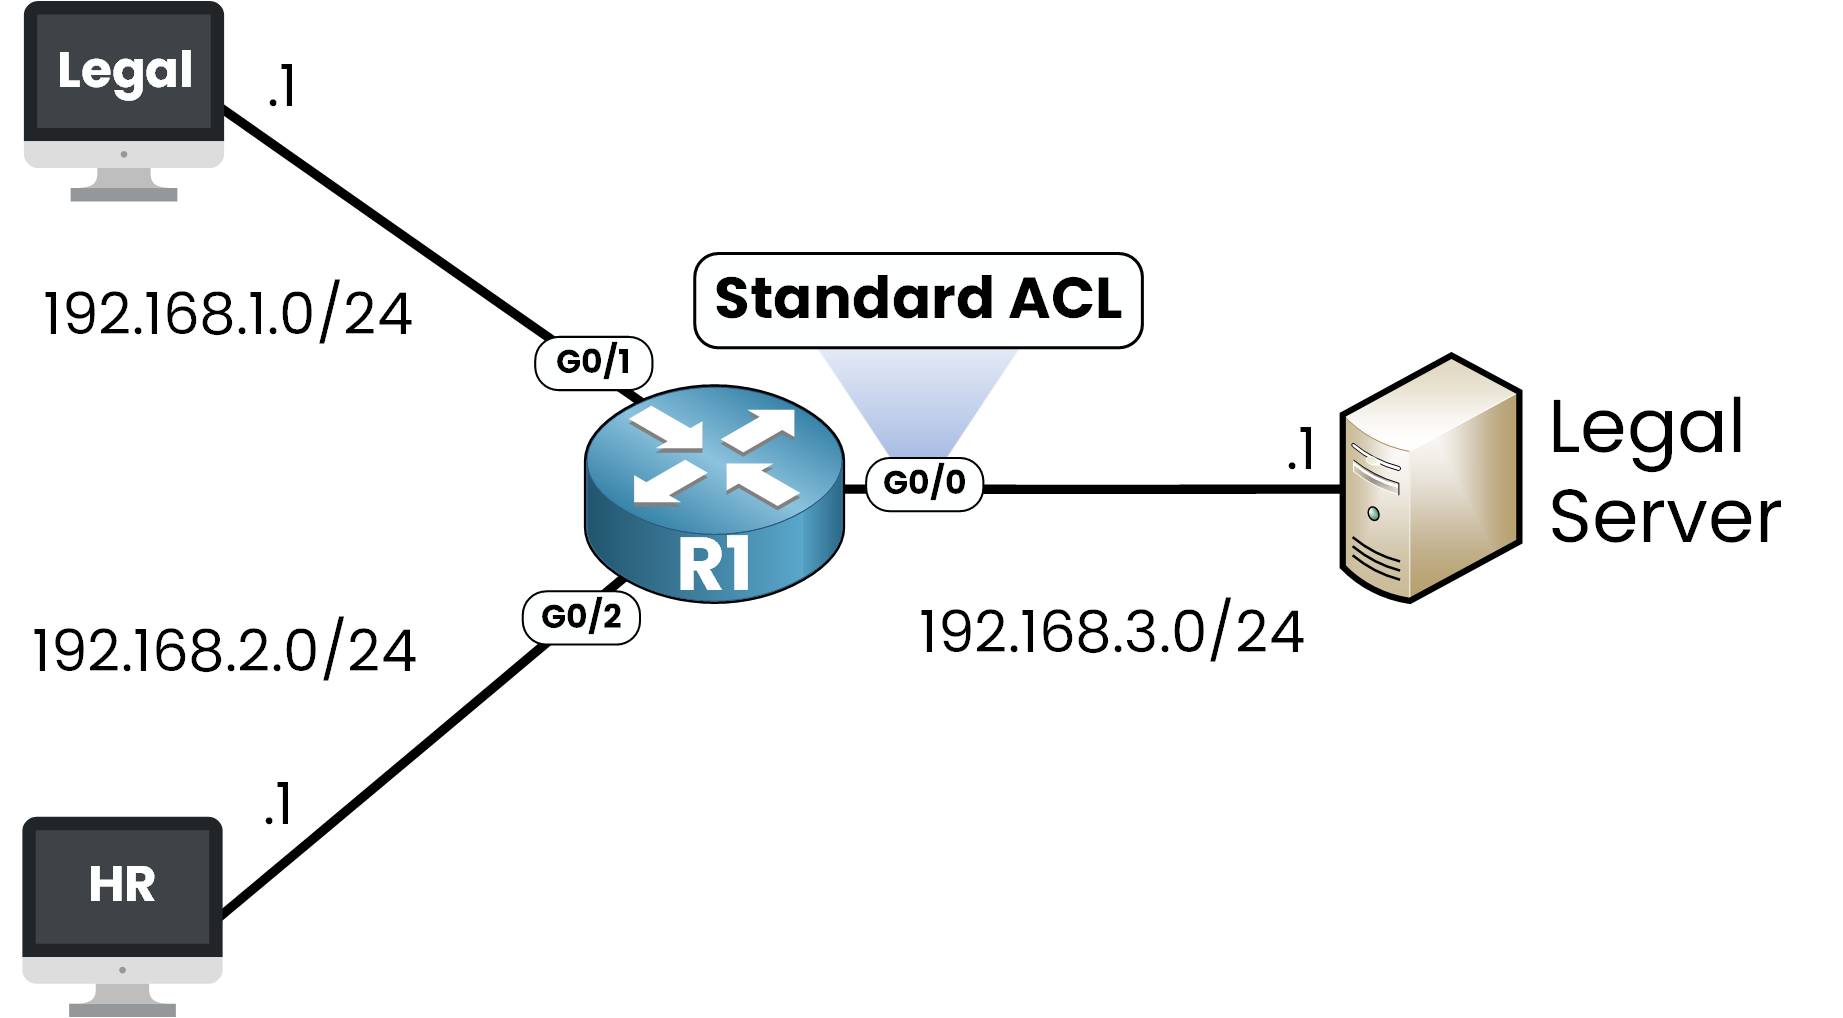
Figure 3 – Named Standard ACL Placement
In our example, the traffic from the Legal and HR departments passes through interface G0/0 before reaching the server.
Step 1 — Enter Interface Configuration Mode
We start by selecting the correct interface:
R1(config)# int g0/0Step 2 — Apply the ACL in the Outbound Direction
Now we apply the ACL using the name we defined earlier:
R1(config-if)# ip access-group ALLOW_LEGAL_DENY_HR out
R1(config-if)# end
We use outbound here because the traffic is exiting the router toward the server.
That's the best practice for standard ACLs, which only filter by source IP.
This ensures the ACL filters the packets just before they reach their destination, as recommended for standard ACL placement.
Answer the question below
In which direction is the named standard ACL applied on interface G0/0?
Once your named ACL configuration is in place, it's important to make sure everything is working as expected.
Step 1 — Check the ACL Content
To view the rules you defined, use the show access-lists command followed by the name of your ACL:
R1# show access-lists ALLOW_LEGAL_DENY_HR
Standard IP access list ALLOW_LEGAL_DENY_HR
    10 permit 192.168.1.0, wildcard bits 0.0.0.255
    20 deny 192.168.2.0, wildcard bits 0.0.0.255
This confirms that the ACL was created correctly.
The permit rule allows traffic from the Legal department, and the deny rule blocks traffic from HR.Step 2 — Confirm It's Applied on the Interface
You can verify that the ACL is active on the correct interface by running:
R1# show ip interface g0/0
GigabitEthernet0/0 is up, line protocol is up
  Internet address is 192.168.3.254/24
  Broadcast address is 255.255.255.255
  Address determined by setup command
  MTU is 1500 bytes
  Helper address is not set
  Directed broadcast forwarding is disabled
  Inbound  access list is not set
  Outgoing access list is ALLOW_LEGAL_DENY_HR
  Proxy ARP is enabled
  Security level is default
// OUTPUT OMITTED FOR BREVITY
This confirms that the ACL is applied to interface G0/0 in the outbound direction, just before packets reach the destination.
Answer the question below
Which command displays named ACL rules?
We're going to use the same scenario as before, but this time we want more precision.
Previously, we filtered traffic based only on the source IP address. This time, we'll filter based on source, destination, protocol, and port number.This is exactly what extended ACLs are designed for.
Scenario
Here's the network setup again:
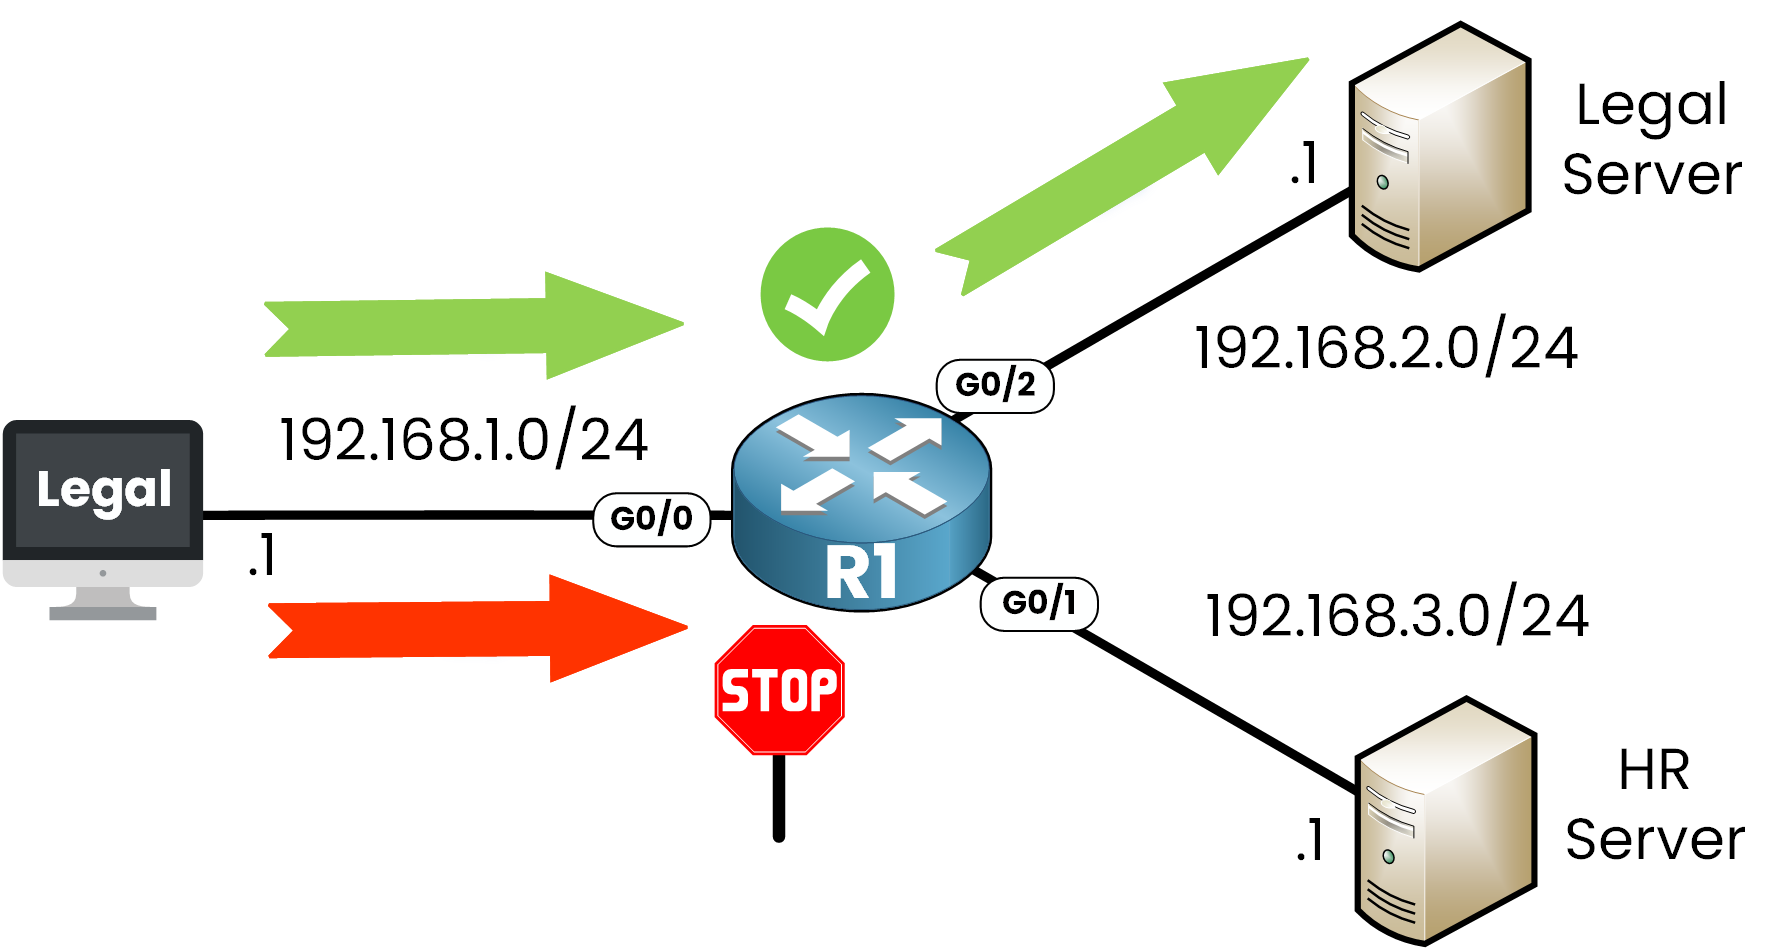
Figure 4 – Named Extended ACL Scenario
The goal:
Allow only HTTPS traffic from the Legal PC to the Legal Server,
and block all access from the Legal PC to the HR Server.To make things clear, we'll name the ACL LEGAL_POLICY.
Step 1 — Define the Named Extended ACL
Start in global configuration mode:
R1# conf t
Enter configuration commands, one per line.  End with CNTL/Z.
R1(config)# ip access-list extended LEGAL_POLICY
Then define the rules:
R1(config-ext-nacl)# permit tcp host 192.168.1.1 host 192.168.2.1 eq 443
R1(config-ext-nacl)# deny ip host 192.168.1.1 host 192.168.3.1
R1(config-ext-nacl)# exit
The first line allows HTTPS traffic to the Legal Server.
The second line blocks all IP traffic to the HR Server.
Anything else will be dropped by the implicit deny at the end of the ACL.Answer the question below
What name is given to the named extended ACL in this example?
Just like standard ACLs, a named extended ACL won't have any effect unless it's applied to an interface.
Extended ACLs should be placed as close as possible to the source, since they filter traffic using multiple criteria (source, destination, protocol, and port). This minimizes unnecessary traffic entering the network.
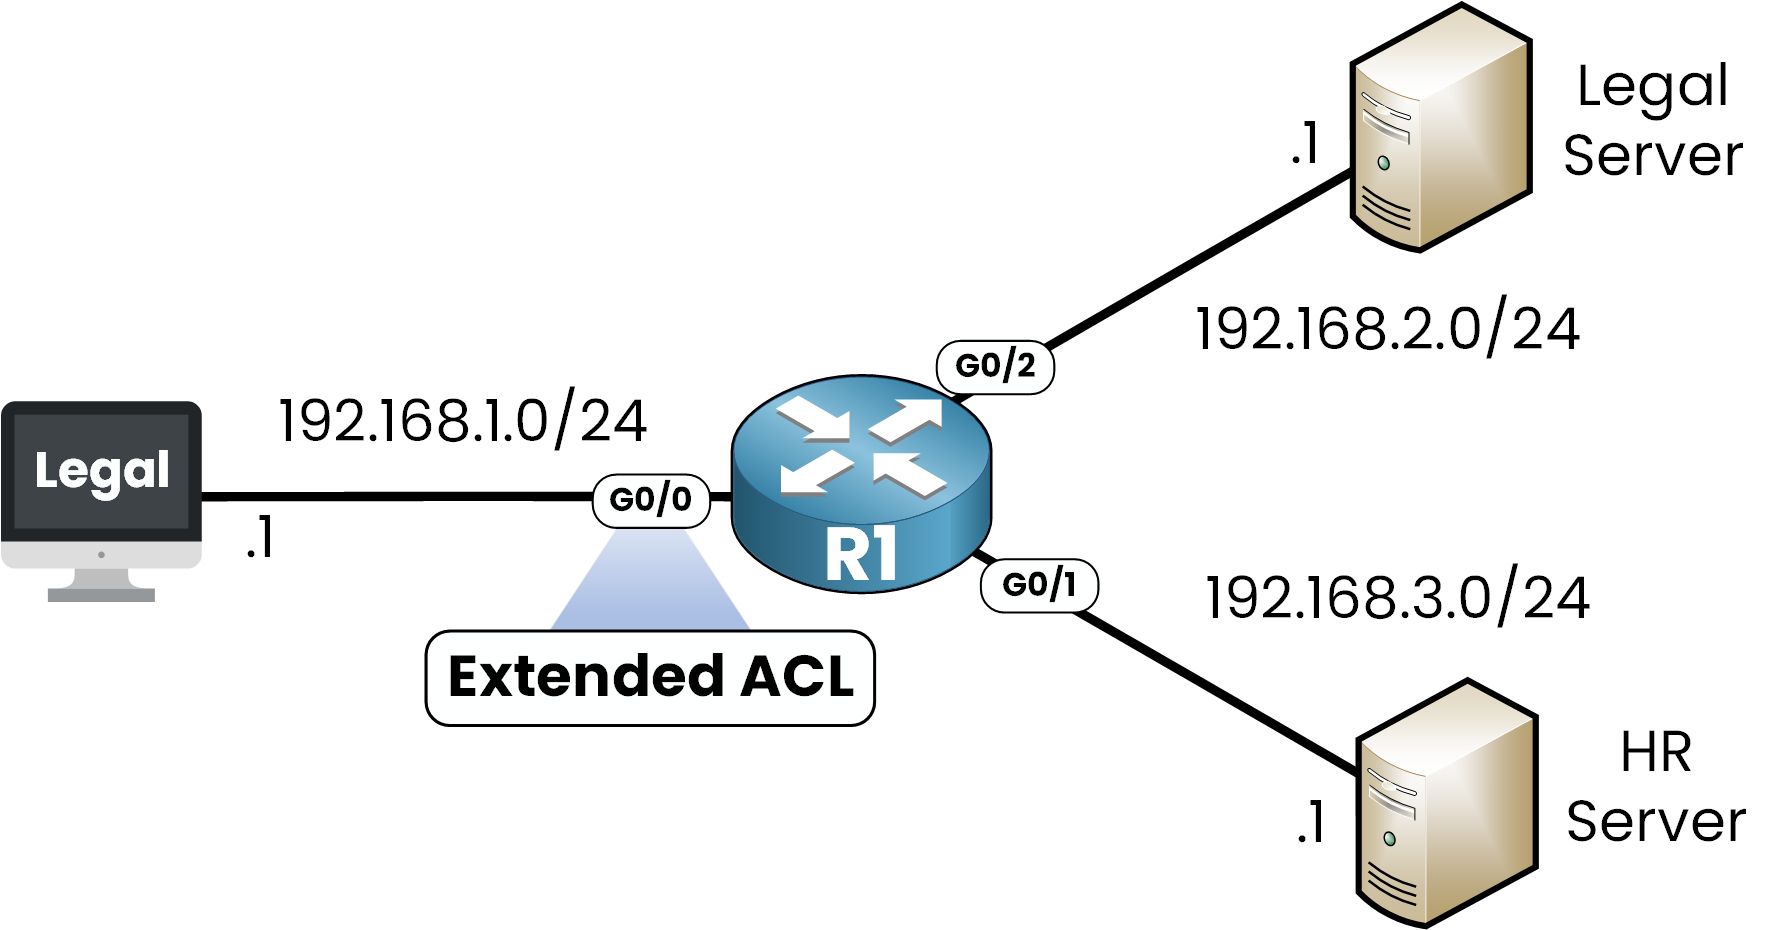
Figure 5 – Named Extended ACL Placement
In our example, the traffic from the Legal PC enters the router through interface G0/0. That's where we'll apply the ACL.
Step 1 — Enter Interface Configuration Mode
We start by selecting the correct interface:
R1(config)# int g0/0Step 2 — Apply the ACL in the Inbound Direction
Now we apply the ACL using the name we defined earlier:
R1(config-if)# ip access-group LEGAL_POLICY in
R1(config-if)# end
We use inbound here because the traffic is entering the router from the Legal PC.
This ensures the ACL filters the packets as soon as they arrive, which is the recommended placement for extended ACLs.Answer the question below
Extended ACLs should be placed as close as possible to what?
Once you've created and applied your named extended ACL, you should verify that it's working as expected.
Step 1 — Check the ACL Content
To view the rules you configured, use the show access-lists command followed by the name of the ACL:
R1# show access-lists LEGAL_POLICY
Extended IP access list LEGAL_POLICY
    10 permit tcp host 192.168.1.1 host 192.168.2.1 eq 443
    20 deny ip host 192.168.1.1 host 192.168.3.1
This confirms that the ACL was created correctly.
The first rule allows HTTPS traffic from the Legal PC to the Legal Server.
The second rule blocks all IP traffic from the Legal PC to the HR Server.Step 2 — Confirm It's Applied on the Interface
You can confirm that the ACL is active on the correct interface by using the following command:
R1# show ip interface g0/0
GigabitEthernet0/0 is up, line protocol is up
  Internet address is 192.168.1.254/24
  Broadcast address is 255.255.255.255
  Address determined by setup command
  MTU is 1500 bytes
  Helper address is not set
  Directed broadcast forwarding is disabled
  Multicast reserved groups joined: 224.0.0.10
  Inbound  access list is LEGAL_POLICY
  Outgoing access list is not set
  Proxy ARP is enabled
  Security level is default
// OUTPUT OMITTED FOR BREVITY
This confirms that the ACL is applied to interface G0/0 in the inbound direction, which is the recommended placement for extended ACLs close to the source.
Answer the question below
On which interface is the LEGAL_POLICY ACL applied?
Let's quickly summarize what we've learned throughout this named ACL configuration lesson:
Type
Purpose
Example
Standard ACL
Filters by source IP only
access-list 10 permit 192.168.1.0 0.0.0.255
Extended ACL
Filters by source, destination, protocol, and port
access-list 101 permit tcp 192.168.1.0 0.0.0.255 192.168.2.1 0.0.0.0 eq 443
Numbered ACL
Uses a number to identify the ACL
access-list 101 deny ip any any
Named ACL
Uses a name to give context to the ACL
ip access-list extended BLOCK_HR_ACCESS
Table 1 – ACL Types Overview
Using named ACLs helps clarify your configuration, especially in large networks with many ACL rules.
It's easier to troubleshoot, document and maintain when each ACL has a meaningful name.
A well-structured named ACL configuration makes your network policies easier to manage, audit, and scale as your environment grows.
Answer the question below
Click 'Complete' to continue