1. What is an Extended ACL
When managing a network, sometimes you need more than just blocking traffic based on the source IP address.
That’s where Extended Access Control Lists (ACLs) come in.
Unlike Standard ACLs, an Extended ACL lets you filter traffic based on source IP, destination IP, protocol, and port numbers.
Let’s say you have this topology:
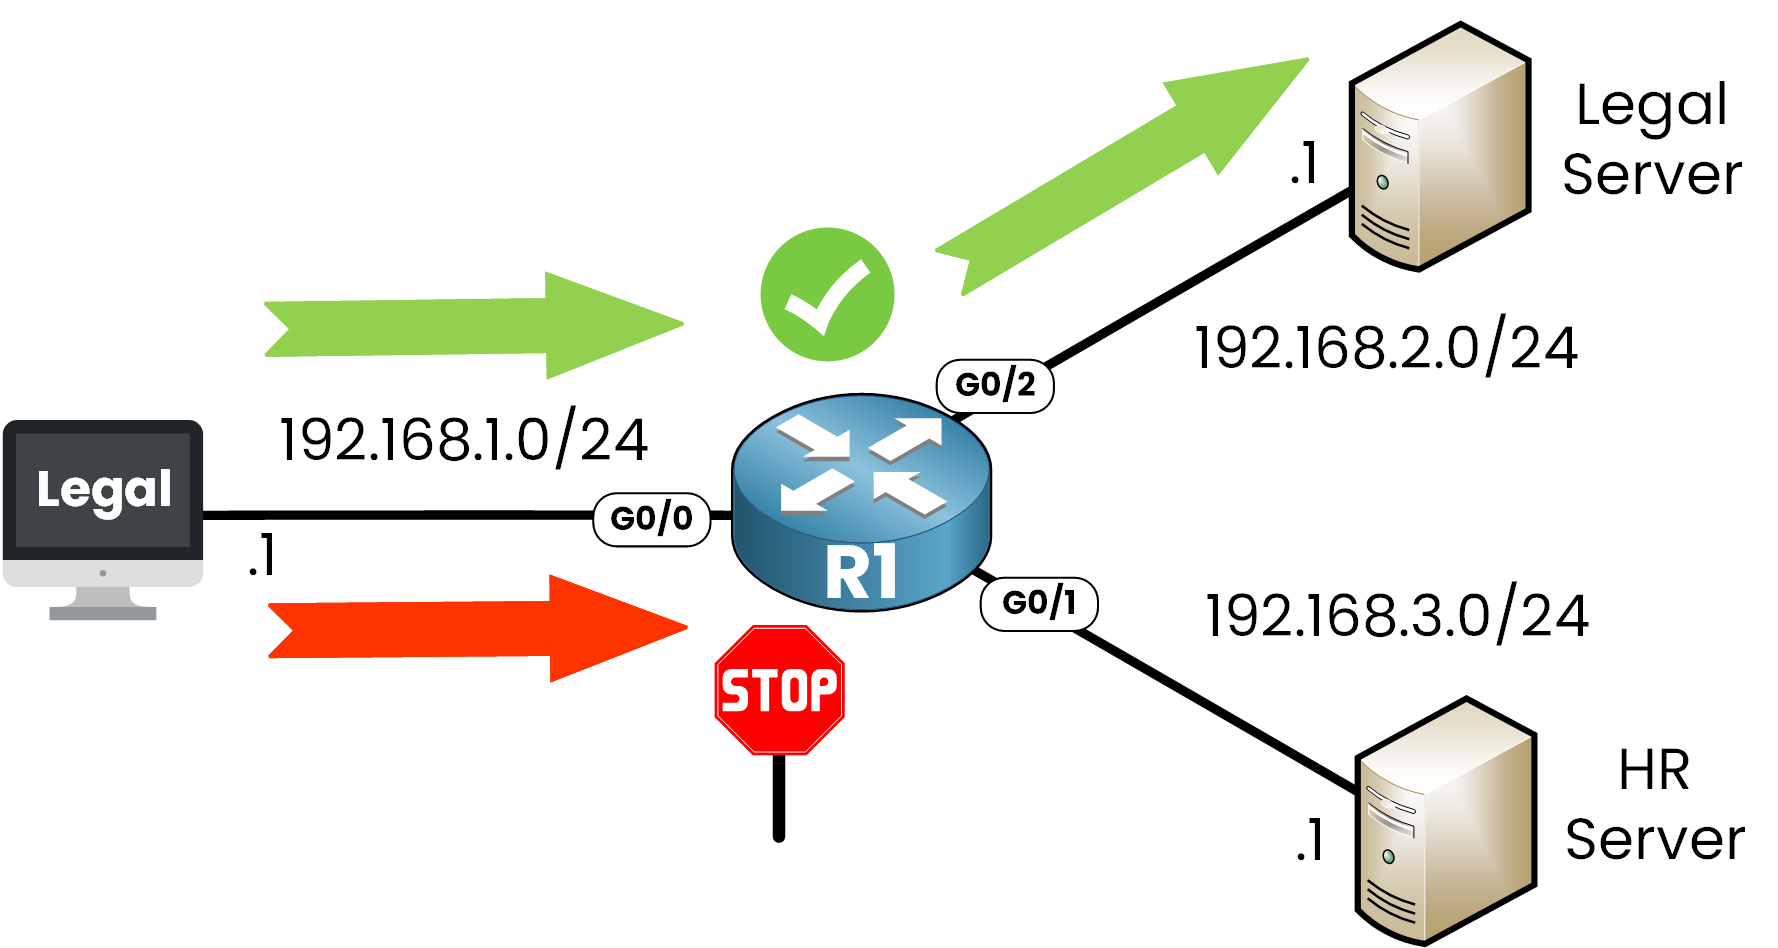
Figure 1 – Extended ACL Use Case
In this example, we want to control access using an Extended ACL:
Allow HTTPS traffic from the Legal PC to a secure Legal Server at 192.168.2.1
Deny all access from the Legal PC to a HR Server at 192.168.3.1
This is a typical use case where Extended ACLs are necessary because Standard ACLs cannot filter by protocol or port.
2. Configure Extended ACL
Now that you understand what an Extended ACL is, let’s walk through how to configure one step by step on a Cisco router.
Step 1 - Enter Global Configuration Mode
Start by entering configuration mode:
R1# configure terminal
Enter configuration commands, one per line. End with CNTL/Z.
R1(config)#
Then, check available ACL types with the ip access-list ? command:
R1(config)# ip access-list ?
extended Extended Access List
helper Access List acts on helper-address
log-update Control access list log updates
logging Control access list logging
resequence Resequence Access List
standard Standard Access List
As you can see, we have the option to create either a standard or an extended ACL.
We’ll proceed with extended.
Step 2 – Create the Extended ACL
Now let's check the available formats for Extended ACLs:
R1(config)# ip access-list extended ?
<100-199> Extended IP access-list number
<2000-2699> Extended IP access-list number (expanded range)
WORD Access-list name
Extended ACLs can be:
Numbered (ranges: 100–199 or 2000–2699)
Named (custom name of your choice)
Let’s create a numbered ACL 101:
In this example, we’ll create a numbered Extended ACL with the number 101.
R1(config)# ip access-list extended 101
R1(config-ext-nacl)#
You are now in Extended ACL configuration mode, ready to define rules.
Step 3 - Permit HTTPS to Legal Server
We want to allow HTTPS traffic (TCP port 443) from the Legal PC to the Legal Server.
🔹 Choose the Protocol
Start with permit, then see the protocol options:
R1(config-ext-nacl)# permit ?
<0-255> An IP protocol number
ahp Authentication Header Protocol
eigrp Cisco's EIGRP routing protocol
esp Encapsulation Security Payload
gre Cisco's GRE tunneling
icmp Internet Control Message Protocol
igmp Internet Gateway Message Protocol
ip Any Internet Protocol
ipinip IP in IP tunneling
nos KA9Q NOS compatible IP over IP tunneling
object-group Service object group
ospf OSPF routing protocol
pcp Payload Compression Protocol
pim Protocol Independent Multicast
sctp Stream Control Transmission Protocol
tcp Transmission Control Protocol
udp User Datagram Protocol
We want HTTPS, which runs over TCP, so:
R1(config-ext-nacl)# permit tcp ?
A.B.C.D Source address
any Any source host
host A single source host
object-group Source network object group
🔹 Define the Source IP Address
Let's specify the Legal PC as the source:
R1(config-ext-nacl)# permit tcp host 192.168.1.1 ?
A.B.C.D Destination address
any Any destination host
eq Match only packets on a given port number
gt Match only packets with a greater port number
host A single destination host
lt Match only packets with a lower port number
neq Match only packets not on a given port number
object-group Destination network object group
range Match only packets in the range of port numbers
🔹 Define the Destination IP Address
We want to reach the Legal Web Server:
R1(config-ext-nacl)# permit tcp host 192.168.1.1 host 192.168.2.1 ?
ack Match on the ACK bit
dscp Match packets with given dscp value
eq Match only packets on a given port number
established Match established connections
fin Match on the FIN bit
fragments Check non-initial fragments
// OUTPUT OMITTED FOR BREVITY
In order to choose the port number to filter, we use eq as you can see in the cli.
🔹 Match the HTTPS Port (443)
We now filter only HTTPS traffic (port 443)
R1(config-ext-nacl)# permit tcp host 192.168.1.1 host 192.168.2.1 eq ?
<0-65535> Port number
bgp Border Gateway Protocol (179)
chargen Character generator (19)
cmd Remote commands (rcmd, 514)
daytime Daytime (13)
discard Discard (9)
domain Domain Name Service (53)
drip Dynamic Routing Information Protocol (3949)
echo Echo (7)
exec Exec (rsh, 512)
finger Finger (79)
ftp File Transfer Protocol (21)
// OUTPUT OMITTED FOR BREVITY
And we complete the command with the port:
R1(config-ext-nacl)# permit tcp host 192.168.1.1 host 192.168.2.1 eq 443
This command allows only HTTPS traffic from the Legal PC to the Legal Server.
Step 4 - Deny All Traffic to HR Server
Every ACL ends with an implicit deny all.
So any traffic that isn’t explicitly allowed will automatically be blocked.
In our case:
We allowed HTTPS traffic to the Legal Server (192.168.2.1)
We did not allow anything to the HR Server (192.168.3.1)
→ This traffic is already denied by default.
But just for demonstration, here’s how to create a deny rule manually, this is to show you how it's done:
R1(config-ext-nacl)# deny ip host 192.168.1.1 host 192.168.3.1
Element | Description |
---|---|
| Block the traffic |
| All protocols (TCP, UDP, ICMP, etc.) |
| Source: Legal PC |
| Destination: HR Server |
Table 1 – Breakdown of an Explicit Deny Rule in an Extended ACL
This rule is not required in this case it’s here to show you how to write an explicit deny rule.
3. Where to Apply Extended ACL
An Extended ACL won’t filter any traffic until it’s applied to an interface.
This step tells the router where to inspect traffic and in which direction.
Placement Strategy
Extended ACLs filter traffic based on:
Source IP
Destination IP
Protocol
Port number
To reduce unnecessary traffic across the network, Extended ACLs should be applied as close as possible to the source.
This way, unwanted packets are dropped early before consuming bandwidth.
Exemple Scenario
In our example:
The Legal PC (192.168.1.1) is the source
We want to:
Allow HTTPS traffic to the Legal Server (192.168.2.1)
Block all access to the HR Server (192.168.3.1)
Figure 2 – Extended ACL Placement
The traffic enters router R1 through interface G0/0 which is connected to the Legal PC.
That’s interface G0/0 on router R1.
Applying the ACL to Interface
🔹 Step 1 – Enter interface configuration mode
R1(config)# int g0/0
🔹 Step 2 – Check available formats
Use the ip access-group command:
R1(config-if)# ip access-group ?
<1-199> IP access list (standard or extended)
<1300-2699> IP expanded access list (standard or extended)
WORD Access-list name
We'll use the ACL 101 that we created earlier.
🔹 Step 3 – Apply the ACL inbound
We apply ACL 101 to inspect packets coming from the source:
R1(config-if)# ip access-group 101 ?
in inbound packets
out outbound packets
R1(config-if)# ip access-group 101 in
This command activates ACL 101 on interface G0/0.
From now on, all inbound packets will be filtered according to your rules.
4. Verifying Extended ACLs
Once your ACL is applied, it's essential to confirm that:
The ACL contains the correct rules
It is properly applied to the correct interface and in the right direction
Step 1 – View the ACL Configuration
R1# show access-lists 101
Extended IP access list 101
10 permit tcp host 192.168.1.1 host 192.168.2.1 eq 443
20 deny ip host 192.168.1.1 host 192.168.3.1
This confirms:
Line 10: Permits HTTPS traffic from 192.168.1.1 to 192.168.2.1
Line 20: Denies all traffic from 192.168.1.1 to 192.168.3.1
Step 2 – Confirm Interface Association
To verify that the ACL is correctly applied to an interface (in this case, G0/0):
R1# show ip interface g0/0
GigabitEthernet0/0 is up, line protocol is up
Internet address is 192.168.1.254/24
Broadcast address is 255.255.255.255
Address determined by setup command
MTU is 1500 bytes
Helper address is not set
Directed broadcast forwarding is disabled
Multicast reserved groups joined: 224.0.0.10
Outgoing access list is not set
Inbound access list is 101
Proxy ARP is enabled
// OUTPUT OMITTED FOR BREVITY
This confirms that:
ACL 101 is applied to GigabitEthernet0/0
It is used in the inbound direction, as expected
5. Conclusion
Here’s what you need to remember about Standard vs Extended ACLs before moving on:
Feature | Standard ACL | Extended ACL |
---|---|---|
Source IP filtering | Yes | Yes |
Destination IP filtering | No | Yes |
Protocol filtering | No | Yes (TCP, UDP, ICMP…) |
Port filtering | No | Yes (example 80, 443, etc.) |
Best placement | Close to destination | Close to source |
Number range | 1–99 / 1300–1999 | 100–199 / 2000–2699 |
Table 2 – Standard vs Extended ACLs
💡 Do you want to use names instead of numbers for your ACLs?
Check out the next lesson on Named ACLs to make your configurations easier to manage.