If you're here, it's because you want to understand what the Native VLAN is and how to configure it.
Good news: if you already know what a trunk port is, you're halfway there!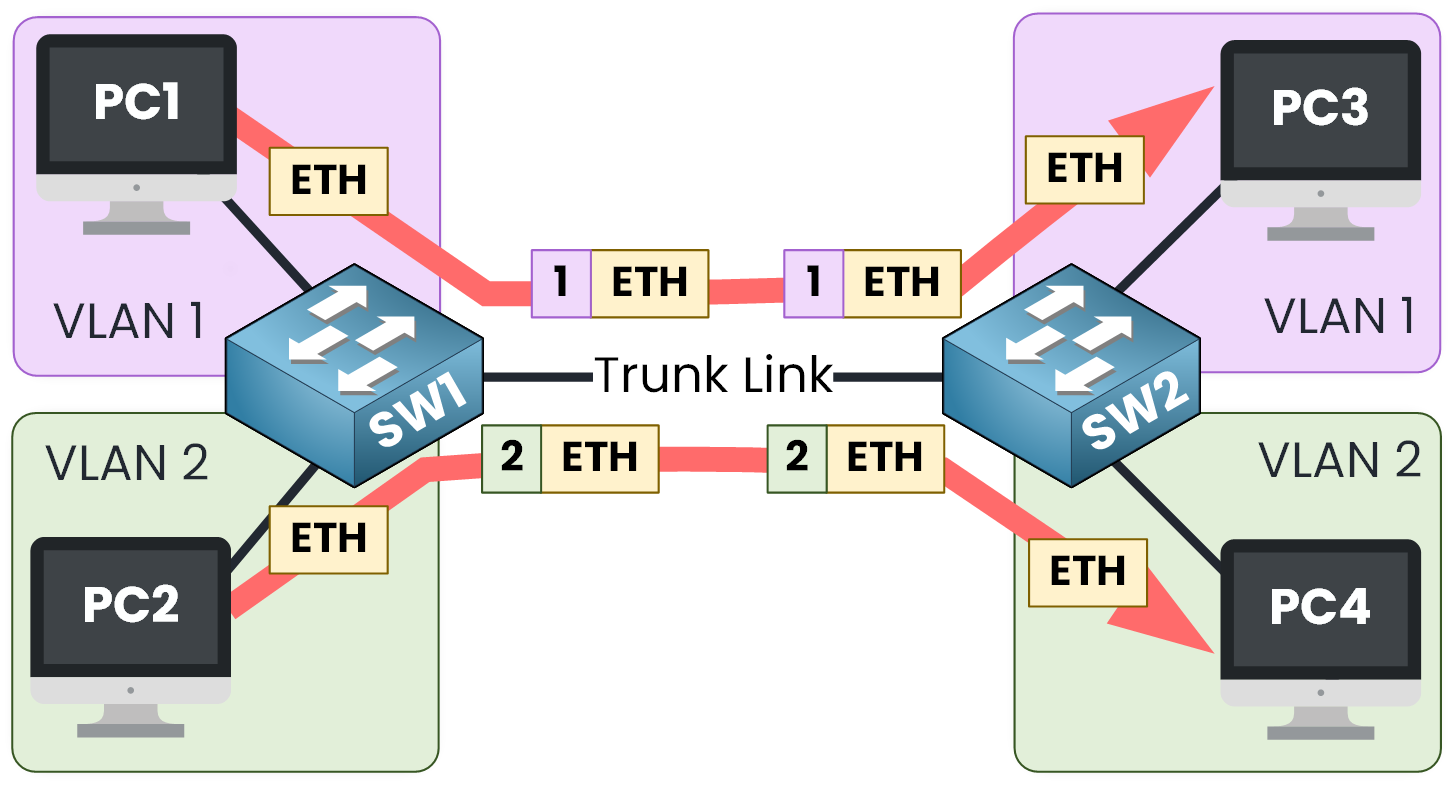
Figure 1 – VLAN Frames over a Trunk Link
Remember, a trunk port allows multiple VLAN frames to be transported at the same time using 802.1Q tags.
As you can see in the diagram above, frames belonging to VLANs 1 and 2 are transmitted over a trunk link with their 802.1Q tags to their respective destinations.
But… what happens if an untagged frame arrives on a trunk port?
Let's look at this example:
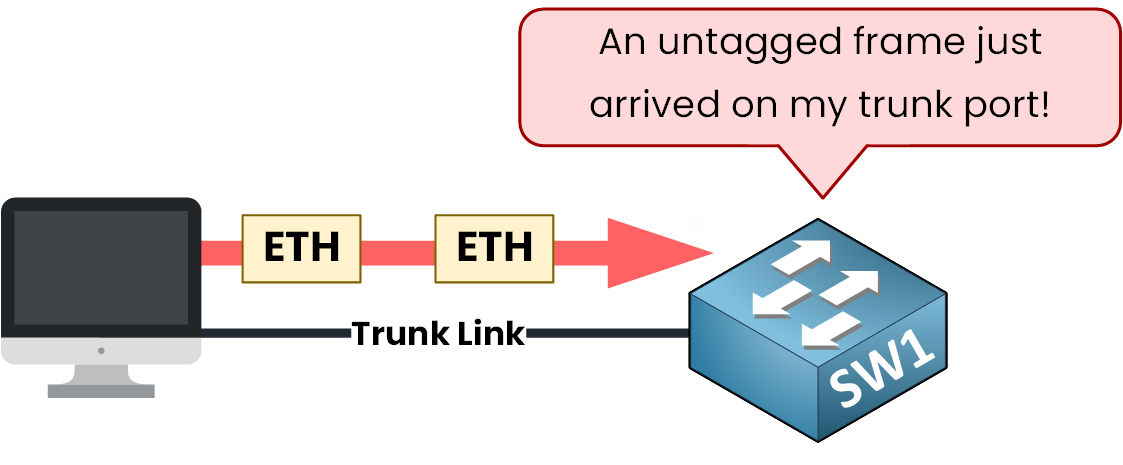
Figure 2 – Untagged Frame on a Trunk Port
A PC is mistakenly connected to a trunk port and starts to send untagged frames.
How does the switch react? It can't just ignore them. The switch will put the untagged frames in the Native VLAN.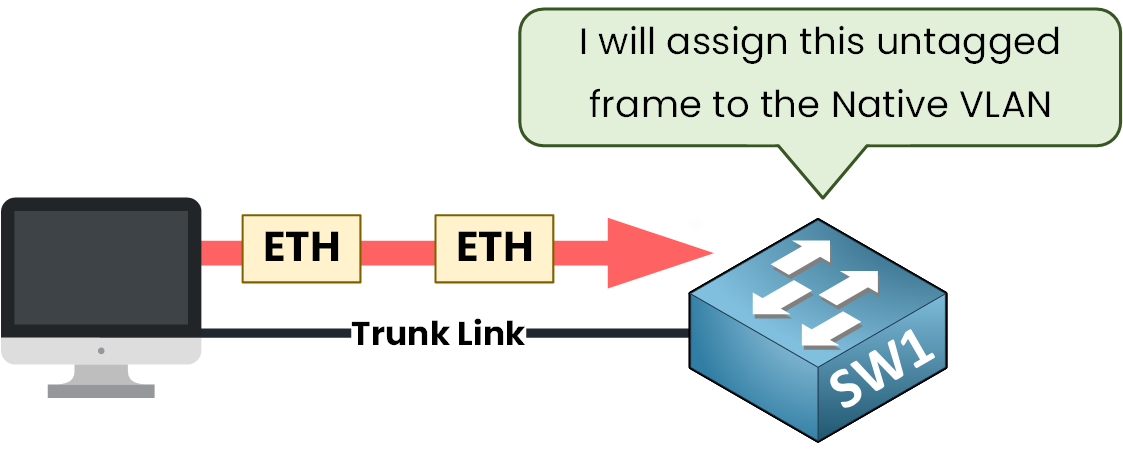
Figure 3 – Native VLAN Behavior
That's exactly the role of the Native VLAN!
A Native VLAN allows untagged frames arriving on a trunk port to be placed into a specific VLAN: the native VLAN.Answer the question below
When an untagged frame arrives on a trunk port, into which VLAN does the switch place it?
Okay, you now know the Native VLAN exists in this case, but why?
The Native VLAN exists to handle situations where untagged traffic arrives on a trunk interface.
It might seem rare… but in reality, it's more common than you'd think.Imagine if a user accidentally plugs into the trunk port connecting two switches…
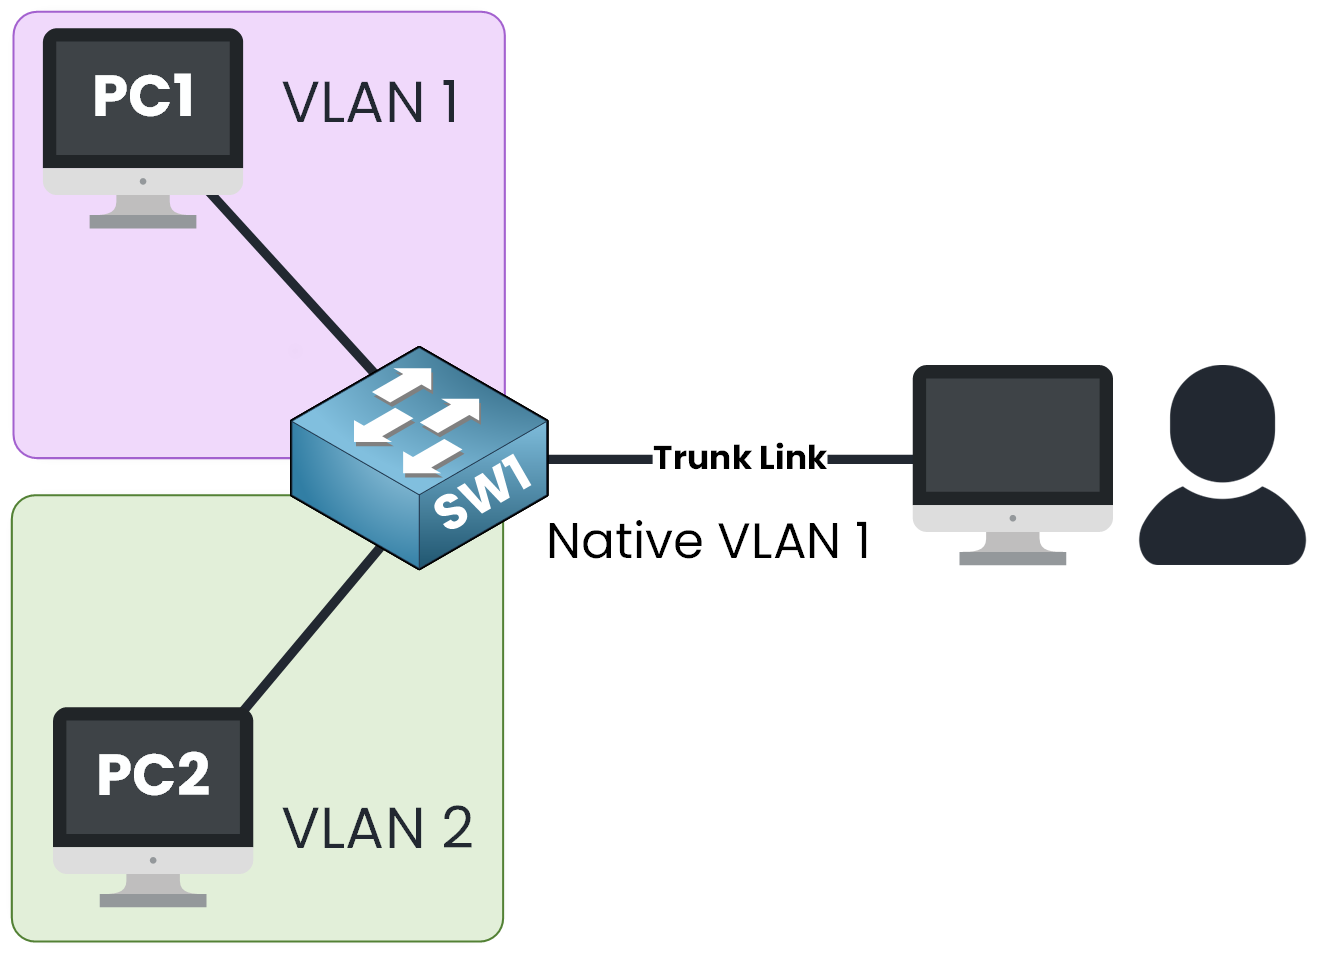
Figure 4 – A PC Plugged into a Trunk Port
…and starts sending untagged frames.
The traffic reaches the trunk port of the switch. Since the frame is untagged, the switch will automatically place it into the native VLAN which by default is VLAN 1.
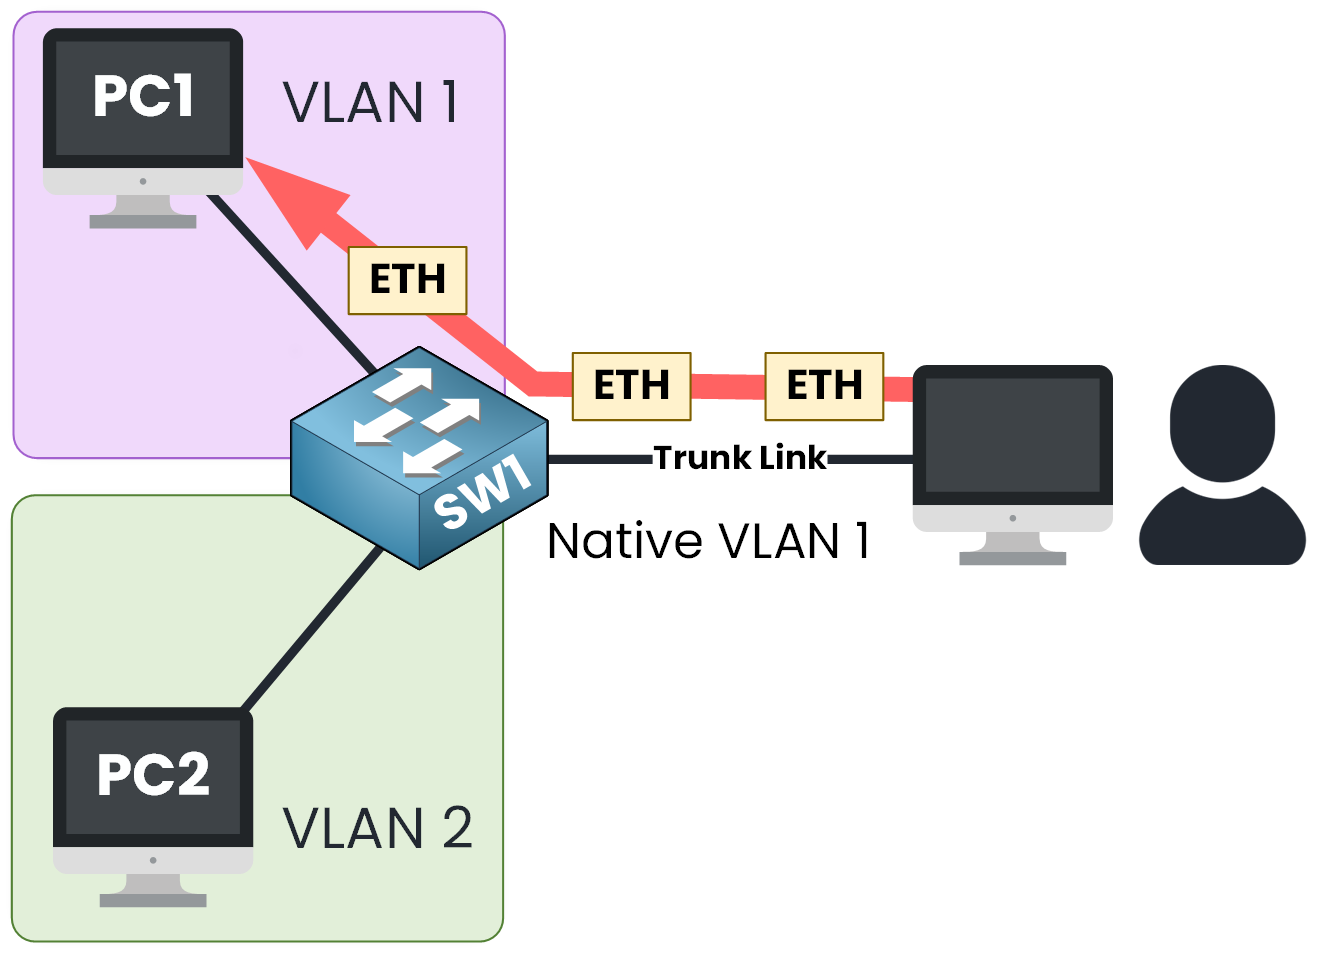
Figure 5 – Untagged Frame Assigned to the Native VLAN
As a result, the switch will now untag frames received on the trunk port and send them to all ports configured in VLAN 1.
Refer to the image above.
Why This Behavior Is Dangerous
This means that a PC accidentally connected to a trunk could communicate with all devices in VLAN 1 without you even realizing it.
And that's where you really need to be careful!
The right approach is to configure an isolated Native VLAN that isn't used by any switch port.
For example, we create a VLAN 99 that no one uses on our network.This way untagged frames are dropped into a “trash VLAN” and aren't forwarded to any host.
Let's now see how to configure it properly.
Answer the question below
What is the default native VLAN on Cisco switches?
So, how do you properly configure the Trunk Native VLAN?
First, you need to know that the trunk native VLAN is configured manually on each trunk port of your switch.
It's not a global setting, so every trunk interface must be configured individually.In our example, we'll configure VLAN 99 as the native VLAN to ensure that any untagged frame received on a trunk link is placed in this isolated VLAN, unused in our topology.
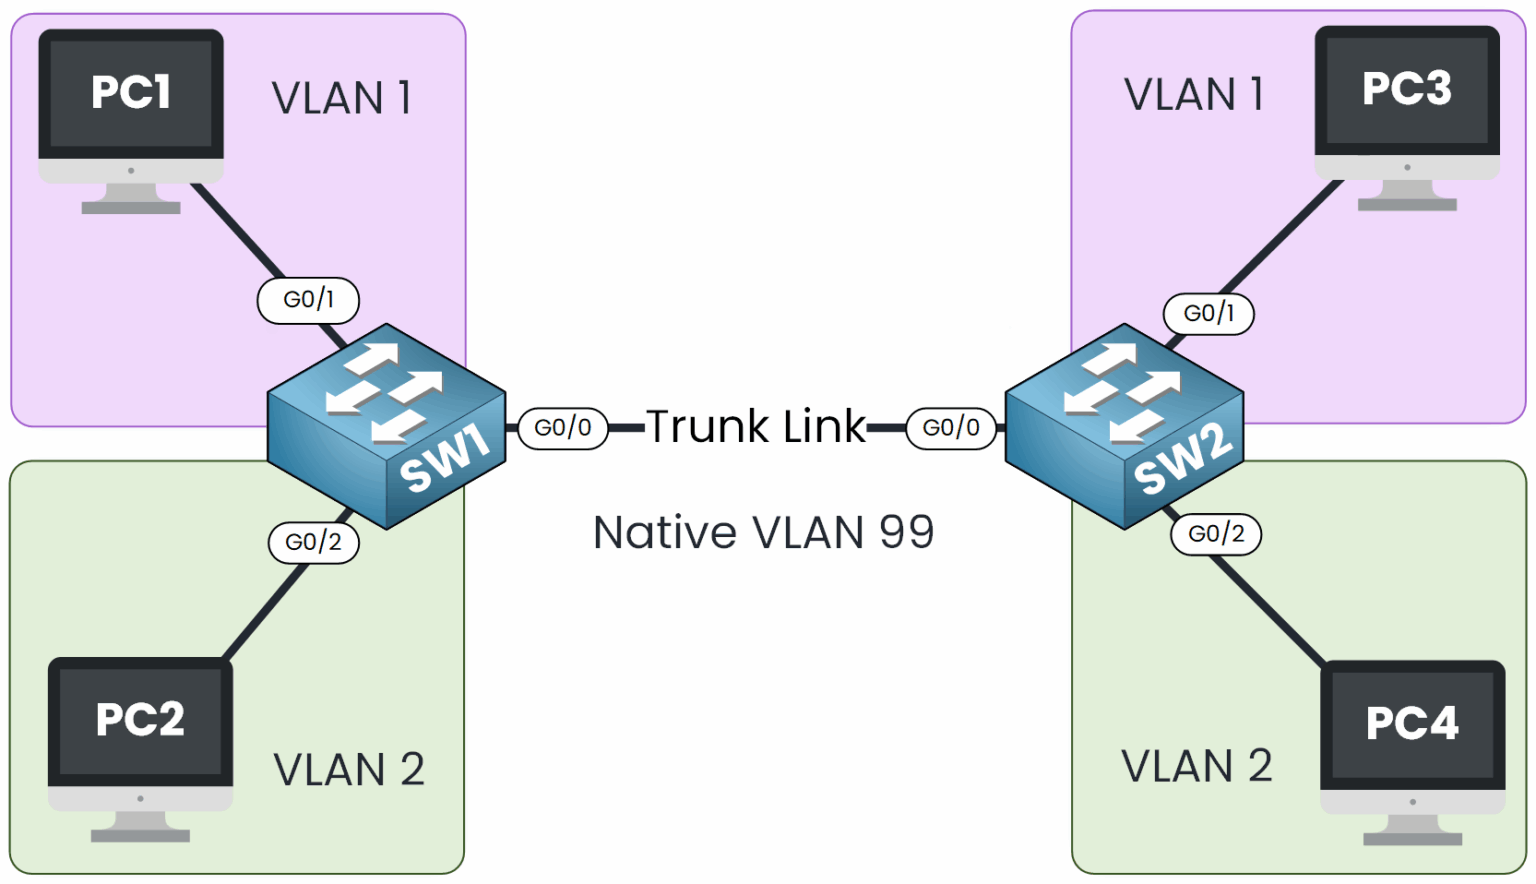
Figure 6 – Native VLAN Configuration on Trunk Link
Let's start by checking the current native VLAN configured on the trunk interfaces of our two switches.
Check the Current Native VLAN
On SW1, you can use the following command:
SW1# show interface G0/0 switchport
Name: Gig0/0
Switchport: Enabled
Administrative Mode: dynamic auto
Operational Mode: trunk
Administrative Trunking Encapsulation: dot1q
Operational Trunking Encapsulation: dot1q
Negotiation of Trunking: On
Access Mode VLAN: 1 (default)
Trunking Native Mode VLAN: 1 (default)
Administrative private-vlan host-association: none
Administrative private-vlan mapping: none
// Output Omitted
And on SW2:
SW2#  show interface G0/0 switchport
Name: Gig0/0
Switchport: Enabled
Administrative Mode: dynamic auto
Operational Mode: trunk
Administrative Trunking Encapsulation: dot1q
Operational Trunking Encapsulation: dot1q
Negotiation of Trunking: On
Access Mode VLAN: 1 (default)
Trunking Native Mode VLAN: 1 (default)
Administrative private-vlan host-association: none
Administrative private-vlan mapping: none
// Output Omitted
As you can see, the native VLAN is currently VLAN 1, which is the default native VLAN.
Change the Native VLAN
Now we want to replace VLAN 1 with VLAN 99, an isolated VLAN that isn't used anywhere else in our network.
Here's the configuration on SW1:
SW1# configure terminal
Enter configuration commands, one per line. End with CNTL/Z.

SW1(config)# interface GigabitEthernet0/0
SW1(config-if)# switchport mode trunk
SW1(config-if)# switchport trunk ?

  allowed  Set allowed VLAN characteristics when interface is in trunking mode
  native   Set trunking native characteristics when interface is in trunking mode

SW1(config-if)# switchport trunk native vlan ?

  <1-4094>  VLAN ID of the native VLAN when this port is in trunking mode

SW1(config-if)# switchport trunk native vlan 99
SW1(config-if)# end
%SYS-5-CONFIG_I: Configured from console by console
And the same configuration on SW2:
SW2# configure terminal
Enter configuration commands, one per line. End with CNTL/Z.
SW2(config)# interface GigabitEthernet0/0
SW2(config-if)# switchport mode trunk
SW2(config-if)# switchport trunk native vlan 99
SW2(config-if)# end
%SYS-5-CONFIG_I: Configured from console by console
⚠️ Be careful! The native VLAN must be the same on both sides of the trunk link, or you'll get a Native VLAN mismatch warning!
Final Verification
Once the configuration is applied, you can double-check everything with:
SW1# show interface trunk Port Mode Encapsulation Status Native vlan Gi0/0 on 802.1q trunking 99 Vlans allowed on trunk: Gi0/0 1-1005 Vlans allowed and active in management domain: Gi0/0 1,2 Vlans in spanning tree forwarding state and not pruned: Gi0/0 1,2SW2# show interface trunk Port Mode Encapsulation Status Native vlan Gi0/0 on 802.1q trunking 99 Vlans allowed on trunk: Gi0/0 1-1005 Vlans allowed and active in management domain: Gi0/0 1,2 Vlans in spanning tree forwarding state and not pruned: Gi0/0 1,2Perfect! As you can see in the CLI output, any untagged frame received on this trunk will be placed into VLAN 99 which is configured as the trunk native VLAN.
Remember! Since no ports belong to that VLAN, the traffic won't be delivered to anyone :)
Mission accomplished!
Answer the question below
Which command sets VLAN 99 as the native VLAN on a trunk?
You now understand what the Native VLAN is and how to configure it properly.
Here's a visual summary of everything you've learned:What You Should Remember
Best Practice to Adopt
VLAN 1 is the default native VLAN
Replace it with an isolated VLAN (example VLAN 99)
A trunk port accepts untagged frames and places them in the native VLAN
Make sure your trunk ports are correctly configured with a native VLAN
The native VLAN must be the same on both sides of the trunk
Verify that the Native VLAN is properly set on both ends
Table 1 – Native VLAN: Key Points and Best Practices
Untagged frames land in the Native VLAN, and it must match on both ends of the trunk. Let's continue with the Native VLAN lab, where you'll move the Native VLAN off VLAN 1 and verify the result.
Answer the question below
According to the summary, what must be identical on both sides of a trunk link?