Static Route

1. What is Static Route ?

A static route is a manual routing method where the network administrator explicitly defines route in the router’s routing table.

Unlike dynamic routing protocols, which automatically adjust to network changes, static routing remains fixed unless manually modified.

Let’s look at a practical example to understand why static routes are needed.

Static route topology with R1 and R2 connecting two networks

Figure 1 – Basic Static Route Topology

In this simple topology, there are two routers.
Router R1 is connected to the 192.168.1.0/24 network through its GigabitEthernet0/1 interface.
Router R2 is connected to both networks:

  • 192.168.1.0/24 via GigabitEthernet0/0

  • 192.168.2.0/24 via GigabitEthernet0/1

The Problem

R1 cannot communicate with the 192.168.2.0/24 network because there’s no route pointing to that network in its routing table.

R1 cannot reach 192.168.2.0/24 network due to missing static route

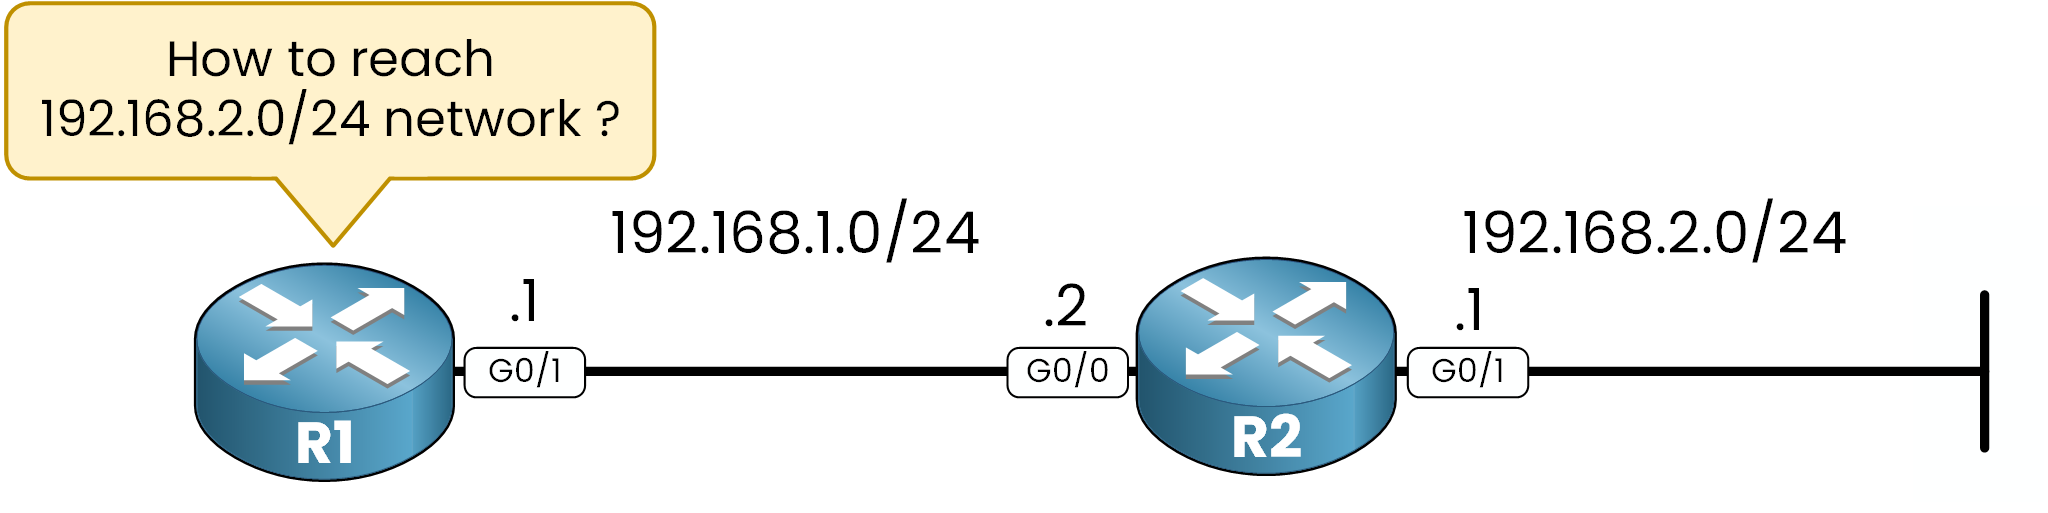
Figure 2 – Missing Static Route Problem

When we look the routing table of R1 by using show ip route:

R1# show ip route
Codes: L - local, C - connected, S - static, R - RIP, M - mobile, B - BGP
       D - EIGRP, EX - EIGRP external, O - OSPF, IA - OSPF inter area
       N1 - OSPF NSSA external type 1, N2 - OSPF NSSA external type 2
       E1 - OSPF external type 1, E2 - OSPF external type 2, E - EGP
       i - IS-IS, L1 - IS-IS level-1, L2 - IS-IS level-2, ia - IS-IS inter area
       * - candidate default, U - per-user static route, o - ODR
       P - periodic downloaded static route

Gateway of last resort is not set

     192.168.1.0/24 is variably subnetted, 2 subnets, 2 masks
C       192.168.1.0/24 is directly connected, GigabitEthernet0/1
L       192.168.1.1/32 is directly connected, GigabitEthernet0/1

We can see there is no entry for 192.168.2.0/24 network, if R1 need to send packets to devices into the 192.168.2.0/24, the router will not be able to know where to send the packet.

Testing Connectivity (Before Configuration)

If we try to send a ping to 192.168.2.1:

ping failure from R1 to 192.168.2.1 due to missing static route

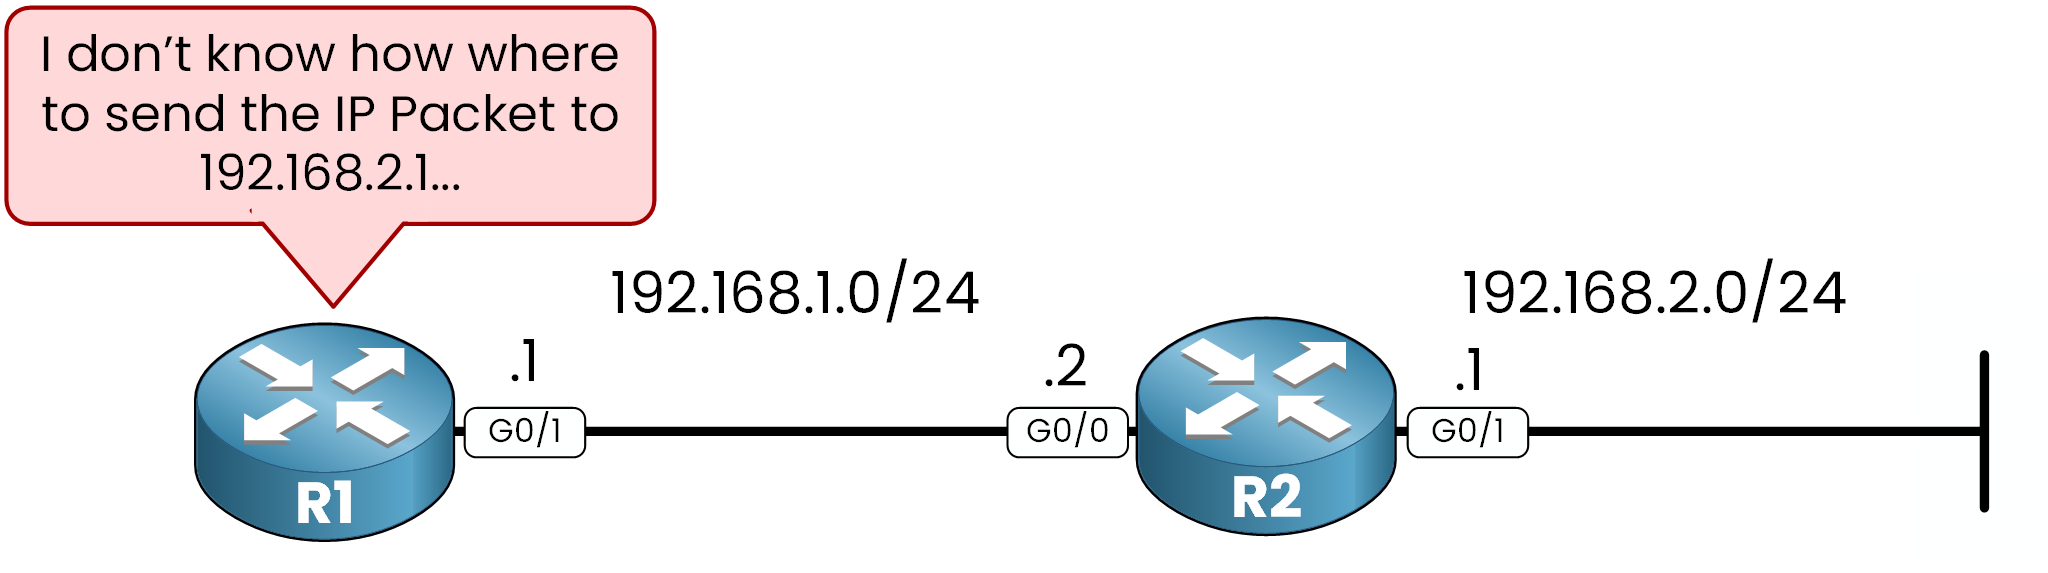
Figure 3 – Ping Failure Due to Missing Route on R1

R1# ping 192.168.2.1 
Sending 5, 100-byte ICMP Echos to 192.168.2.1, timeout is 2 seconds:  
.....  
Success rate is 0 percent (0/5)

The ping fails because R1 lacks a route to reach the destination.

2. How Static Route Works

Static routes are manually defined paths in a router’s routing table. This type of route need a specific IP address (next-hop IP) that the router will use to reach the given network.

Static route command syntax with destination network, subnet mask, next hop, and administrative distance

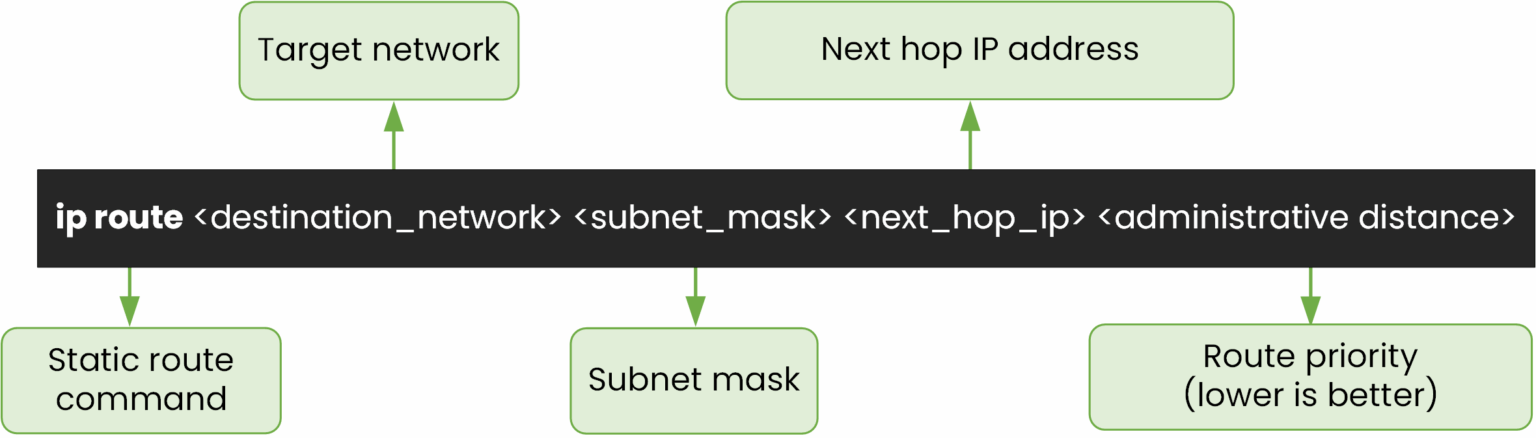
Figure 4 – Static Route Syntax Breakdown

Components of a Static Route

  • Destination Network: The target network

  • Subnet Mask: The mask of the destination network

  • Next-Hop IP: The IP address of the next hop that indicates the path to the destination network

  • Administrative Distance (AD) (Optional): An optional parameter to define the priority of the route.

Administrative Distance (AD)

Static routes have an Administrative Distance (AD) of 1 by default, making them more trustworthy than most dynamic routing protocols (example RIP: 120, OSPF: 110). This ensures the static route is preferred over other routes.

3. Configure Static Route

Now that we understand the problem and the theory, let’s solve it by configuring a static route.
Here, R1 wants to reach the 192.168.2.0/24 network. The command to use will be: ip route 192.168.2.0 255.255.255.0 192.168.1.2

Static route configuration on R1 using next hop 192.168.1.2 to reach 192.168.2.0/24

Figure 5 – Static Route Configuration on R1

The next-hop IP address is the G0/0 interface of R2 (192.168.1.2).

Router R1 will send traffic destined for the 192.168.2.0/24 network to the next-hop IP address 192.168.1.2.
Then, R2 will be able to forward the traffic to the network.

Configuration Command

R1(config)# ip route 192.168.2.0 255.255.255.0 192.168.1.2

Now we can see in the routing table our route to 192.168.2.0/24 using 192.168.1.2 as the next-hop:

R1# show ip route  
Codes: L - local, C - connected, S - static, R - RIP, M - mobile, B - BGP
       D - EIGRP, EX - EIGRP external, O - OSPF, IA - OSPF inter area
       N1 - OSPF NSSA external type 1, N2 - OSPF NSSA external type 2
       E1 - OSPF external type 1, E2 - OSPF external type 2, E - EGP
       i - IS-IS, L1 - IS-IS level-1, L2 - IS-IS level-2, ia - IS-IS inter area
       * - candidate default, U - per-user static route, o - ODR
       P - periodic downloaded static route

Gateway of last resort is not set

     192.168.1.0/24 is variably subnetted, 2 subnets, 2 masks
C       192.168.1.0/24 is directly connected, GigabitEthernet0/1
L       192.168.1.1/32 is directly connected, GigabitEthernet0/1
S    192.168.2.0/24 [1/0] via 192.168.1.2

R1 now has a static route pointing to the 192.168.2.0/24 network via the next-hop 192.168.1.2 with AD set to 1 (by default).

Testing Connectivity After Configuration

R1# ping 192.168.2.1  

Type escape sequence to abort.
Sending 5, 100-byte ICMP Echos to 192.168.2.1, timeout is 2 seconds:
!!!!!
Success rate is 100 percent (5/5), round-trip min/avg/max = 0/0/0 ms

Static route allows R1 to ping 192.168.2.1 through R2 successfully

Figure 6 – Static Route Enables Successful Ping

The ping is now successful because the static route allows R1 to forward packets to the 192.168.2.0/24 network via R2.

To confirm that static routes are correctly configured and active, we can use the show ip route command:

R1# show ip route  
Codes: L - local, C - connected, S - static, R - RIP, M - mobile, B - BGP
       D - EIGRP, EX - EIGRP external, O - OSPF, IA - OSPF inter area
       N1 - OSPF NSSA external type 1, N2 - OSPF NSSA external type 2
       E1 - OSPF external type 1, E2 - OSPF external type 2, E - EGP
       i - IS-IS, L1 - IS-IS level-1, L2 - IS-IS level-2, ia - IS-IS inter area
       * - candidate default, U - per-user static route, o - ODR
       P - periodic downloaded static route

Gateway of last resort is not set

     192.168.1.0/24 is variably subnetted, 2 subnets, 2 masks
C       192.168.1.0/24 is directly connected, GigabitEthernet0/1
L       192.168.1.1/32 is directly connected, GigabitEthernet0/1
S    192.168.2.0/24 [1/0] via 192.168.1.2

The static route is present and marked with an S indicating that it is manually configured.

Troubleshooting Static Route Issues

Common Issues and Solutions:

1. Missing Route Entrie: Ensure the next-hop address is correct.

R1# show running-config | section ip route
ip route 192.168.2.0 255.255.255.0 192.168.1.2

2. Interface Down: Check interface status.

R1# show ip interface brief
Interface              IP-Address      OK? Method Status            Protocol  
GigabitEthernet0/1     192.168.1.1     YES manual up                up  
GigabitEthernet0/0     unassigned      YES unset  administratively down down

4. Summary

Static routes are manually configured on a router to define a specific path to reach a destination network.
They do not change unless you manually modify them.

By default, a static route has an Administrative Distance (AD) of 1, which makes it more trustworthy than dynamic routes like RIP (AD 120) or OSPF (AD 110).

You configure a static route in global configuration mode using the ip route command.

R1# configure terminal
R1(config)# ip route 192.168.2.0 255.255.255.0 192.168.1.2
R1(config)# exit

This tells R1:
→ To reach the 192.168.2.0/24 network, send packets to the next-hop IP 192.168.1.2.

Once configured, the route appears in the routing table marked with an S:

R1# show ip route  
...
S    192.168.2.0/24 [1/0] via 192.168.1.2

The static route is now active and used for forwarding traffic to the remote network.

In the next lesson, we’ll look at how to configure a Default Static Route to provide a gateway of last resort for unknown destinations.