1. What is LLDP ?
Imagine you’re working in a network with devices from multiple vendors, and you need to identify the topology but don’t have a detailed diagram. This is where LLDP (Link Layer Discovery Protocol) becomes your best ally!
Unlike CDP (Cisco Discovery Protocol) which is proprietary to Cisco, LLDP is an open-standard protocol that allows devices from different manufacturers to exchange neighbor information together.
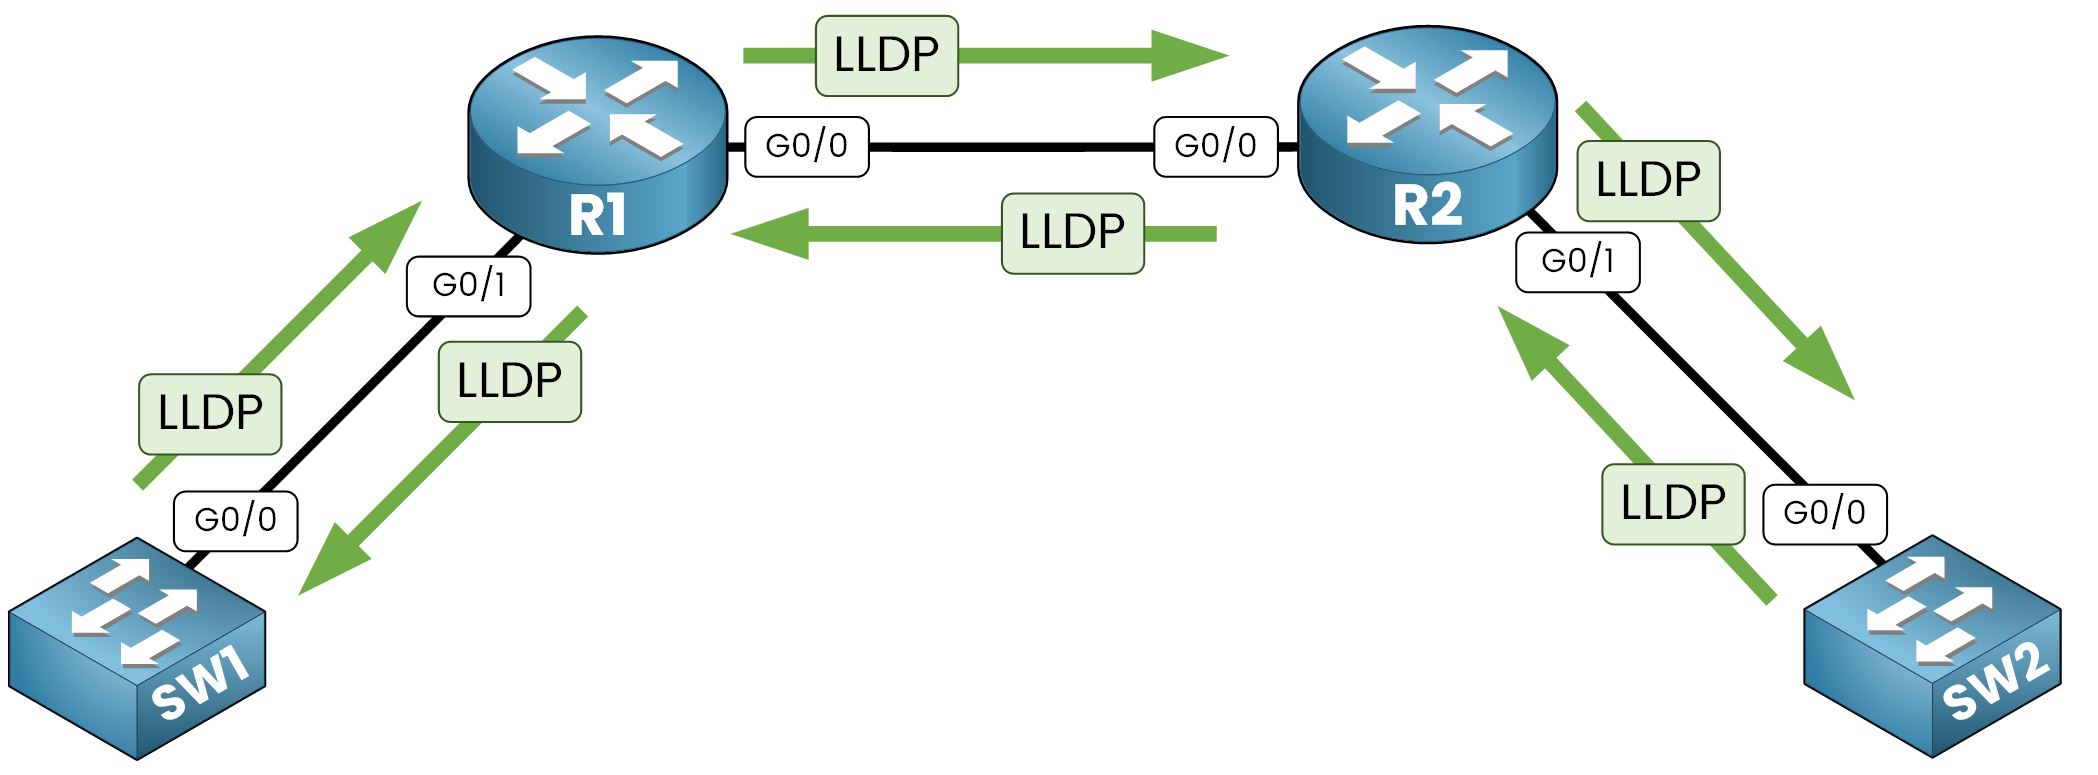
Figure 1 – LLDP exchanges neighbor information between devices
LLDP operates at Layer 2 (Data Link Layer) of the OSI model. It helps network devices share details about their identity, capabilities, and connectivity to theirs neighbors.
For example, using LLDP on a Cisco router allows you to discover neighboring devices like an HP switch or an Avaya IP phone. This interoperability makes LLDP ideal for multi-vendor environments.
2. How LLDP Works
You might wonder, how does LLDP share so much useful information?
LLDP relies on LLDP Data Units (LLDPDUs) frame which are sent periodically over LLDP active interfaces. These LLDPDUs contain multiple details, including:
Device ID: The hostname of the device.
Port ID: The interface sending the LLDPDU.
System Capabilities: The role of the device (router, switch, IP phone, etc.).
Management IP Address: If configured, this provides a management access point.
Neighboring devices collect and store this information in their LLDP tables.
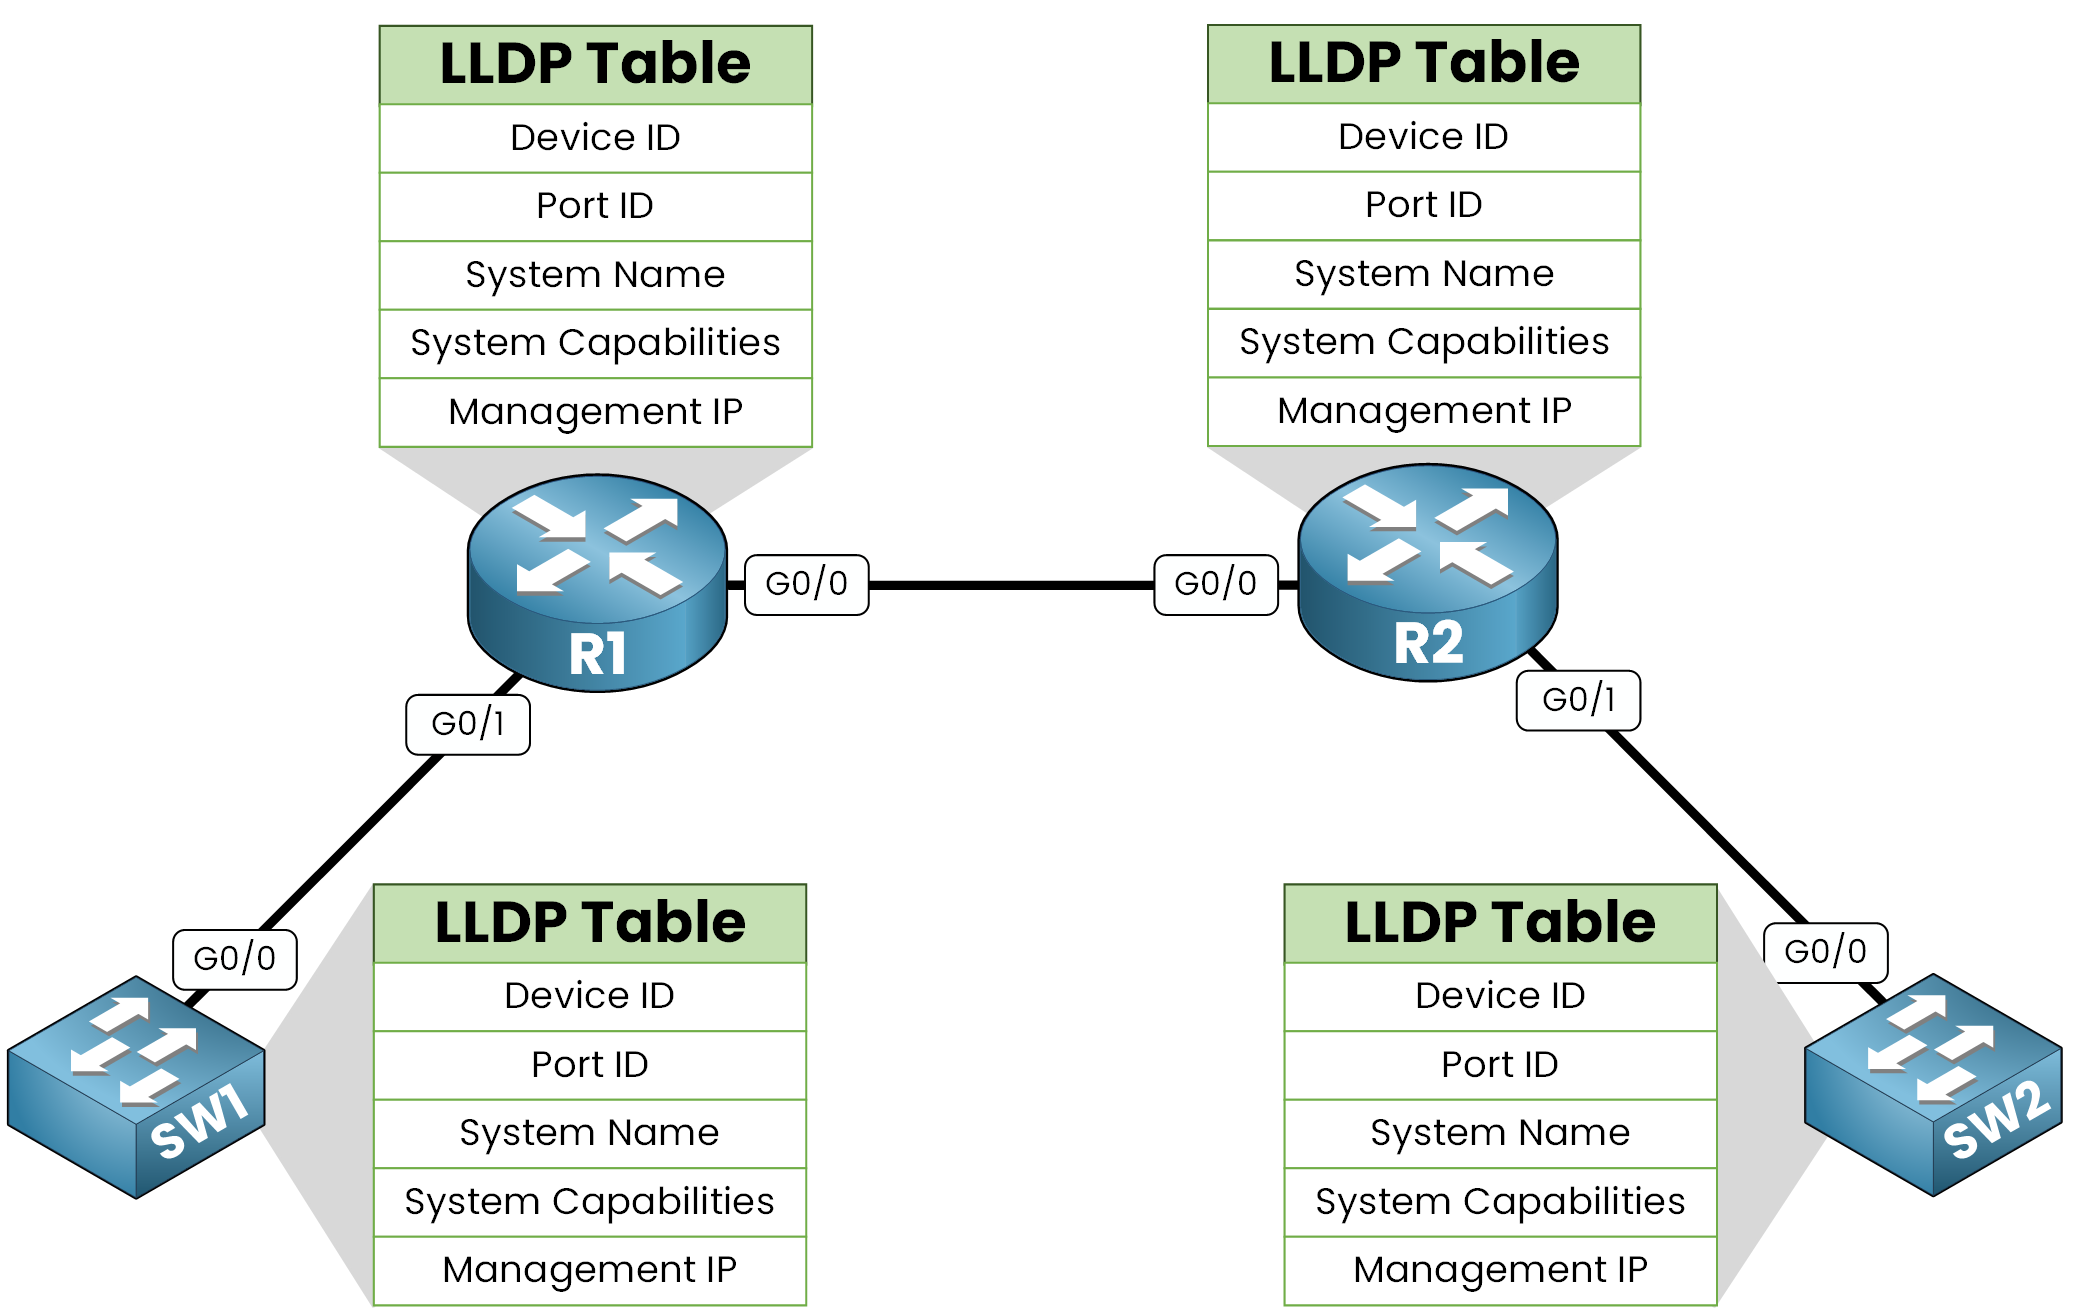
 You can retrieve this data using commands like:
Figure 2 – LLDP store neighbors devices details using LLDP tables
This allows administrators to easily verify and understand network connections.
LLDP Timers
LLDP manages advertisements and neighbor information using specific timers:
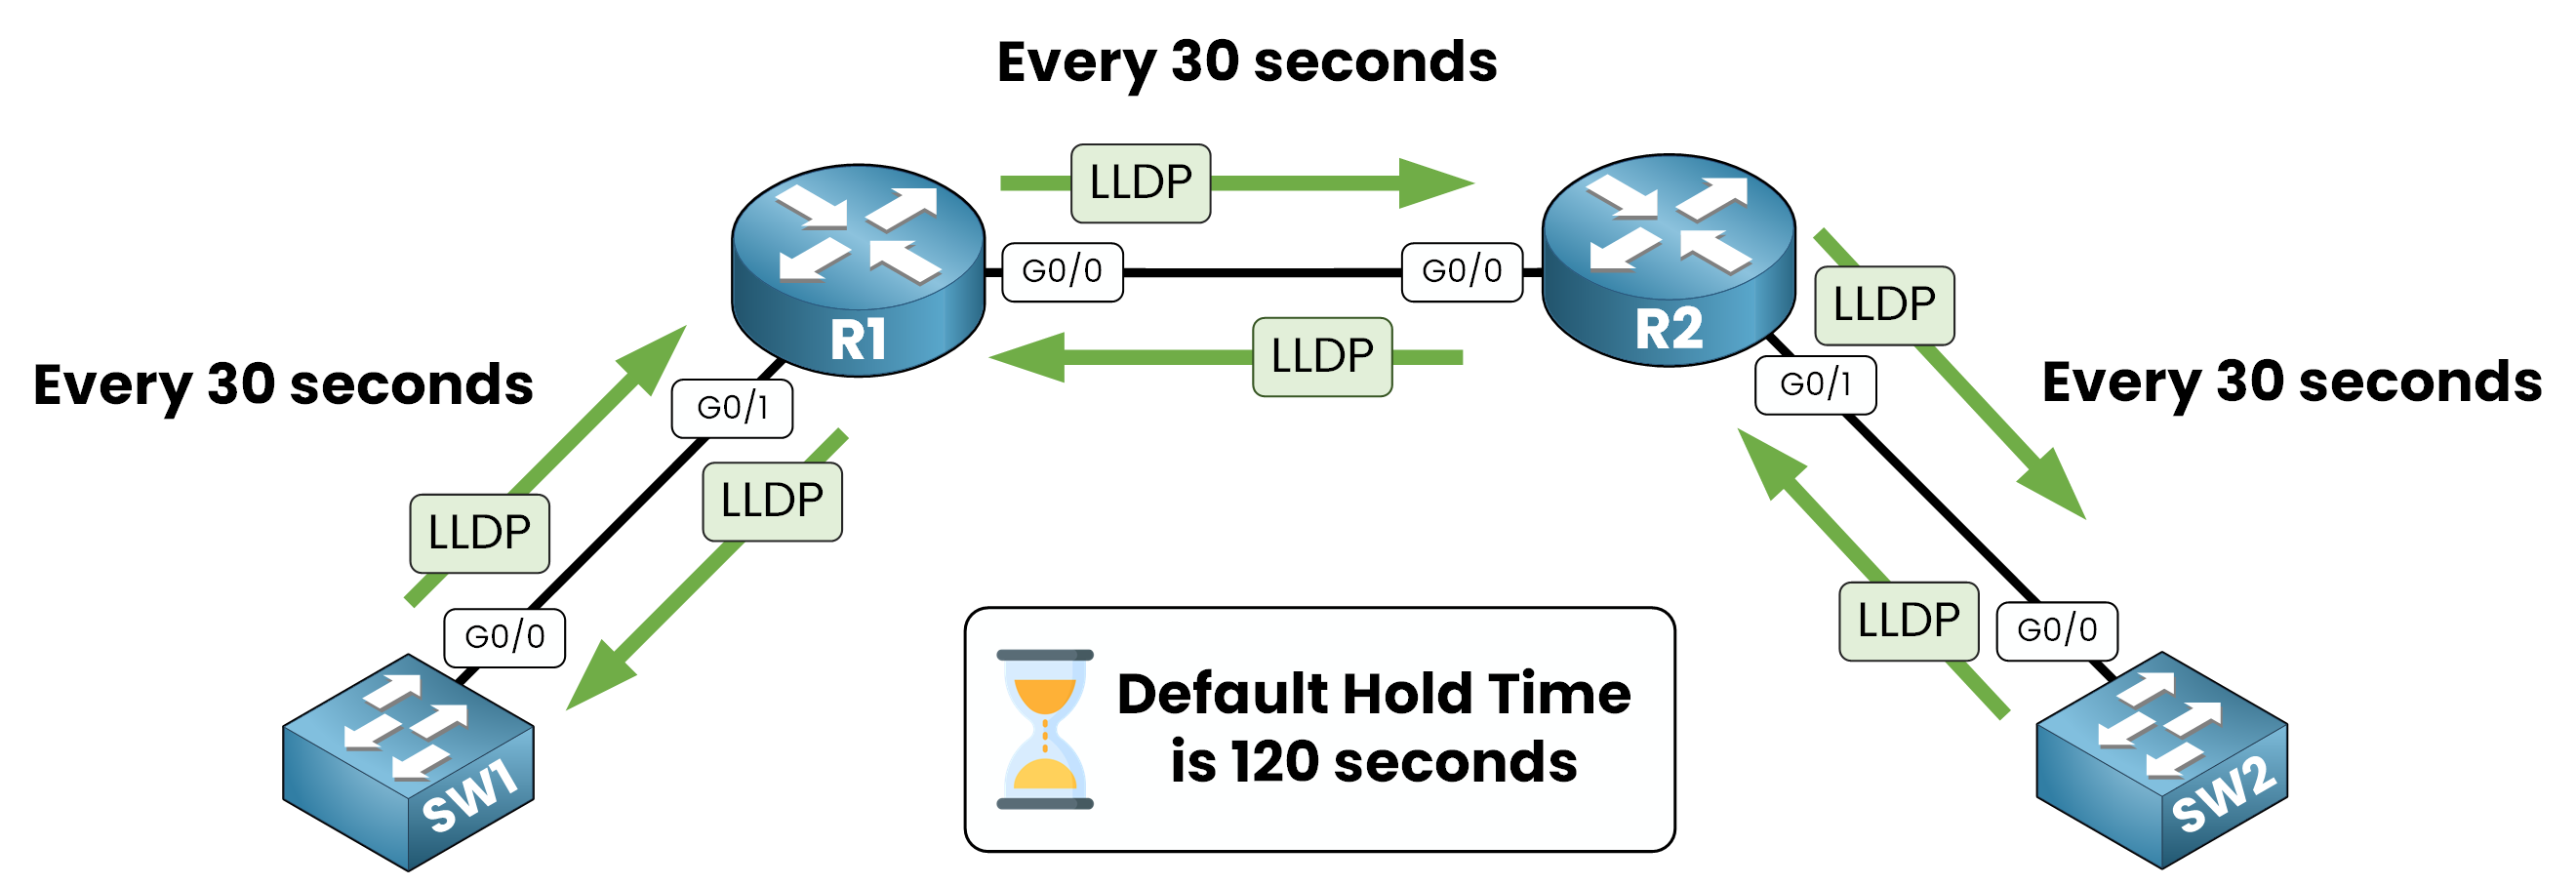
Figure 3 – LLDP sends updates every 30 seconds and holds info for 120 seconds
Timers in LLDP:
Transmission Timer: Defines how often LLDPDUs are sent. The default value is 30 seconds.
Hold Timer: Specifies how long neighbor information is retained after the last received update. The default is 120 seconds.
These timers help maintain an up-to-date view of network devices while minimizing unnecessary traffic.
3. Configure LLDP
Enabling LLDP Globally
By default, LLDP may be disabled on your Cisco devices. To enable it globally, use the following command in configuration mode:
R1(config)# lldp run
What this does:
Activates LLDP on all active interfaces.
Allows the device to send and receive LLDP information.
Once enabled, your device will start discovering directly connected neighbors.
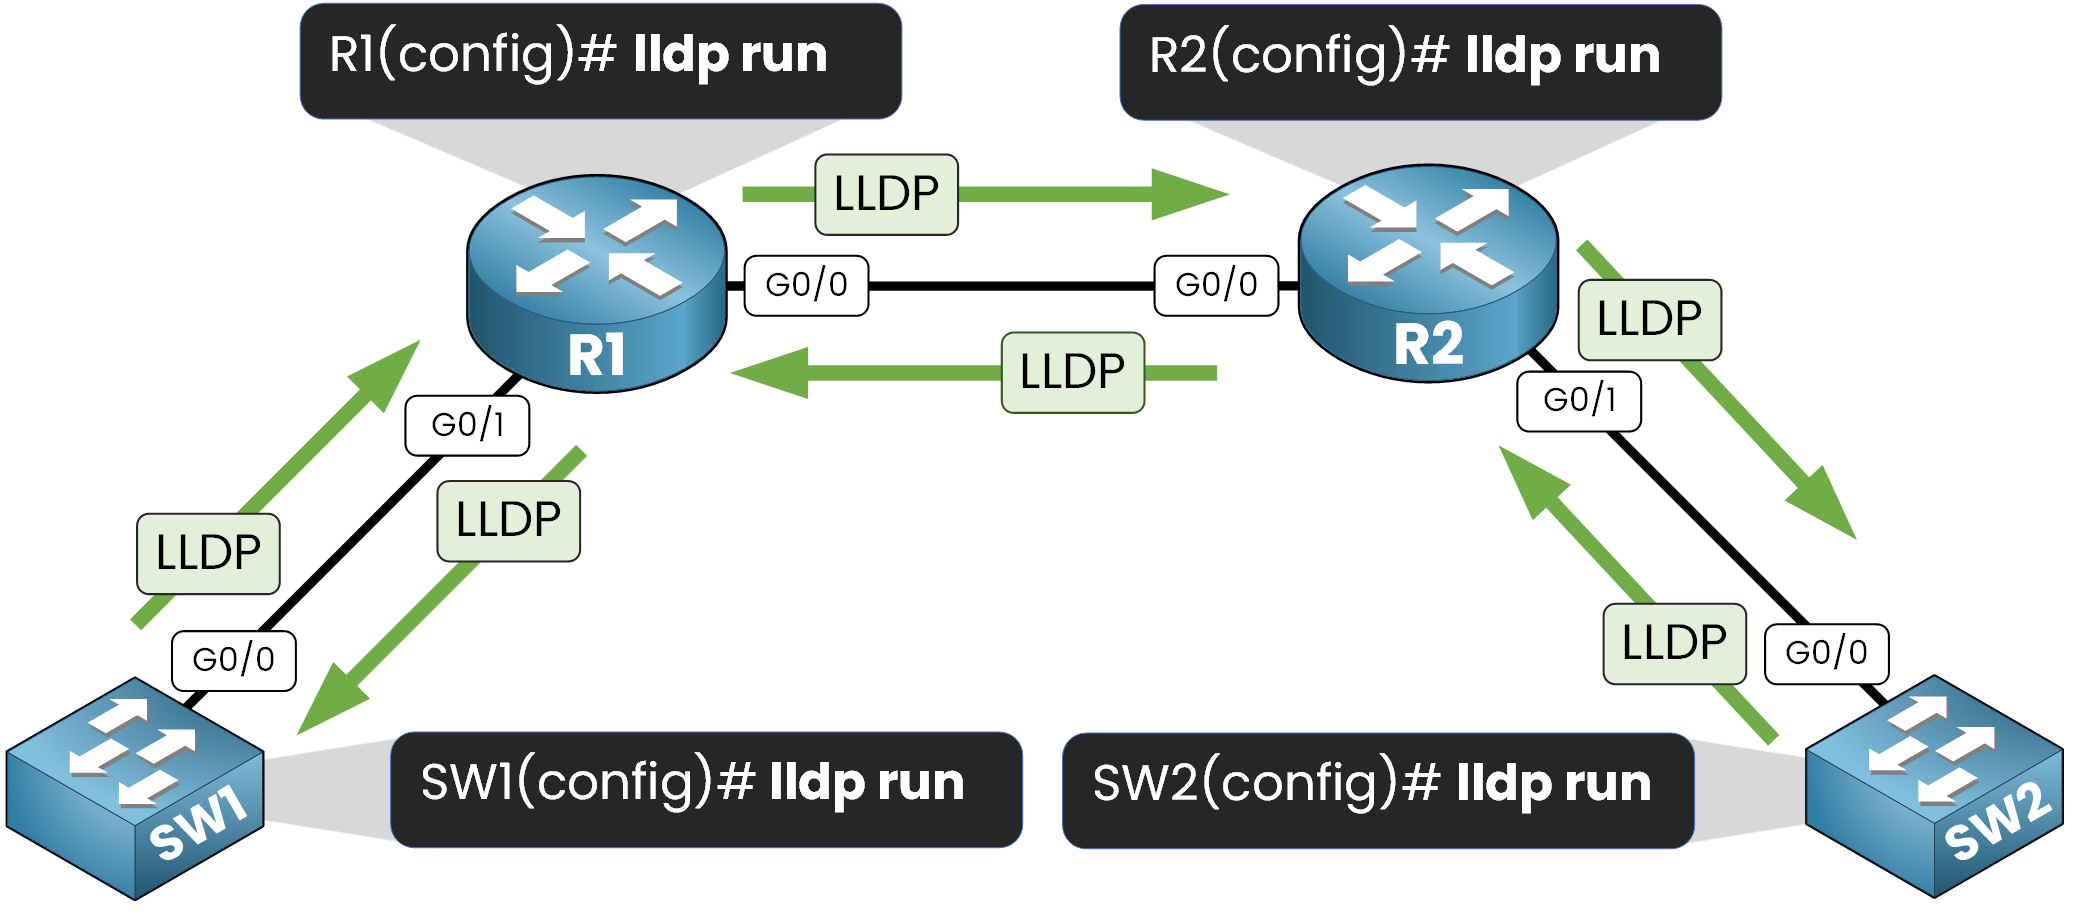
Figure 4 – The lldp run command enables LLDP on all active interfaces
🔹 Viewing LLDP Neighbors
After enabling LLDP, you can verify connected devices using:
R1# show lldp neighbors
Capability codes:
(R) Router, (B) Bridge, (T) Telephone, (C) DOCSIS Cable Device
(W) WLAN Access Point, (P) Repeater, (S) Station, (O) Other
Device ID Local Intf Hold-time Capability Port ID
SW1 Gig0/1 120 B Gig0/1
R2 Gig0/0 120 R Gig0/0
Total entries displayed: 2
What you’re seeing:
Device ID: The hostname of the connected device.
Local Interface: Where the neighbor is connected on your device.
Hold-time: The time (in seconds) before the LLDP entry is removed if no updates are received.
Capability: Indicates what type of device is connected (
B
for Bridge/Switch,R
for Router).Port ID: The interface on the neighbor’s side.
Key takeaway:
You can now identify directly connected devices and their interfaces, which helps with troubleshooting and documentation.
Getting Detailed Neighbor Information
To dive deeper into LLDP details, use:
R1# show lldp neighbors detail
------------------------------------------------
Chassis id: 0000.0C85.B119
Port id: Gig0/1
Port Description: GigabitEthernet0/1
System Name: SW1
System Description:
Cisco IOS Software, C2960 Software (C2960-LANBASEK9-M), Version 15.0(2)SE4, RELEASE SOFTWARE (fc1)
Technical Support: http://www.cisco.com/techsupport
Copyright (c) 1986-2013 by Cisco Systems, Inc.
Compiled Wed 26-Jun-13 02:49 by mnguyen
Time remaining: 90 seconds
System Capabilities: B
Enabled Capabilities:B
Management Addresses: not advertised
Auto Negotiation: supported, enabled
Physical media capabilities:
100baseT(HD)
1000baseT(FD)
1000baseT(HD)
Media Attachment Unit type: 10
Vlan ID: 1
------------------------------------------------
Chassis id: 00D0.D3D8.4201
Port id: Gig0/0
Port Description: GigabitEthernet0/0
System Name: R2
System Description:
Cisco IOS Software, C2900 Software (C2900-UNIVERSALK9-M), Version 15.1(4)M4, RELEASE SOFTWARE (fc2)
Technical Support: http://www.cisco.com/techsupport
Copyright (c) 1986-2012 by Cisco Systems, Inc.
Compiled Thurs 5-Jan-12 15:41 by pt_team
Time remaining: 90 seconds
System Capabilities: R
Enabled Capabilities:R
Management Addresses: not advertised
Auto Negotiation: supported, enabled
Physical media capabilities:
1000baseT(FD)
Media Attachment Unit type: 10
Vlan ID: 1
Total entries displayed: 2
Breakdown :
Chassis ID: A unique hardware identifier (often a MAC address).
System Name: The hostname of the neighbor device.
Port Description: The port on the neighbor device, useful for documentation.
System Capabilities: The device’s function (
B
for switch,R
for router, etc.).Management Address: IP address for remote management (if configured).
Auto-Negotiation: Indicates if speed and duplex settings are negotiated.
Use Case:
If you suspect a misconfigured port or an incorrect device connection, this command gives you clarity on what’s actually connected.
🔹 Disable LLDP Globally
Figure 5 – The no lldp run command disables LLDP globally on the device
To disable LLDP globally (useful if you want to limit visibility of devices in sensitive areas):
SW1(config)# no lldp run
SW1(config)# end
Verification:
SW1# show lldp neighbors
% LLDP is not enabled
This ensures that your device no longer sends or receives LLDP information.
4. Enable/Disable LLDP on Specific Interfaces
Enable LLDP on an Interface
By default, enabling LLDP globally activates it on all interfaces. However, in some cases, you may want to enable LLDP only on specific ports, such as an uplink to another switch or router.
To enable LLDP on a specific interface:
SW1(config)# interface gigabitethernet 0/0
SW1(config-if)# lldp transmit
SW1(config-if)# lldp receive
Figure 6 – LLDP can be enabled per interface using lldp
transmit
and lldp receive
Explanation:
lldp transmit: Sends LLDP information to the directly connected neighbor.
lldp receive: Accepts LLDP information from the neighbor.
This approach is useful when you want LLDP enabled only on critical infrastructure links.
Disable LLDP on an Interface
In some situations, it’s best to disable LLDP on certain interfaces—especially those connected to end-user devices, like PCs or printers. This prevents unnecessary LLDP advertisements and minimizes exposure of network details.
To disable LLDP on a specific interface:
SW1(config)# interface gigabitethernet 0/1
SW1(config-if)# no lldp transmit
SW1(config-if)# no lldp receive
Figure 7 – Disabling LLDP on specific interfaces prevents unwanted neighbor discovery
This configuration prevents the interface from sending or receiving LLDP information, ensuring that only essential network links participate in LLDP discovery.
5. Conclusion
LLDP is a powerful tool for network visibility, especially in multi-vendor environments. By enabling LLDP selectively, you can:
Optimize network discovery by ensuring that only relevant devices share LLDP information.
Enhance security by preventing unnecessary LLDP data exposure.
Simplify troubleshooting by making it easier to identify connections between devices.
Whether you’re mapping your network, validating configurations, or troubleshooting connectivity, LLDP provides valuable insights into your infrastructure. Be strategic in its deployment to maximize efficiency and security.