IPv6 SLAAC (Stateless Address Autoconfiguration) is a method that allows hosts to automatically configure their IPv6 address without using a DHCPv6 server.
In IPv6 networks, hosts can't just pick any address at random; they need a valid Global Unicast Address (GUA) to communicate across the Internet.
But how do they get that address?
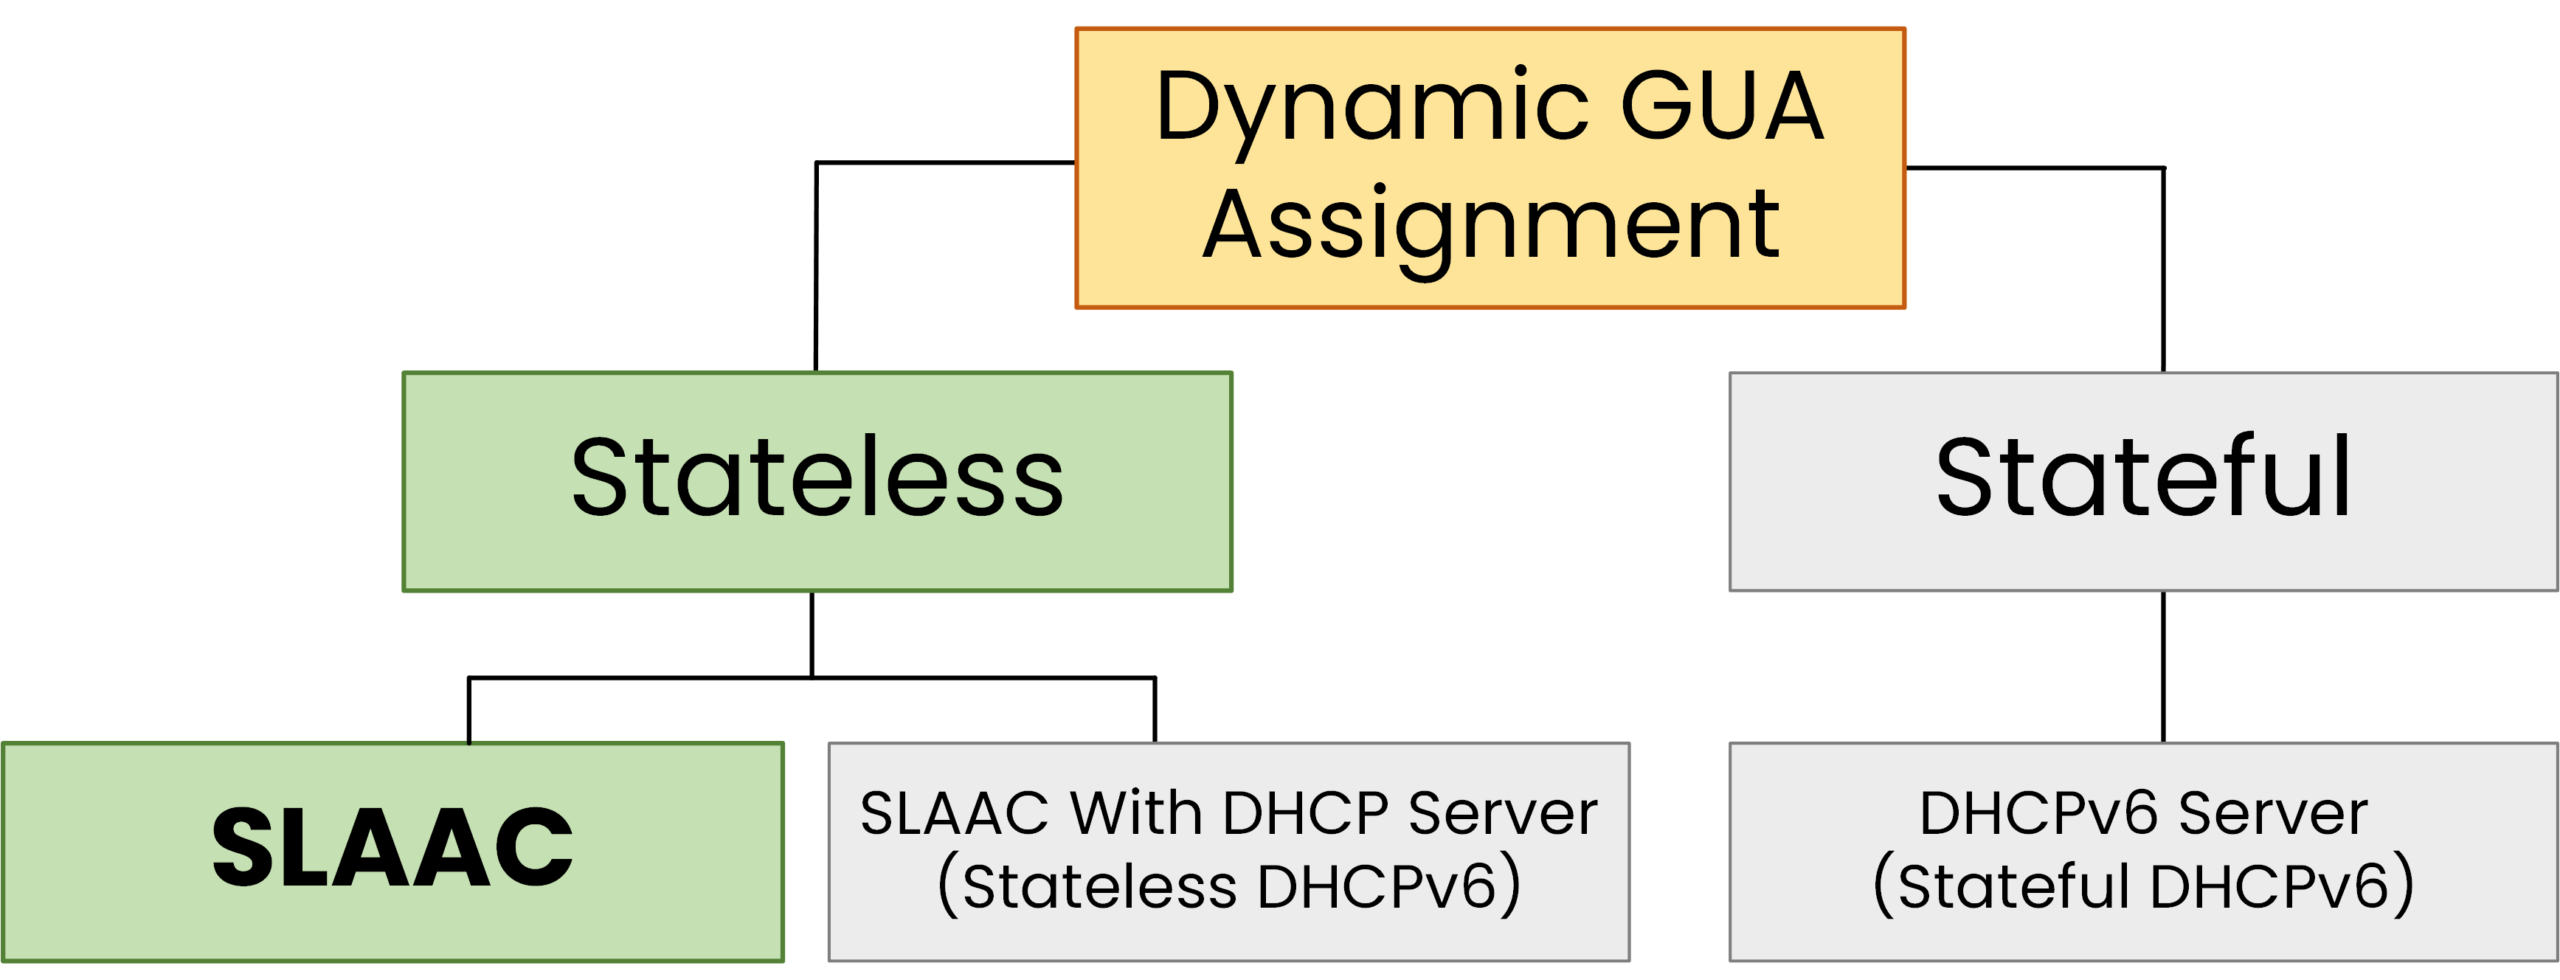
Figure 1 - Dynamic GUA Assignment different approaches
There are two main approaches:
Stateful methods, where a DHCPv6 server assigns and tracks the addresses (similar to IPv4)
Stateless methods, where the host configures itself without needing any central server
SLAAC which stands for Stateless Address Autoconfiguration is the most common stateless method.
Defined in RFC 4862, it allows a host to automatically configure its Global Unicast IPv6 address without relying on DHCP.
How does SLAAC work?
All it needs is a router on the local network that can advertise a prefix. From there, the host can build its Global Unicast Address IPv6 address by:
Generating a Link-Local Address using EUI-64 or a random Interface ID.
Sending a Router Solicitation (RS) to request the network prefix.
Receiving a Router Advertisement (RA) with the network prefix.
Combining the Network Prefix with its Interface ID to form the Global Unicast Address (GUA).
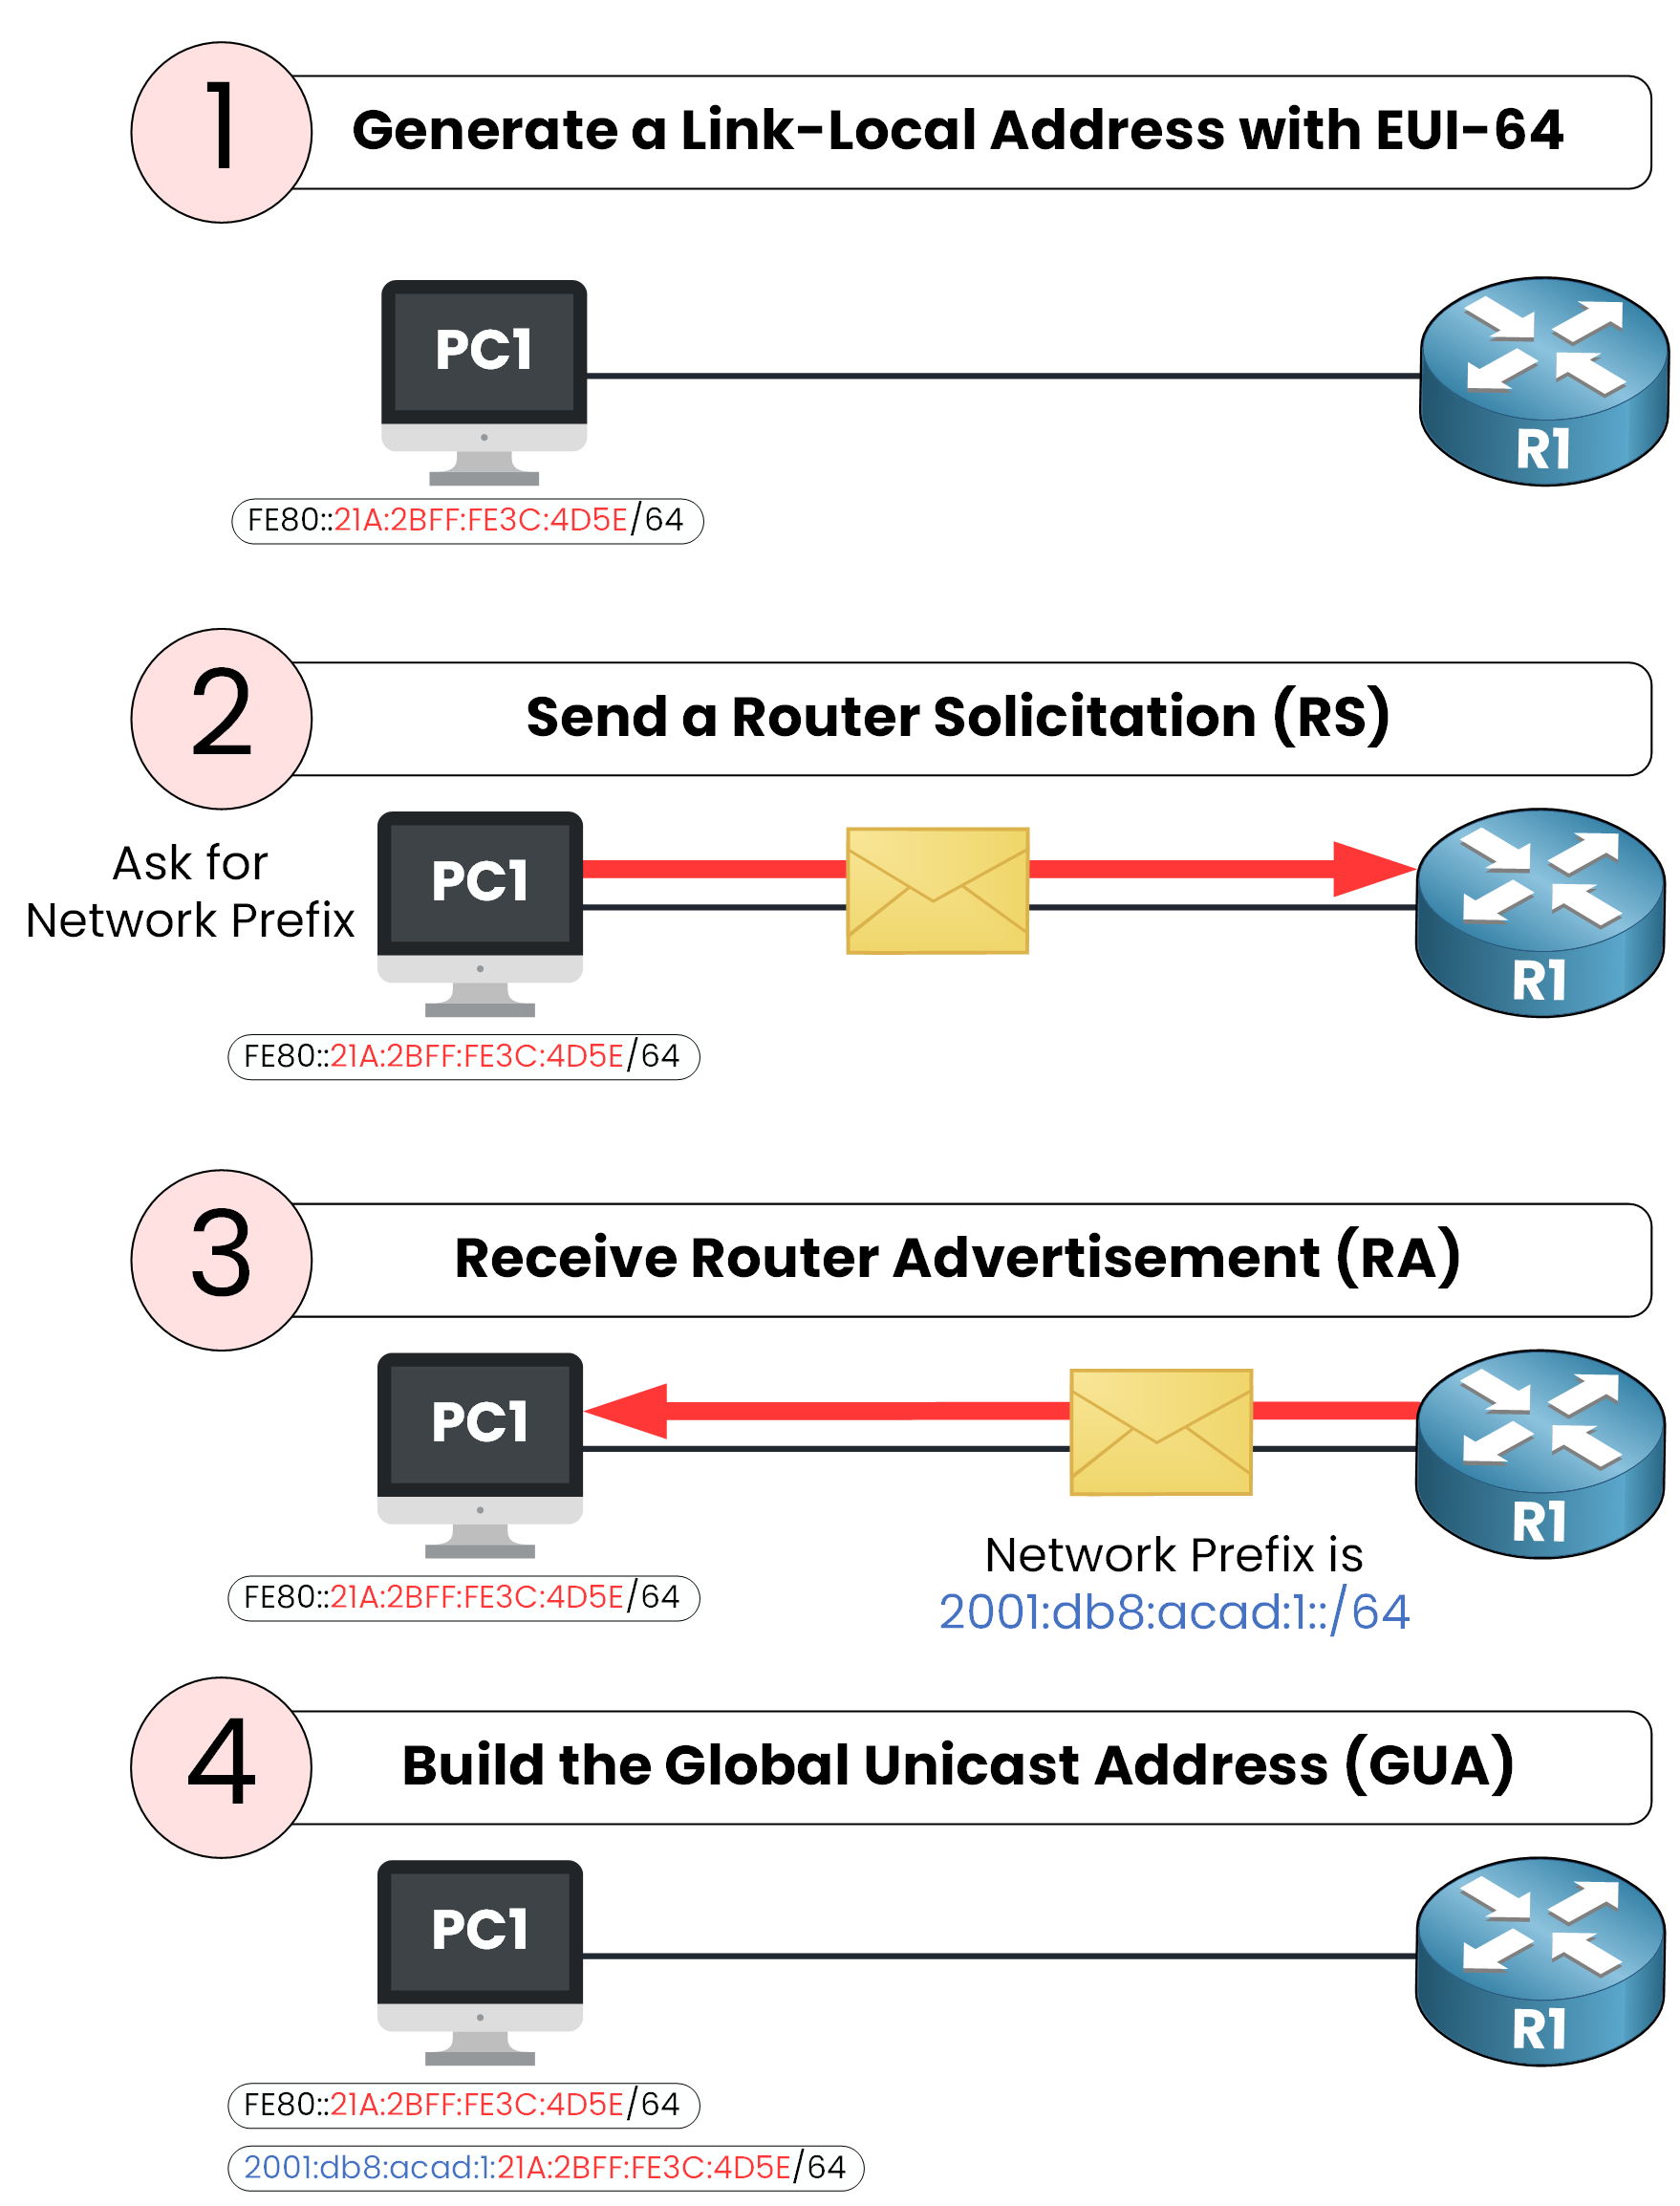
Figure 2 - SLAAC Process Step by Step Simplified
Now that you've seen the big picture, let's explore each step in detail.
Answer the question below
Which method allows a host to configure an IPv6 address without DHCPv6?
Step 1: Host generates a Link-Local Address
As soon as PC1 connects to the network and IPv6 is enabled, it automatically generates a Link-Local Address.
This address allows communication only within the local segment.
Figure 3 - Topology used to demonstrate SLAAC
The Link-Local Address is built from:
A Fixed Prefix → FE80::/64
An Interface ID → based on the MAC address (using EUI-64) or randomly generated.
The interface ID needs to be calculated in order to create our Link Local Address, in this example we will use EUI-64.
Answer the question below
What fixed prefix is used when building a Link-Local IPv6 address?
Building the Link-Local Address with EUI-64
We start by looking at the PC1 device MAC Address in order to begin the EUI-64 process :
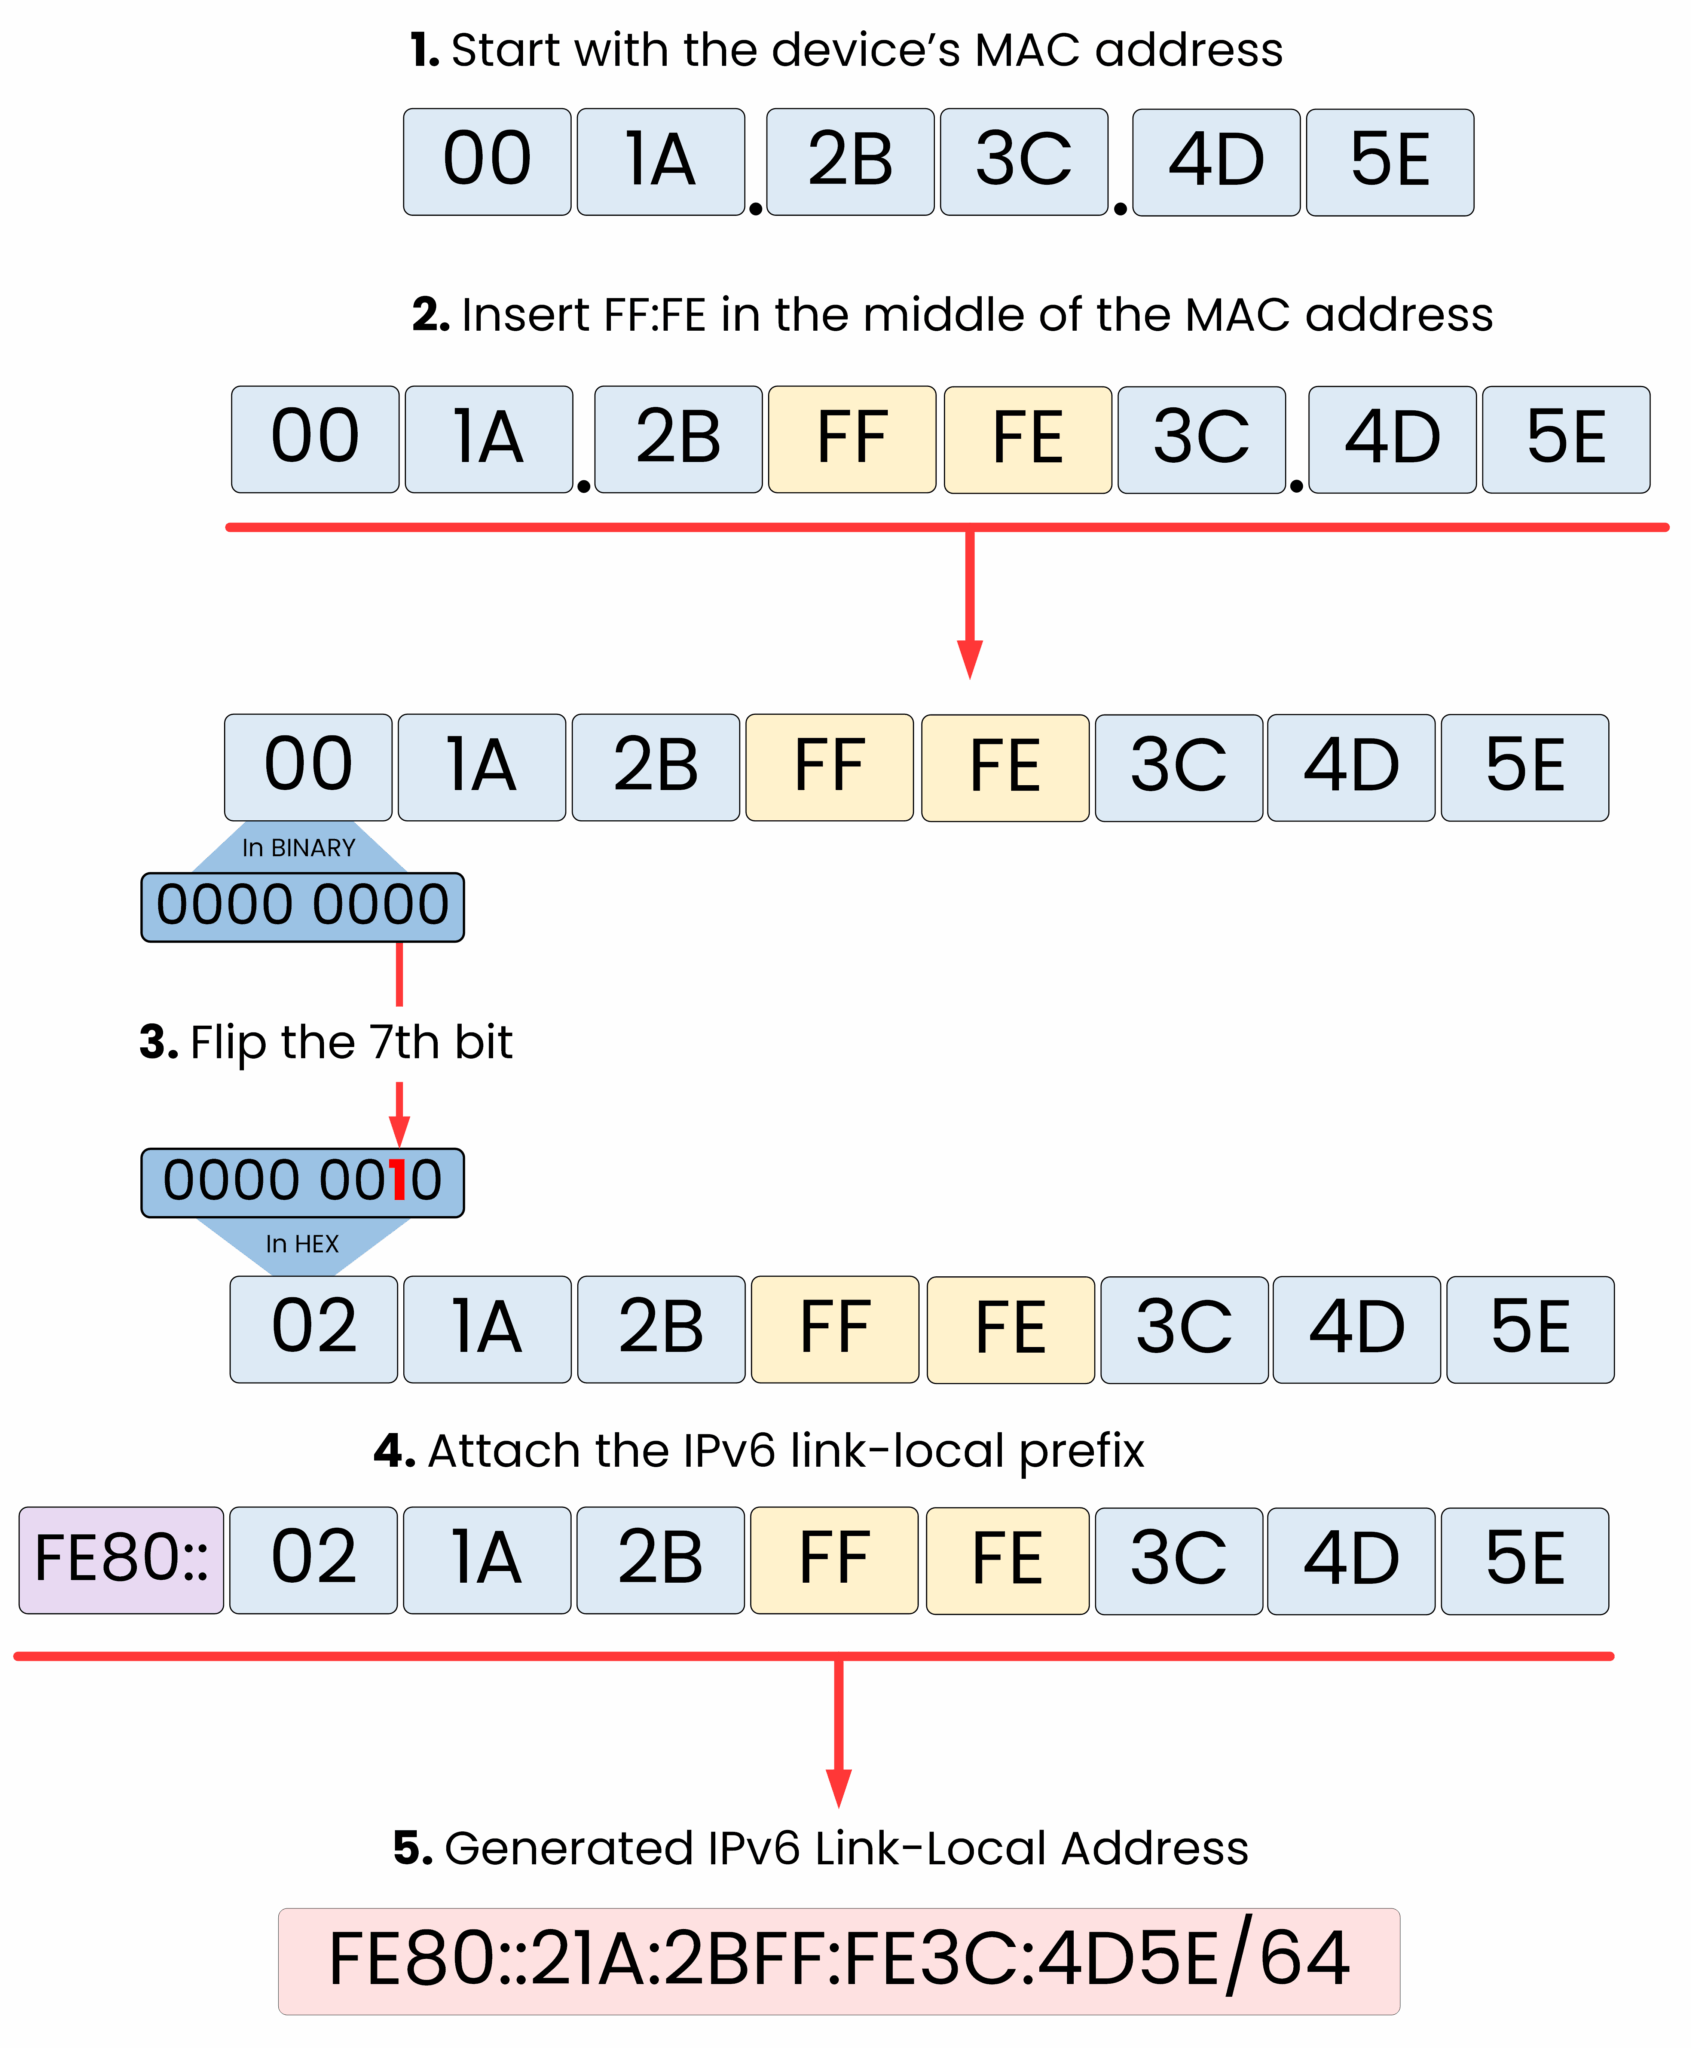
Figure 4 - EUI-64 Process Step by Step
PC1 has successfully generated its Link-Local Address (FE80::21A:2BFF:FE3C:4D5E), it appears now in the interface output:
C:\Users\PC1> ipconfig /all

Ethernet adapter Ethernet0:

   Connection-specific DNS Suffix..:
   Physical Address................: 001A.2B3C.4D5E
   Link-local IPv6 Address.........: FE80::21A:2BFF:FE3C:4D5E
   IP Address......................: 0.0.0.0
   Subnet Mask.....................: 0.0.0.0
   Default Gateway.................: 0.0.0.0
   DNS Servers.....................: 0.0.0.0
   DHCP Servers....................: 0.0.0.0
   DHCPv6 Client DUID..............: 00-01-00-01-26-AB-91-42-00-1A-2B-3C-4D-5E
Once the Link-Local Address has been created, we need to make sure no other device is already using it on the local network.
To verify this, the host runs a process called Duplicate Address Detection (DAD).
Step 2: Run Duplicate Address Detection (DAD)
Every time an IPv6 address is created, the host automatically subscribes to a special multicast group called the solicited-node multicast address.
This multicast address is derived from the last 24 bits of the IPv6 address, and it's unique for each address.
For example:
Link-Local Address:
FE80::21A:2BFF:FE3C:4D5ELast 24 bits:
3C:4D5E→ Solicited-node multicast address:
FF02::1:FF3C:4D5E
This multicast group ensures that only devices configured with the exact same address will receive the message.
You can confirm that PC1 has joined this group with:
C:\Users\PC1> netsh interface ipv6 show joins

Interface 12: Ethernet0

Scope       References  Last  Address
----------  ----------  ----  ---------------------------------
0                    1  Yes   ff02::1           (All-nodes)
0                    1  Yes   ff02::2           (All-routers)
0                    2  Yes   ff02::1:ff3c:4d5e (For DAD)
At this point, PC1 sends a Neighbor Solicitation (NS) to the solicited-node multicast address:
Source address →
::(unspecified, since the address is not yet valid)Destination →
FF02::1:FF3C:4D5E(Multicast)Target →
FE80::21A:2BFF:FE3C:4D5E(Link-Local Address)
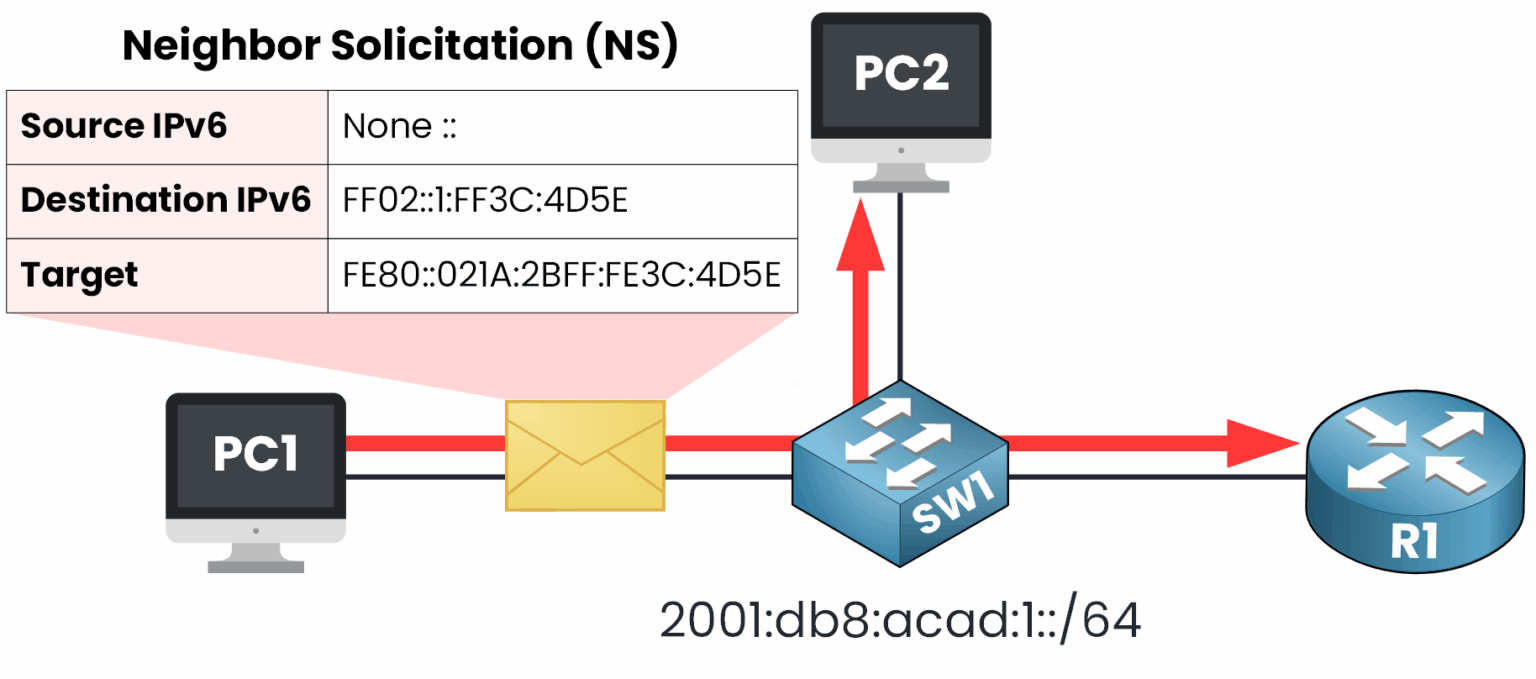
Figure 5 - PC1 sends an NS to check if the Link-Local Address is in use
Other devices like PC2 or R1 ignore this message because they are not subscribed to the
FF02::1:FF3C:4D5Emulticast group.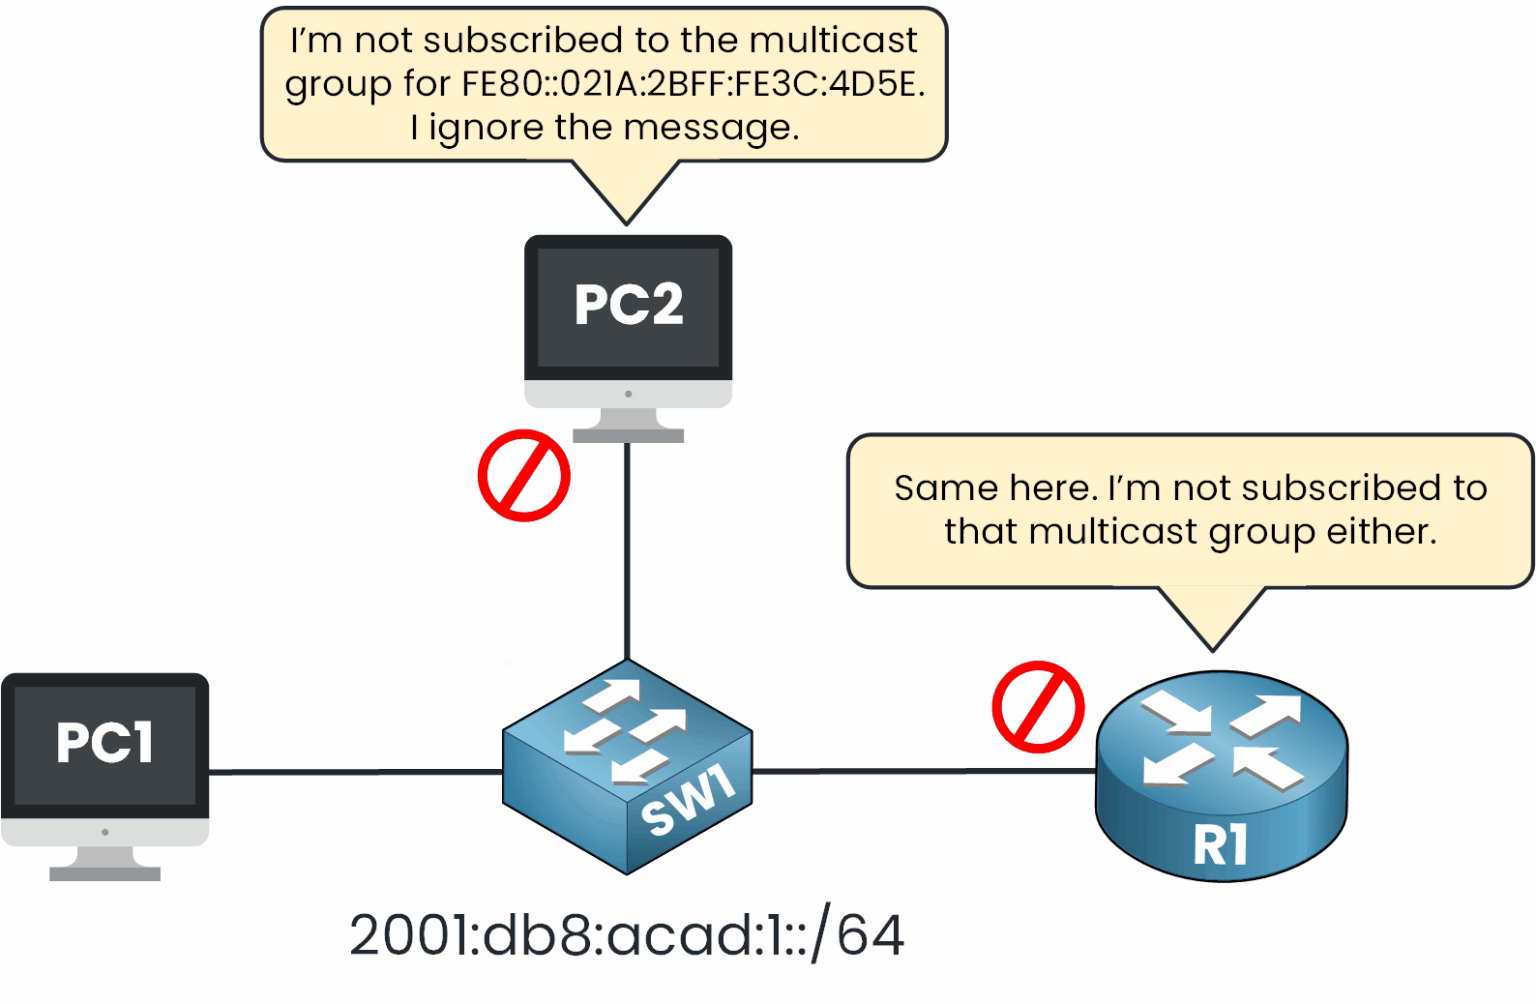
Figure 6 - Neighbors don't respond
40 % Complete: you’re making great progress
Ready to pass your CCNA exam?