In the previous lesson, you built a GRE tunnel between the New York headquarters and the San Francisco branch office.
The tunnel works, R1 and R2 can exchange traffic through the overlay network.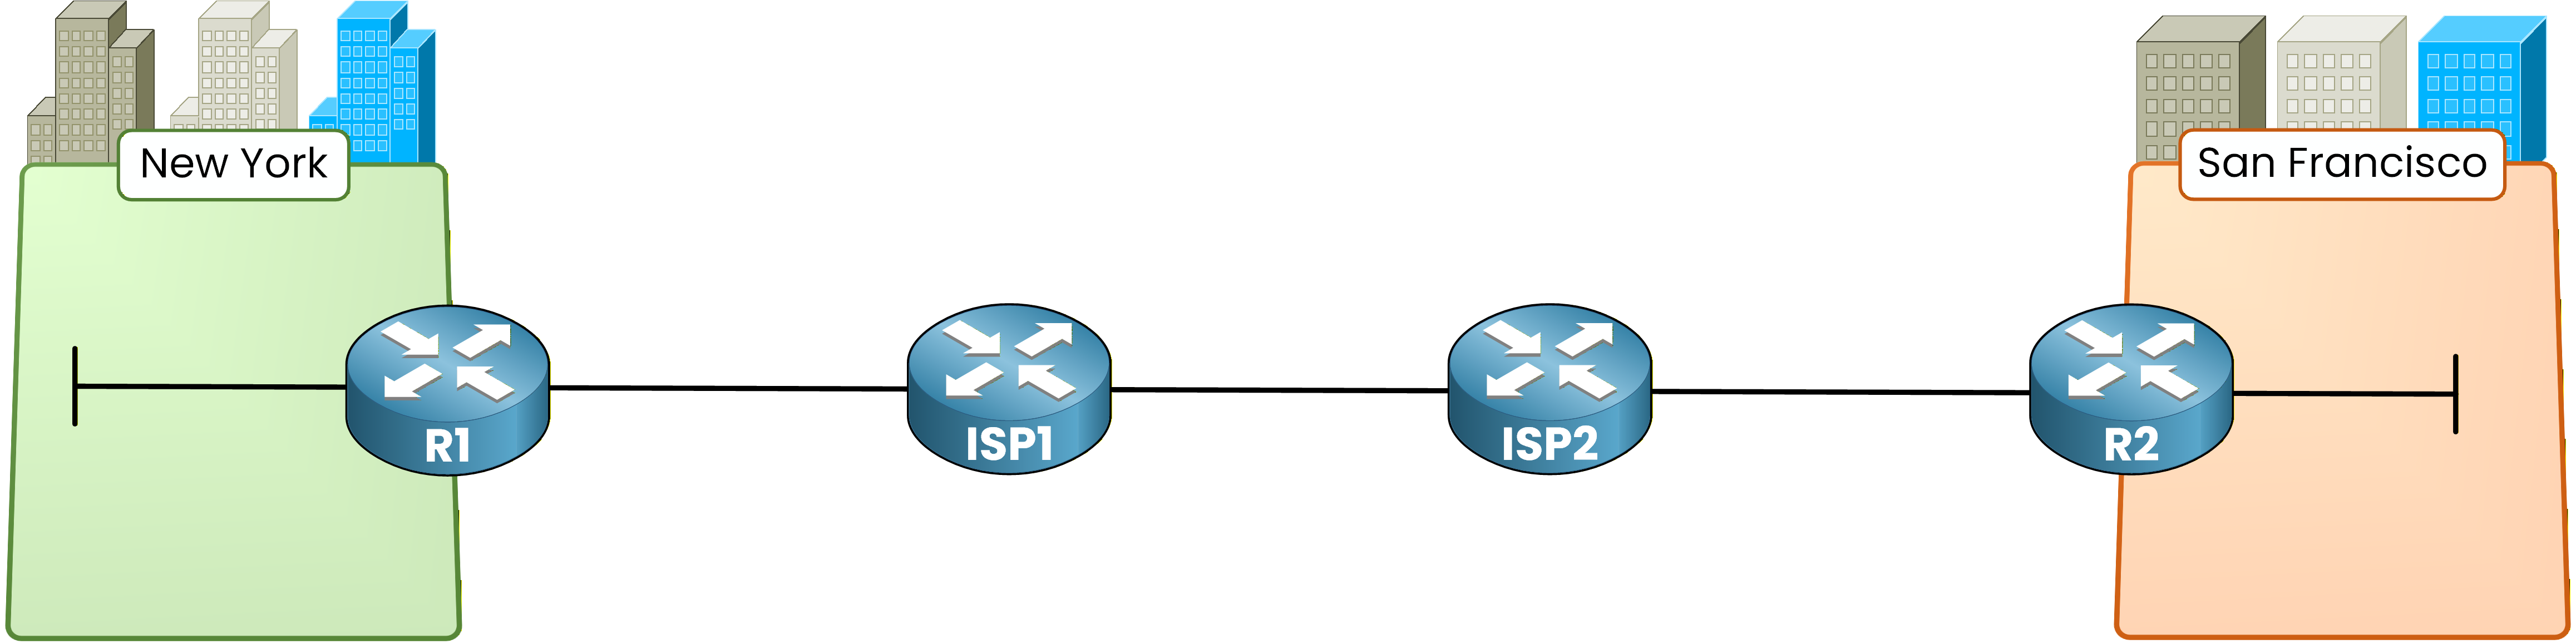
Figure 1 – Enterprise sites network topology
But there is a problem.
GRE provides zero encryption. Every packet traveling through the tunnel is in cleartext.
Anyone capturing traffic between the two ISP routers can read your data.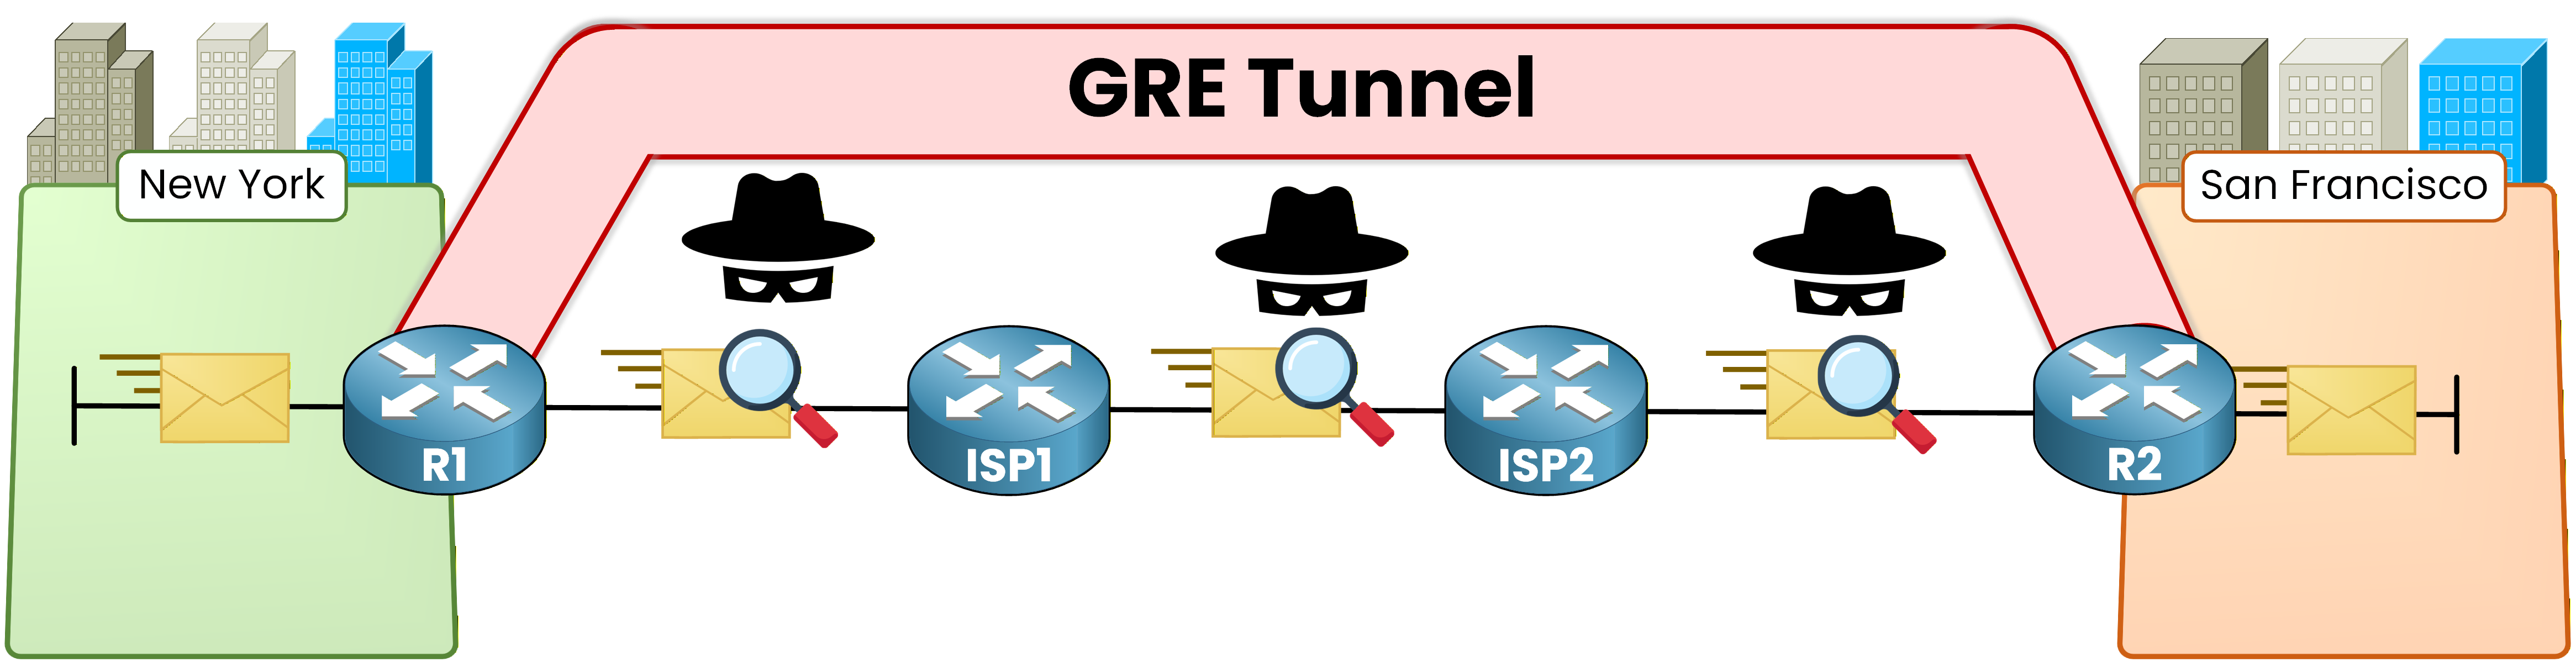
Figure 2 – GRE tunnel overlay concept
IPsec solves this.
It wraps every packet in an encrypted envelope before sending it across the untrusted network.
Only the two IPsec peers hold the keys to decrypt the content.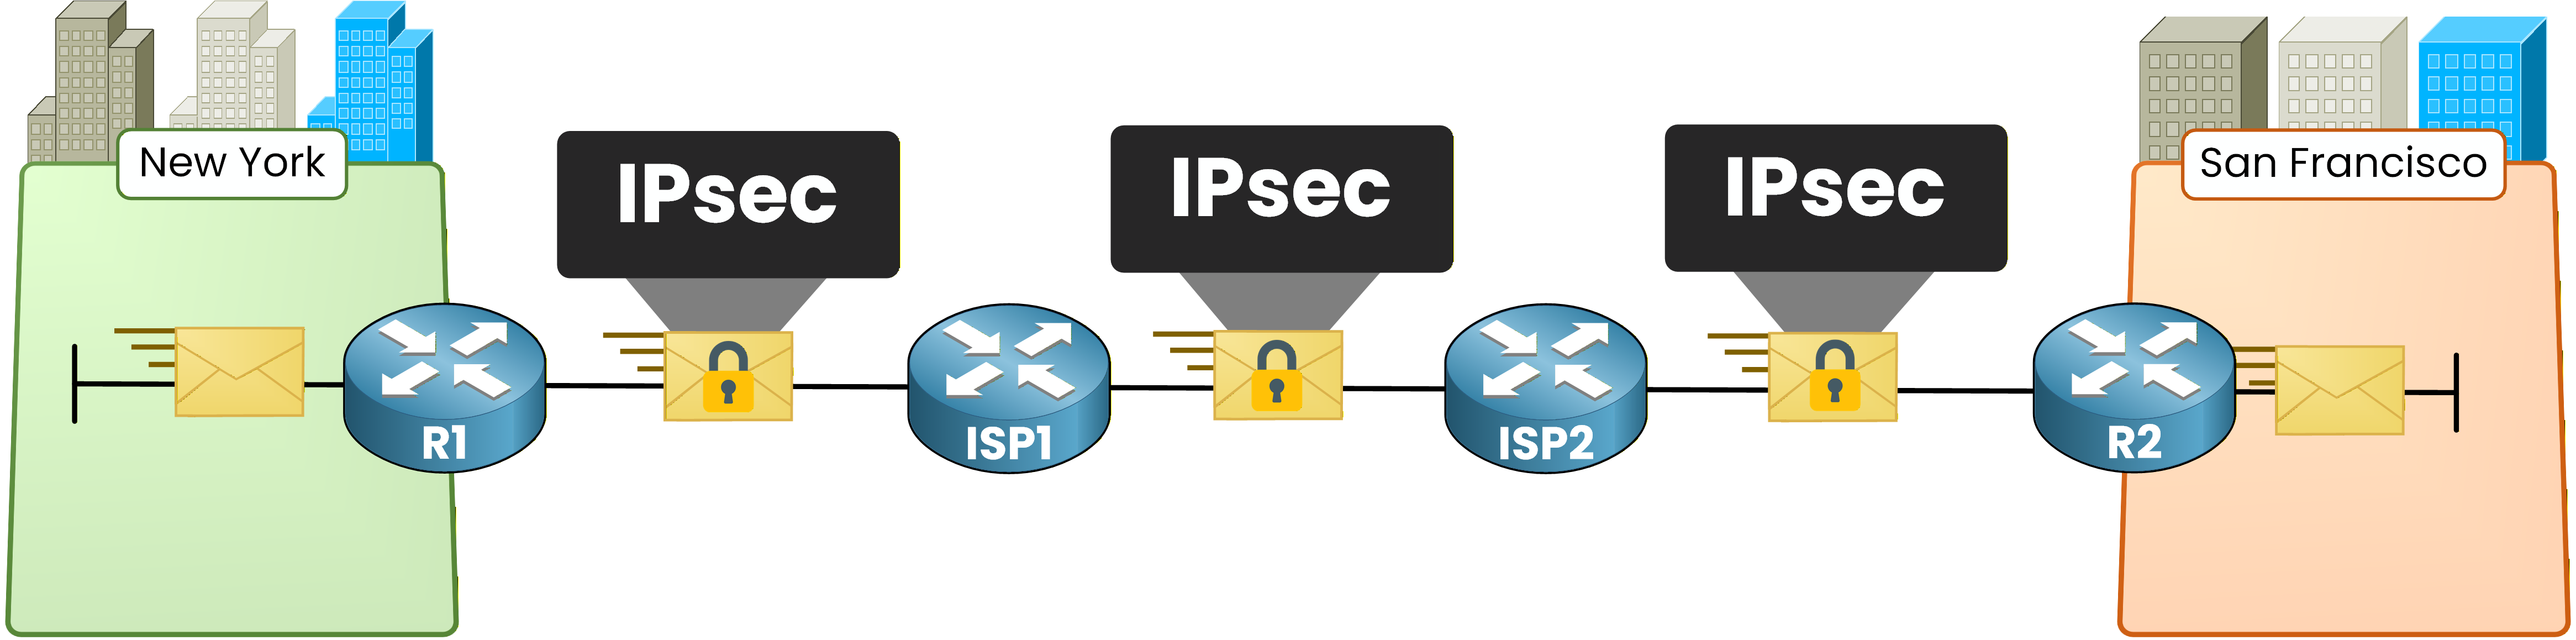
Figure 3 – IPsec encrypted tunnel concept
IPsec is not a single protocol. It is a framework that combines several components. Let's go through each one:
IKE (Internet Key Exchange): Negotiates encryption parameters and exchanges keys between peers.
ESP (Encapsulating Security Payload): Encrypts and authenticates the data payload.
AH (Authentication Header): Provides authentication and integrity without encryption. Rarely used in modern deployments because ESP can do both.
SA (Security Association): A one-way agreement between two peers that defines the encryption algorithm, keys, and lifetime for a specific traffic flow.
In real-world deployments, the combination you will see most often is
IKE + ESP.Answer the question below
What does IPsec provide that GRE alone does not?
Now that you know what IPsec is, let's see how it actually establishes a secure tunnel.
IPsec uses a two-phase process. Before any of your traffic is encrypted, the two peers must agree on security parameters and exchange cryptographic keys.
This negotiation happens through IKE (Internet Key Exchange).
Here is the high-level packet processing flow when IPsec is active: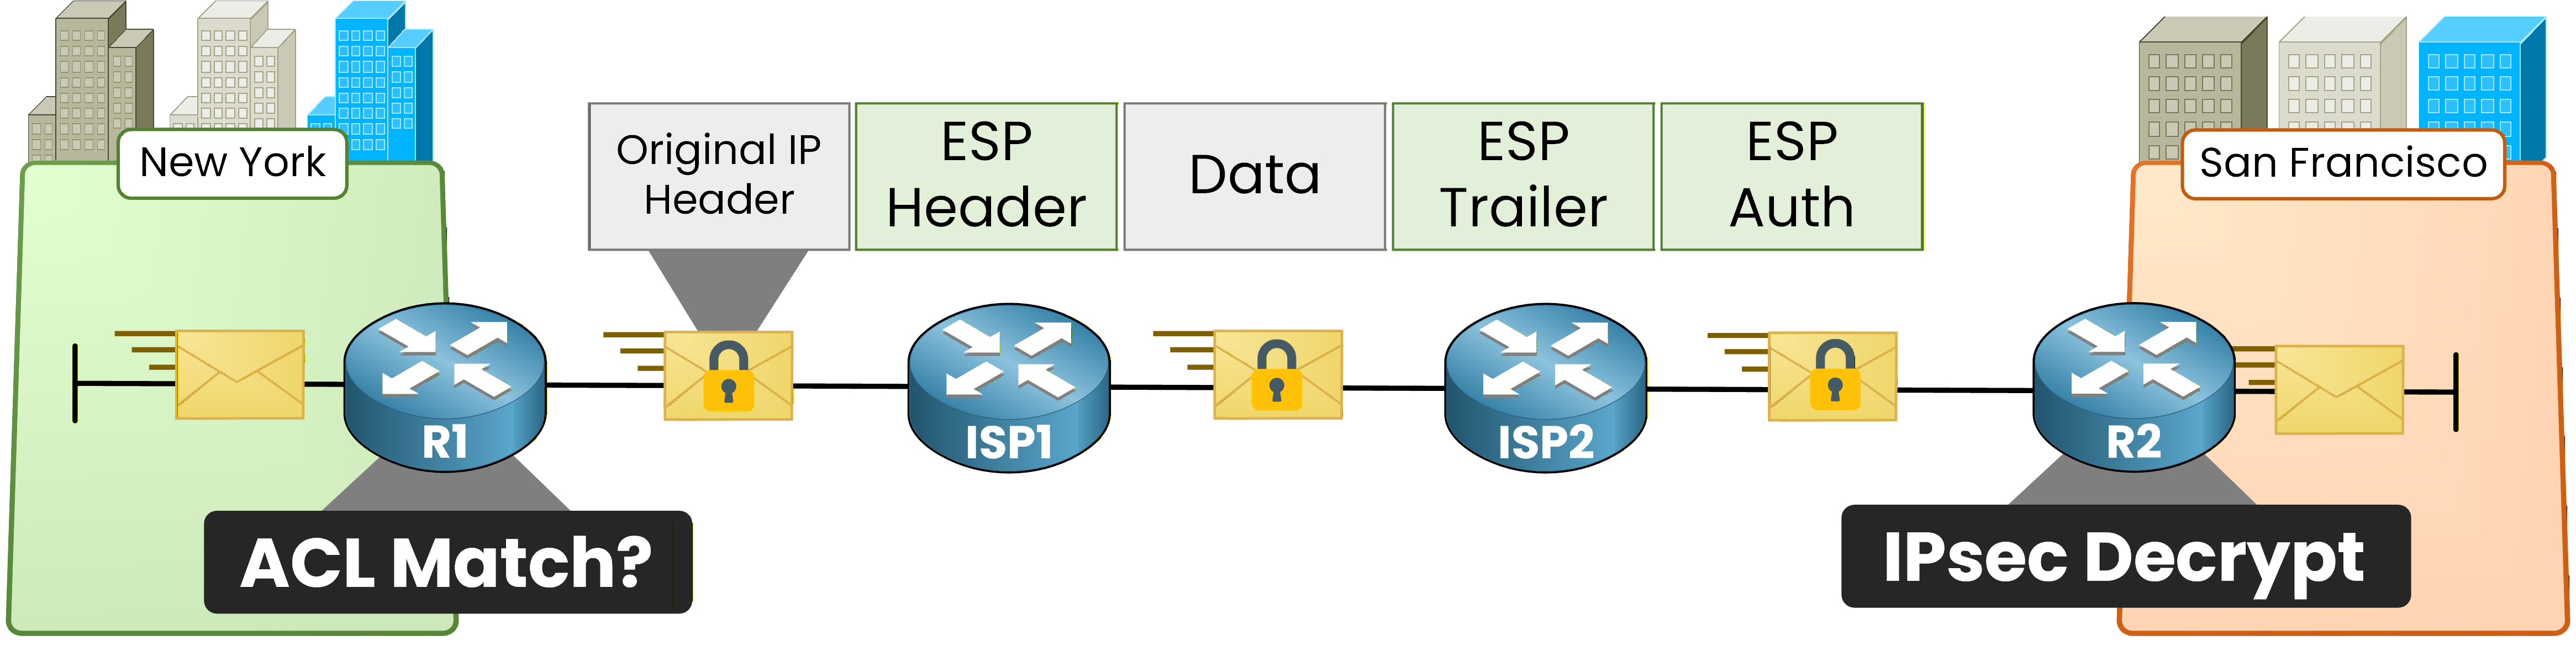
Figure 4 – IPsec packet processing flow
The process works in three stages:
Interesting traffic detection: The router checks outgoing packets against an ACL. If the packet matches, it triggers the IPsec process.
IKE Phase 1: The two peers establish a secure management channel (ISAKMP SA) to protect the negotiation itself.
IKE Phase 2: Using the secure channel from Phase 1, the peers negotiate the actual IPsec SA that will encrypt user traffic.
IKE Phase 1
IKE Phase 1 creates a bidirectional ISAKMP Security Association between the two peers.
Think of it as the secure meeting room where both sides sit down and agree on how they will protect the actual data.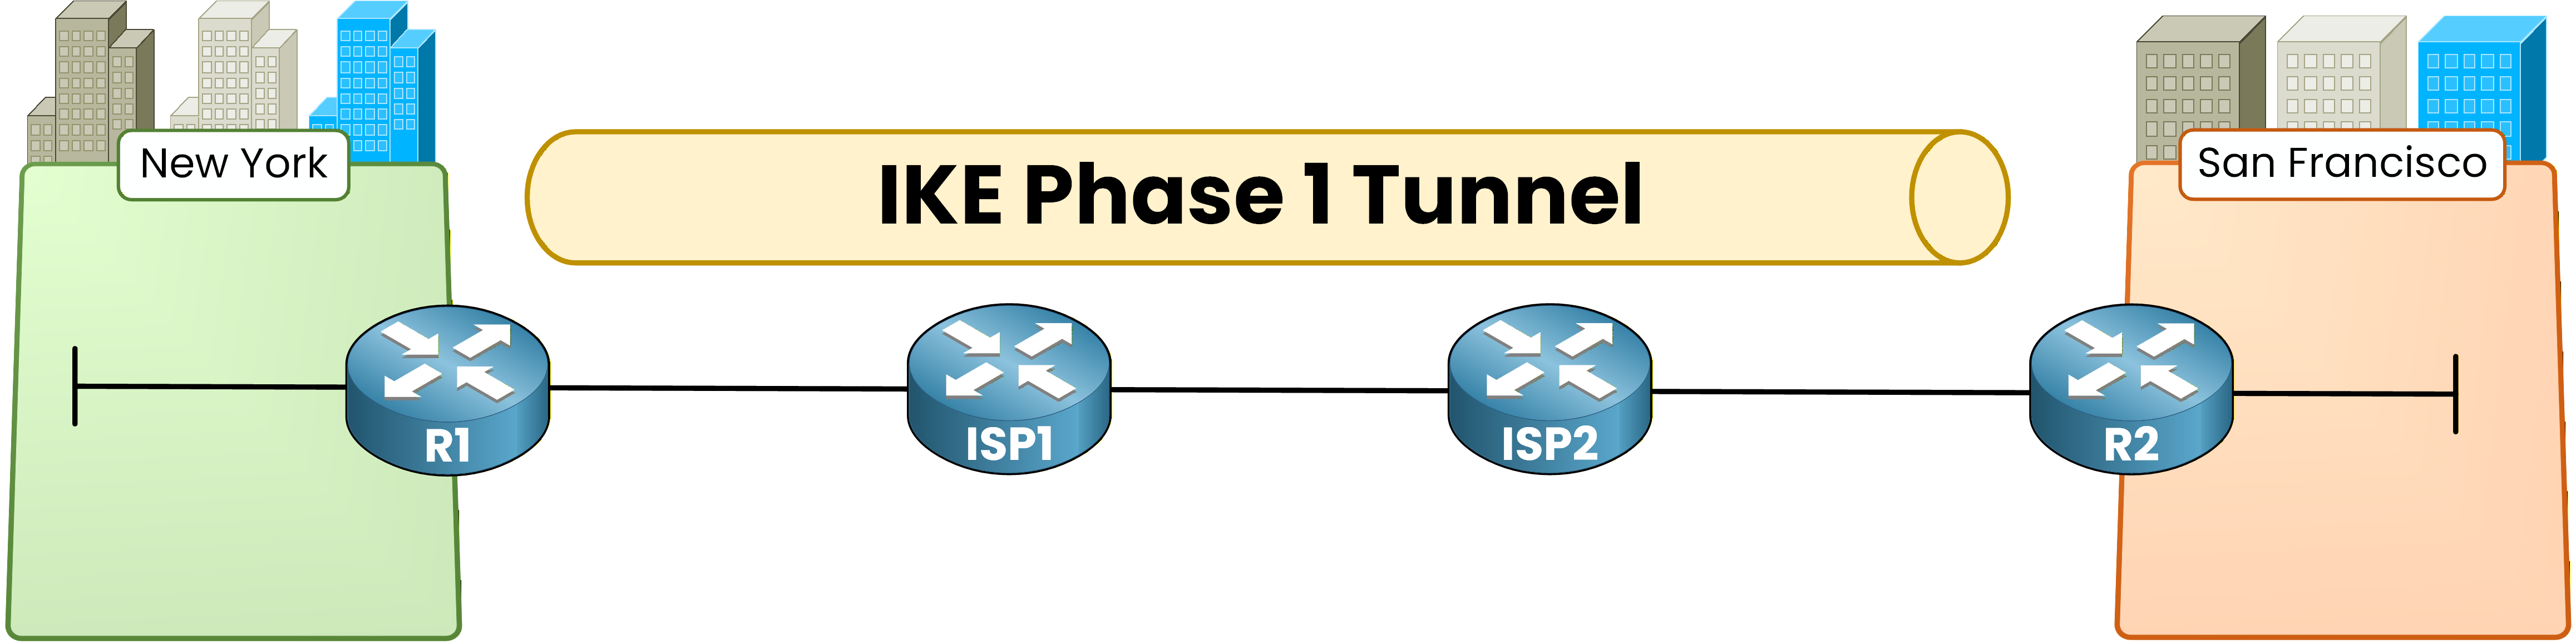
Figure 5 – IKE Phase 1 tunnel establishment
During Phase 1, the peers negotiate five parameters.
You need to know each one of them:Parameter
Purpose
Common Values
Encryption algorithm
Protects IKE messages
AES-128, AES-256
Hash algorithm
Ensures message integrity
SHA-256, SHA-384
Authentication method
Verifies peer identity
Pre-shared key, RSA certificates
DH group
Generates shared secret key
Group 14 (2048-bit), Group 19 (256-bit ECC)
Lifetime
Duration before renegotiation
86400 seconds (24 hours)
Both peers must agree on identical parameters for Phase 1 to succeed.
If there is a mismatch on any parameter, the negotiation fails.IKE Phase 2
Once Phase 1 is complete, the peers use the secure ISAKMP channel to negotiate the IPsec SA in Phase 2.
This SA defines how your actual user traffic will be encrypted.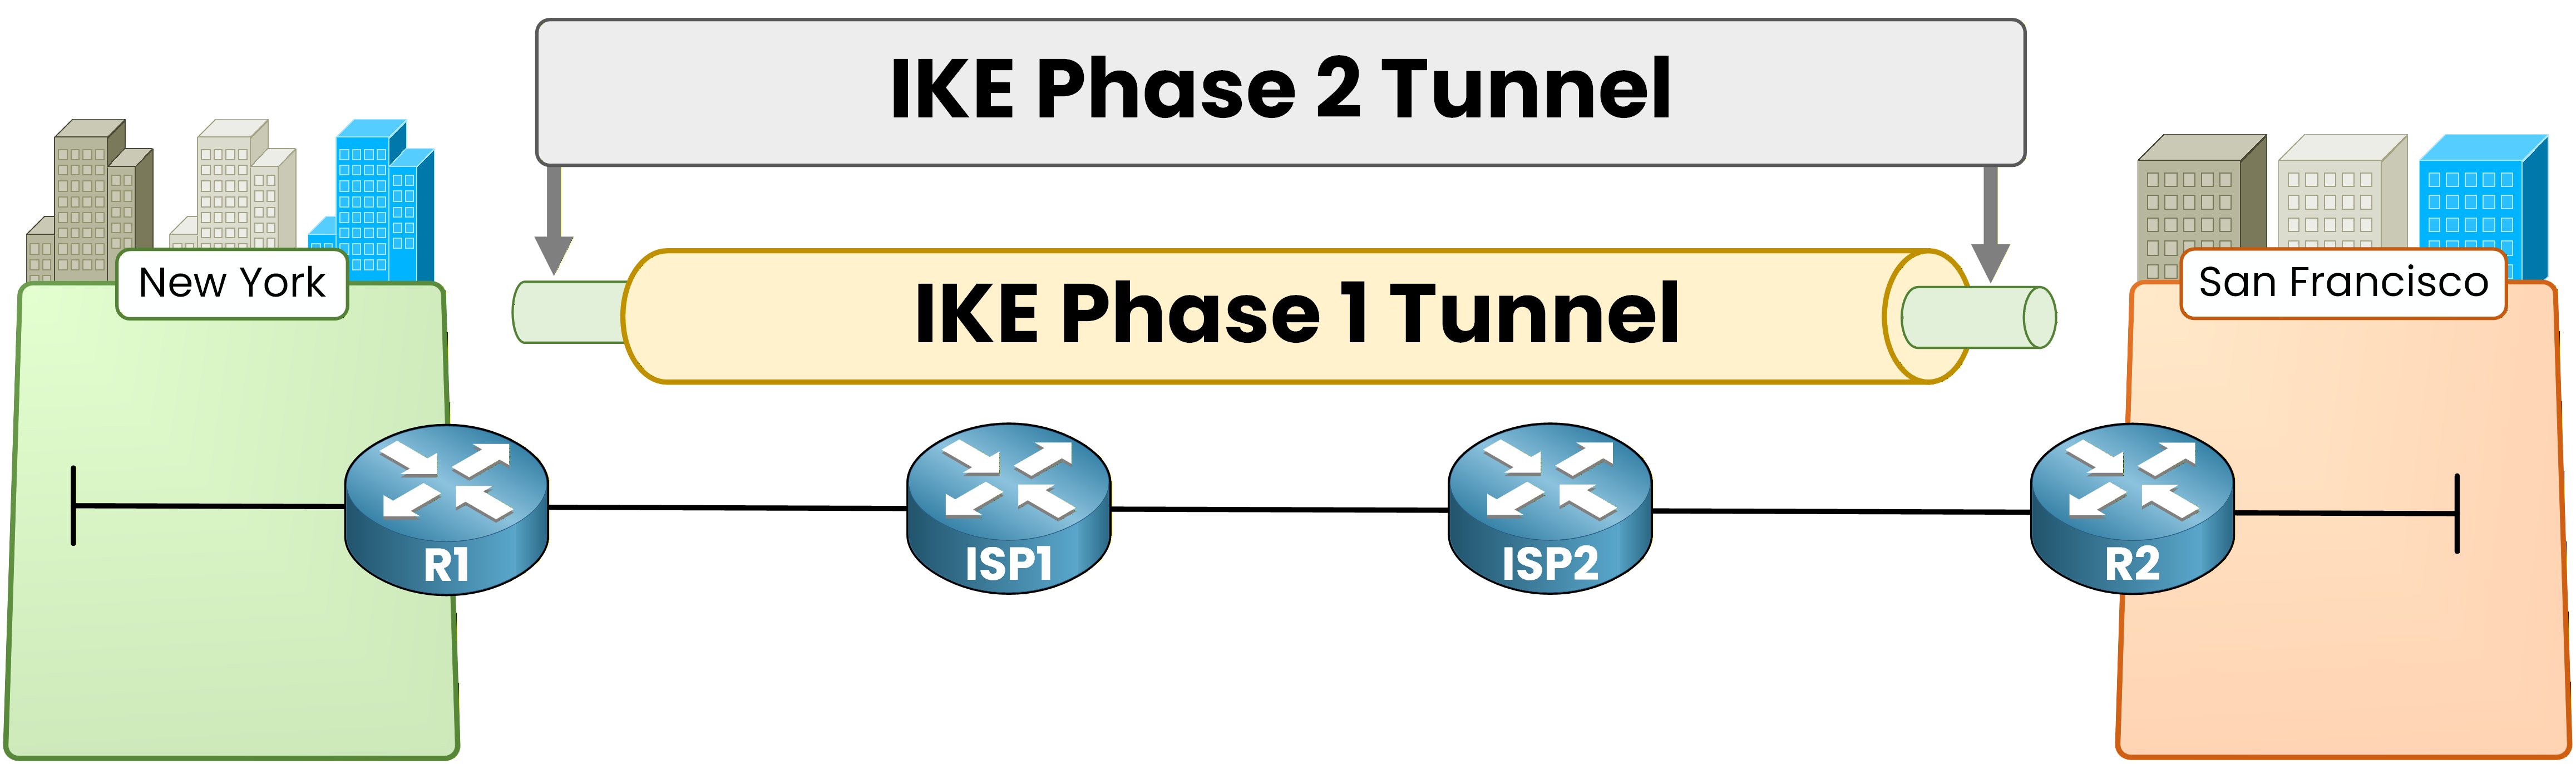
Figure 6 – IKE Phase 2 IPsec SA establishment
Phase 2 negotiates:
The transform set (encryption + integrity algorithms for user traffic, e.g., ESP-AES + ESP-SHA-HMAC)
The interesting traffic definition (which traffic flows will be protected)
The IPsec SA lifetime (how long before rekeying)
Answer the question below
How many phases does IKE use to establish an IPsec tunnel?
Before you can configure IPsec, the underlay must be working.
This lab uses the same topology and addressing as the GRE lesson.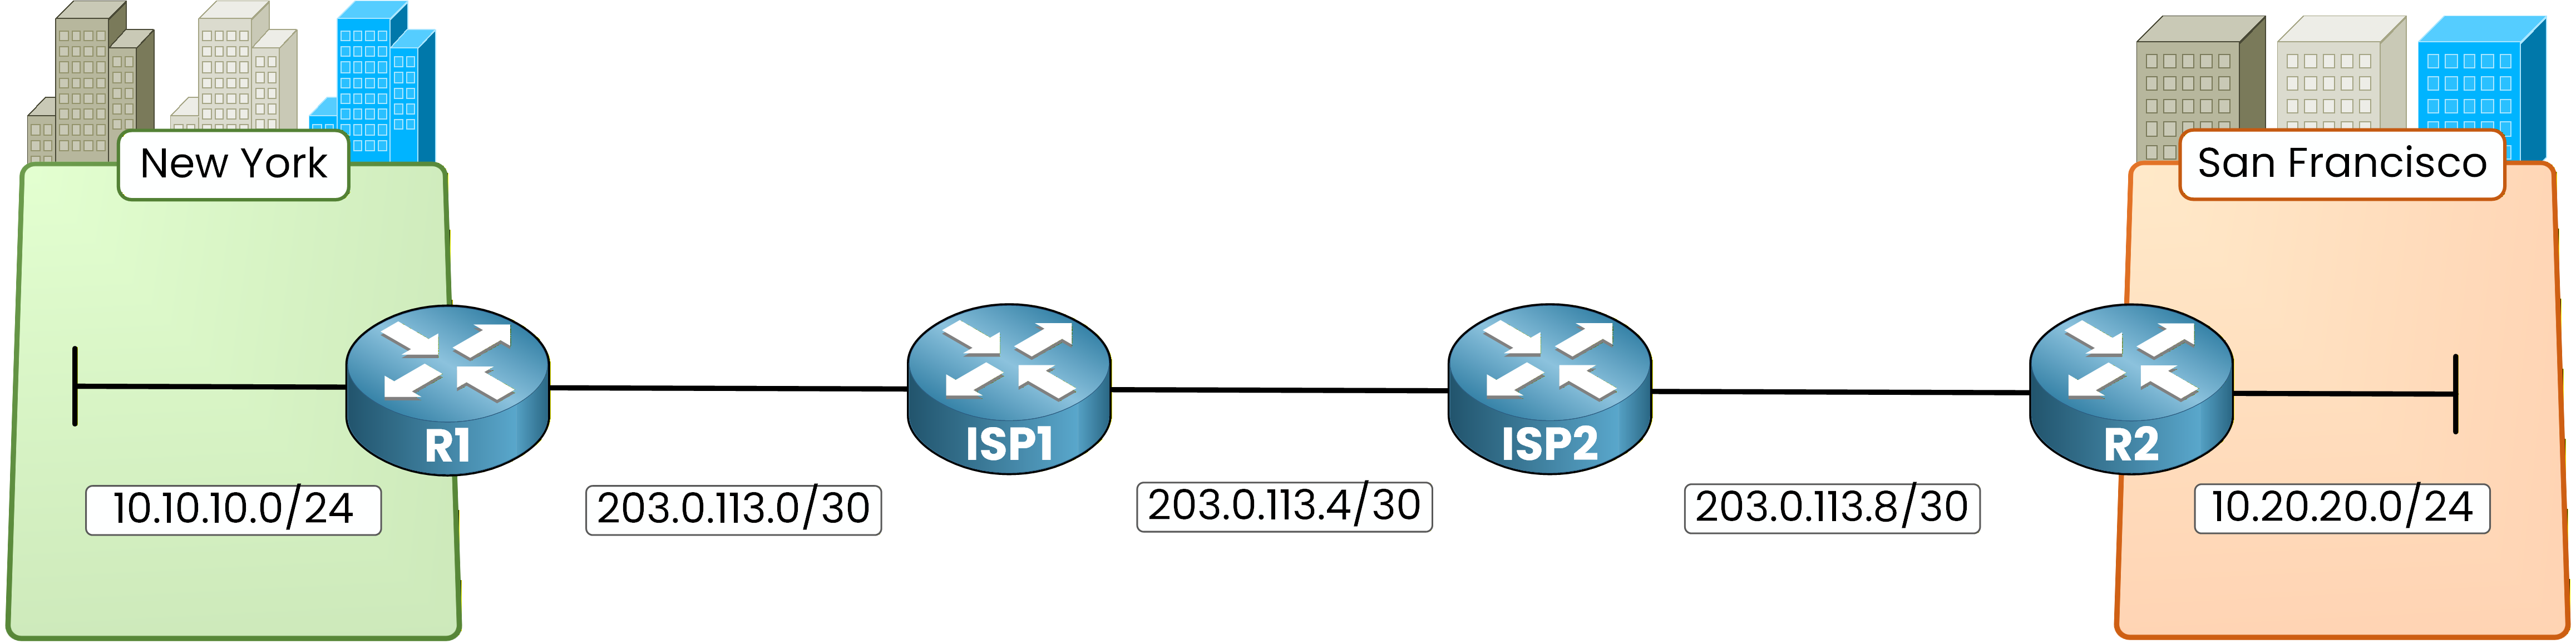
Figure 7 - IPsec lab topology
The routing is also identical: static routes on ISP1 and ISP2, and default routes on R1 and R2.

Figure 8 - Routing configuration on the IPsec topology
Here is a quick recap of the routing configuration:
ISP1# conf t
Enter configuration commands, one per line.  End with CNTL/Z.
ISP1(config)# ip route 203.0.113.8 255.255.255.252 203.0.113.6
Figure 9 - ISP2 static routing
ISP2# conf t
Enter configuration commands, one per line.  End with CNTL/Z.
ISP2(config)# ip route 203.0.113.0 255.255.255.252 203.0.113.5
Figure 10 - Default route configuration
R1(config)# ip route 0.0.0.0 0.0.0.0 203.0.113.2R2(config)# ip route 0.0.0.0 0.0.0.0 203.0.113.9At this point, R1 and R2 can reach each other's WAN interfaces through the ISP network.
Your underlay is ready. Now you can build the IPsec tunnel on top of it.Answer the question below
Why must R1 and R2 have WAN reachability before configuring IPsec?
Now that your routing is in place, you can configure the IPsec site-to-site VPN.
Figure 11 - IPsec site-to-site lab topology
The configuration follows a strict workflow with five steps.
Follow them in order.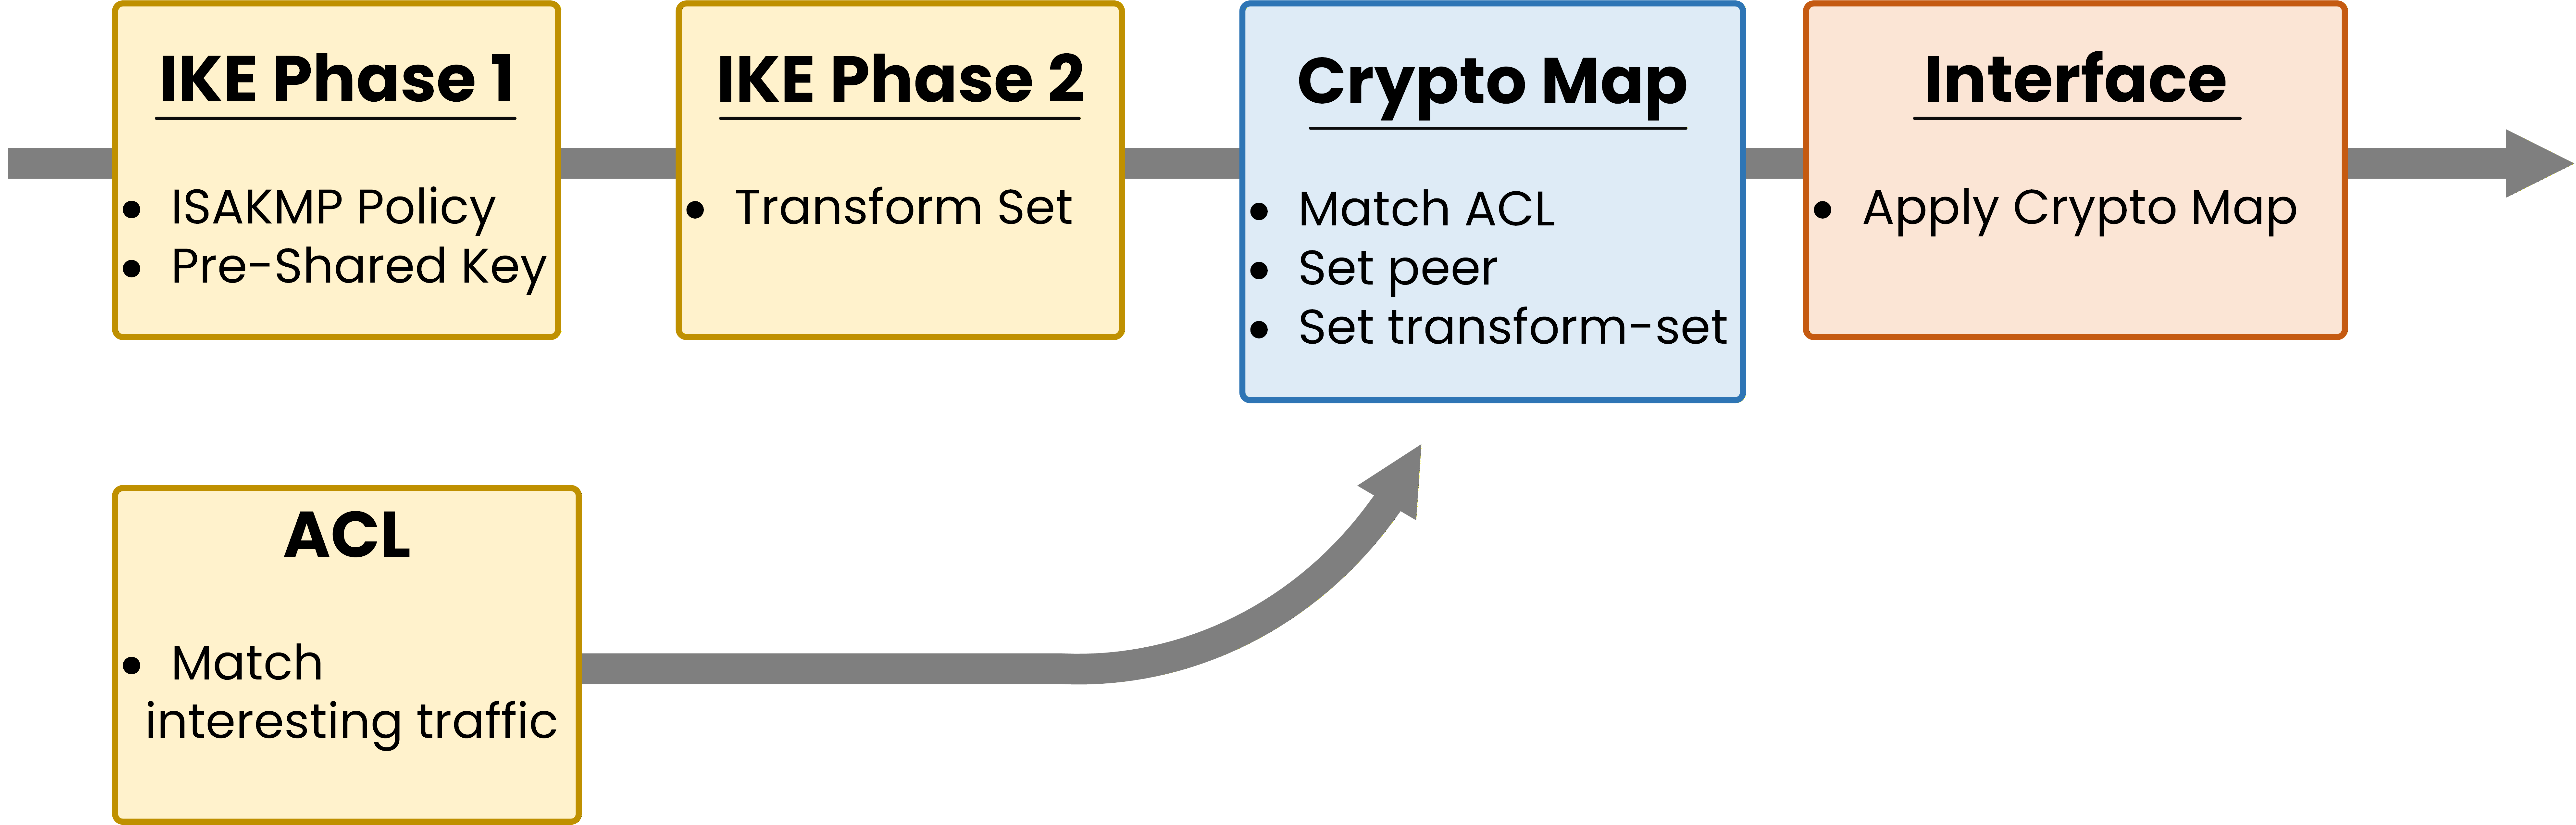
Figure 12 – IPsec configuration workflow
The five steps are:
Define interesting traffic (ACL)
Configure IKE Phase 1 (ISAKMP policy + pre-shared key)
Configure IKE Phase 2 (transform set)
Create the crypto map (ties everything together)
Apply the crypto map to the WAN interface
Step 1 — Define Interesting Traffic
First, you need to tell your router which traffic should be encrypted. This is called interesting traffic.
You define it with an extended ACL that matches the source and destination subnets.Any traffic matching this ACL triggers IPsec encryption.
Traffic that does not match travels in cleartext.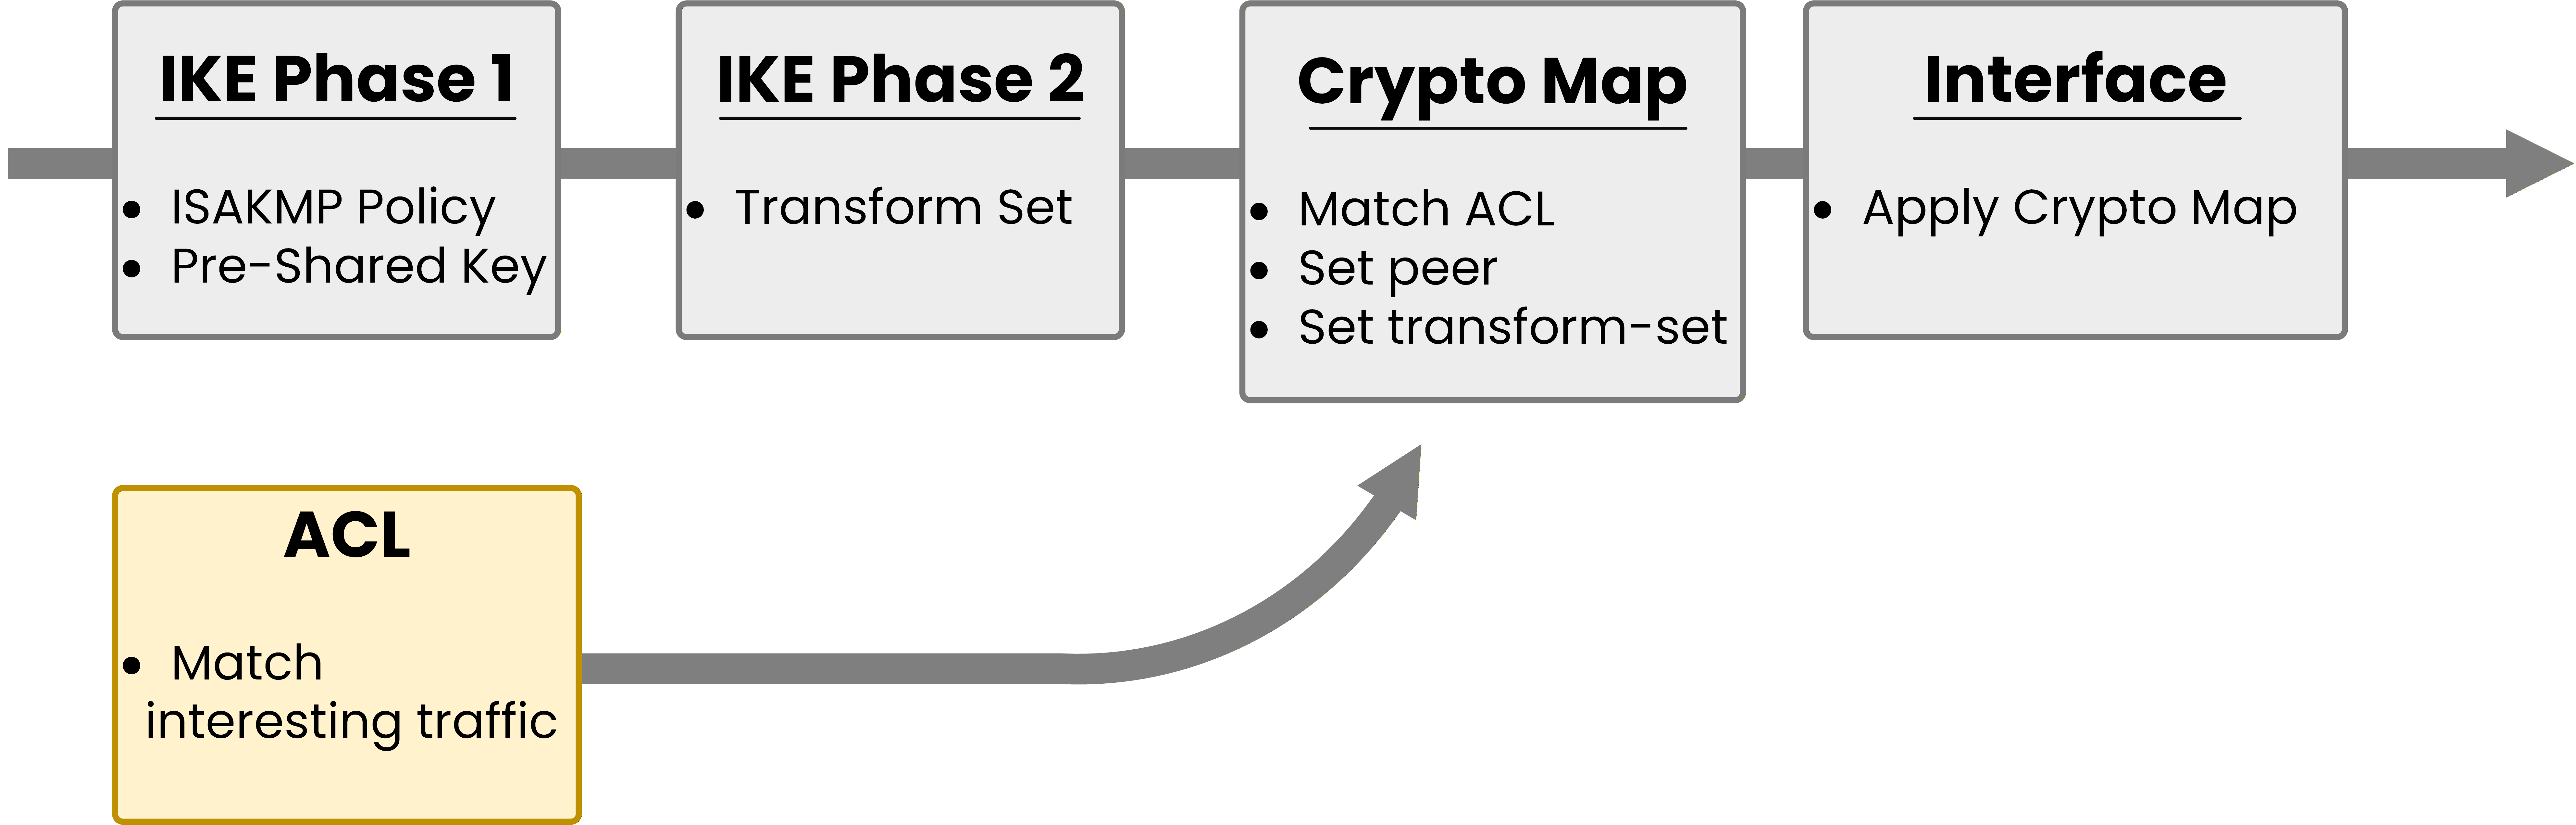
Figure 13 – ACL Configuration Step
R1:
R1(config)# access-list 100 permit 10.10.10.0 0.0.0.255 10.20.20.0 0.0.0.255R2:
R2(config)# access-list 100 permit 10.20.20.0 0.0.0.255 10.10.10.0 0.0.0.255Notice that the ACLs are mirrored. On R1, the source is 10.10.10.0/24 and the destination is 10.20.20.0/24. On R2, it is the opposite.
This is critical. If the ACLs do not mirror each other, the IPsec tunnel will not form for that traffic.
Step 2 — Configure IKE Phase 1
Next, you configure the secure management channel between R1 and R2.
You need two things: the ISAKMP policy (encryption, hash, authentication, DH group, lifetime) and the pre-shared key.40 % Complete: you’re making great progress
Ready to pass your CCNP exam?