When managing a network, you often need to control which traffic is allowed or denied.
A Standard Access Control List (ACL) filters IPv4 traffic solely based on the source IP address.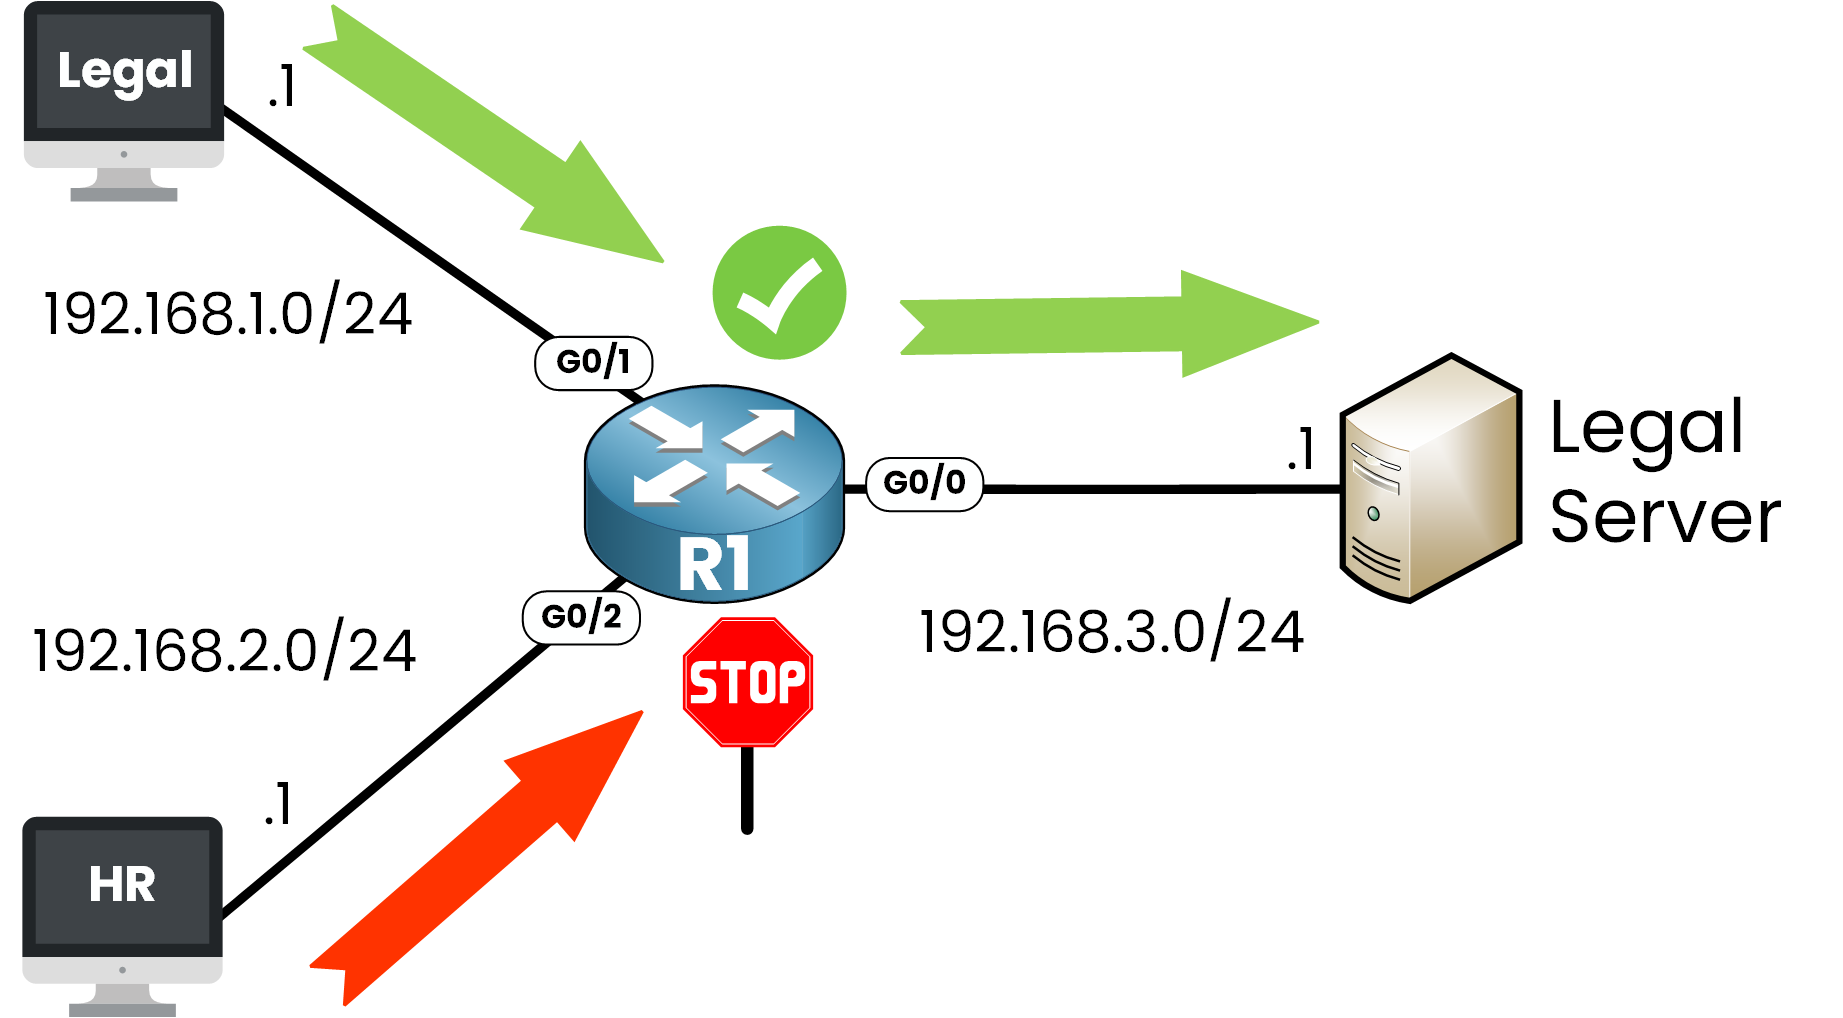
Figure 1 – Standard ACL Use Case
In the example above:
The Legal network (192.168.1.0/24) is allowed to access the Legal Server (192.168.3.1).
The HR network (192.168.2.0/24) is denied access to that same server.
This is a perfect use case for a Standard ACL: you only care about who is sending the traffic, not where it's going or what kind of traffic it is.
Answer the question below
What does a Standard ACL use to filter traffic?
Now that you understand what a Standard ACL is, let's walk through how to configure one step by step on a Cisco router.
Step 1 - Enter global configuration mode
R1# conf t
Enter configuration commands, one per line.  End with CNTL/Z.
Step 2 - Create the Standard ACL
To create a Standard ACL, use the ip access-list standard command.
R1(config)# ip access-list standard ?
  <1-99>        Standard IP access-list number
  <1300-1999>   Standard IP access-list number (expanded range)
  WORD          Access-list name
Here we choose the number 10, which is part of the valid ranges for Standard ACLs:
From 1 to 99 (classic range)
From 1300 to 1999 (expanded range)
R1(config)# ip access-list standard 10Step 3 - Permit the Legal network
We want to allow traffic from the 192.168.1.0/24 network.
Let's see the available options:
R1(config-std-nacl)# permit ?
  Hostname or A.B.C.D  Address to match
  any                  Any source host
  host                 A single host address
Here we choose to match a network address:
R1(config-std-nacl)# permit 192.168.1.0 ?
  A.B.C.D  Wildcard bits
  log      Log matches against this entry
We'll match the network using a wildcard mask:
R1(config-std-nacl)# permit 192.168.1.0 0.0.0.255This line matches any host from 192.168.1.0 to 192.168.1.255.
Why 0.0.0.255?
In ACLs, we don't use subnet masks, we use wildcard masks.
A wildcard mask is the inverse of a subnet mask. It tells the router which bits to ignore when comparing IP addresses.
R1(config-std-nacl)# permit 192.168.1.0 0.0.0.255Subnet Mask
Wildcard Mask
Matches
255.255.255.0
0.0.0.255
All IPs in a /24 subnet
255.255.255.255
0.0.0.0
One exact IP
Table 1 – Subnet Mask vs Wildcard Mask in ACLs
So:
permit 192.168.1.0 0.0.0.255 => allows the whole 192.168.1.0/24 network
permit 192.168.1.10 0.0.0.0 => allows only 192.168.1.10
Step 4 - Deny the HR network
Now we block all traffic from 192.168.2.0/24:
R1(config-std-nacl)# deny 192.168.2.0 0.0.0.255
R1(config-std-nacl)# end
This matches all IPs in the HR subnet and blocks them.
Normally, you don't need to write a deny: there's already an implicit deny any at the end of every ACL.
But here, we add it explicitly to show how to manually deny a specific subnet.Answer the question below
What mask type is used in ACL configuration?
Your ACL is now configured, but it won't do anything until you apply it to an interface.
Placement Strategy
Standard ACLs only filter based on the source IP address.
That's why the best practice is to apply them as close as possible to the destination.Why?
Because if you apply the ACL too early, you might block traffic before it reaches other parts of the network.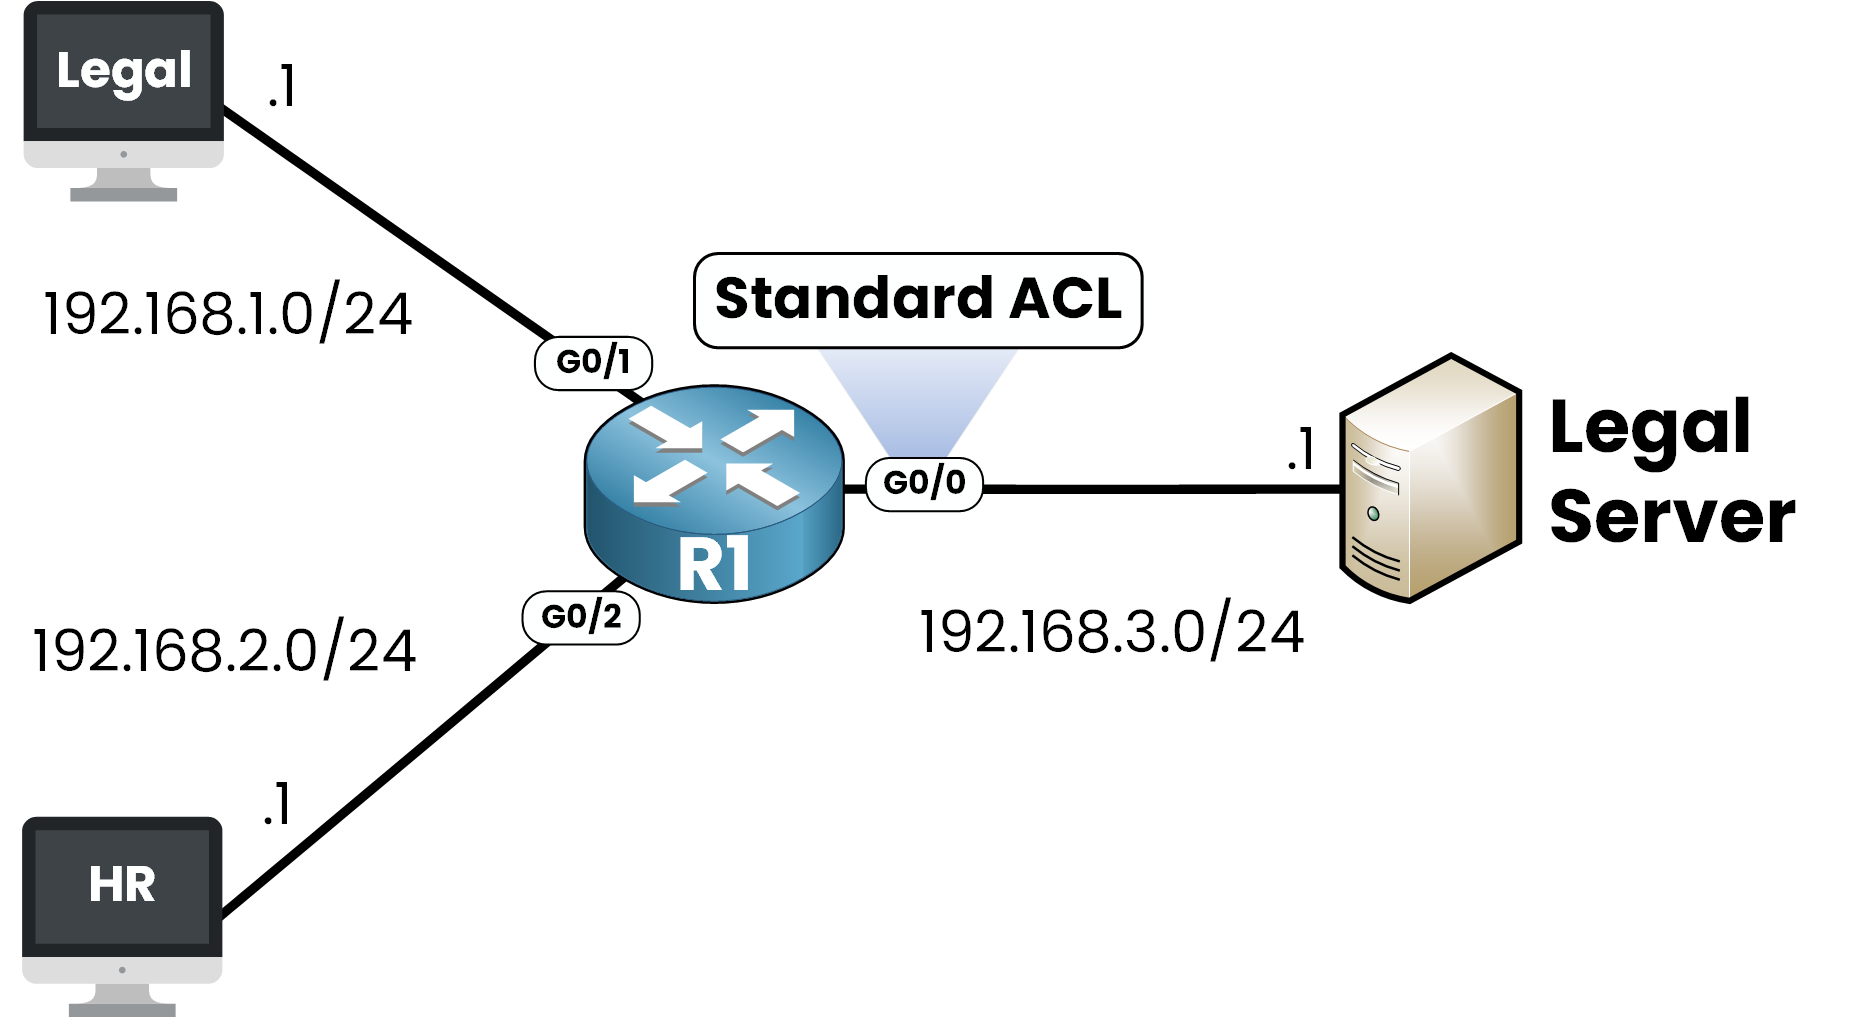
Figure 2 – Standard ACL Placement
In our example:
Legal network (192.168.1.0/24) is allowed
HR network (192.168.2.0/24) is denied
The Legal Server (192.168.3.1) is the destination
We'll apply the ACL on the interface G0/0, which connects to the destination server.
How to Apply the ACL
We will now apply the ACL number 10 that we previously created.
Step 1 - Enter interface configuration mode
R1(config)# int g0/0Step 2 - Check available ACL options
Use the ip access-group command. The router will show you the supported formats:
R1(config-if)# ip access-group ?
  <1-199>      IP access list (standard or extended)
  <1300-2699>  IP expanded access list (standard or extended)
  WORD         Access-list name
Step 3 - Apply ACL 10 in the outbound direction
Since traffic is going out toward the server, we apply it outbound:
R1(config-if)# ip access-group 10 ?
  in   inbound packets
  out  outbound packets
R1(config-if)# ip access-group 10 out
Summary
What to do
Why
Apply the ACL on the exit interface
Because Standard ACLs only check the source IP
Use ip access-group 10 out
To activate the ACL on outbound traffic
Table 2 – Applying a Standard ACL
Now your ACL is active and filtering traffic on the interface as expected.
Answer the question below
A Standard ACL should be placed as close as possible to what?
After applying your ACL, it's important to check that:
The ACL is correctly written
The ACL is correctly applied to the interface
Cisco provides two commands for this.
Step 1: Check the ACL content
Use the following command to view the ACL rules:
R1# show access-lists 10
Standard IP access list 10
    10 permit 192.168.1.0, wildcard bits 0.0.0.255
    20 deny   192.168.2.0, wildcard bits 0.0.0.255
This confirms that:
ACE 10: Traffic from 192.168.1.0/24 is allowed
ACE 20: Traffic from 192.168.2.0/24 is blocked
Step 2: Check if the ACL is applied to the interface
Use the following command to verify that the ACL is actually active on the router's interface:
R1# show ip interface g0/0
GigabitEthernet0/0 is up, line protocol is up
  Internet address is 192.168.3.254/24
  Broadcast address is 255.255.255.255
  Address determined by setup command
  MTU is 1500 bytes
  Helper address is not set
  Directed broadcast forwarding is disabled
  Outgoing access list is 10
  Inbound  access list is not set
  Proxy ARP is enabled
// OUTPUT OMITTED FOR BREVITY
This confirms that:
The ACL number 10 is applied in the outbound direction
It is active on interface G0/0, which connects to the destination server
Answer the question below
Which command shows the ACL applied on an interface?
Let's summarize what you should remember about Standard ACLs.
Key Concept
Description
What it filters
Only the source IP address
Cannot filter
Destination IP, protocols, or ports
Best placement
As close as possible to the destination
Rule evaluation
Top to bottom, the first match wins
Default behavior
Ends with an implicit deny all
Number range
1–99 or 1300–1999
Table 3 - Standard ACL Summary
A Standard ACL is ideal when you only need to control who can send traffic, without considering where it's going or what type of traffic it is.
Now that you've mastered Standard ACLs, the next step is to explore Extended ACLs, which let you filter traffic based not only on the source IP address, but also on the destination, protocol, and port number.
Answer the question below
What is the number range for Standard ACLs?