OSPF Passive Interface allows you to disable the sending of Hello packets on a specific interface.
It sounds useful, but why would someone actually need to do that?
By default, OSPF sends Hello packets on all interfaces included in the OSPF Routing Process.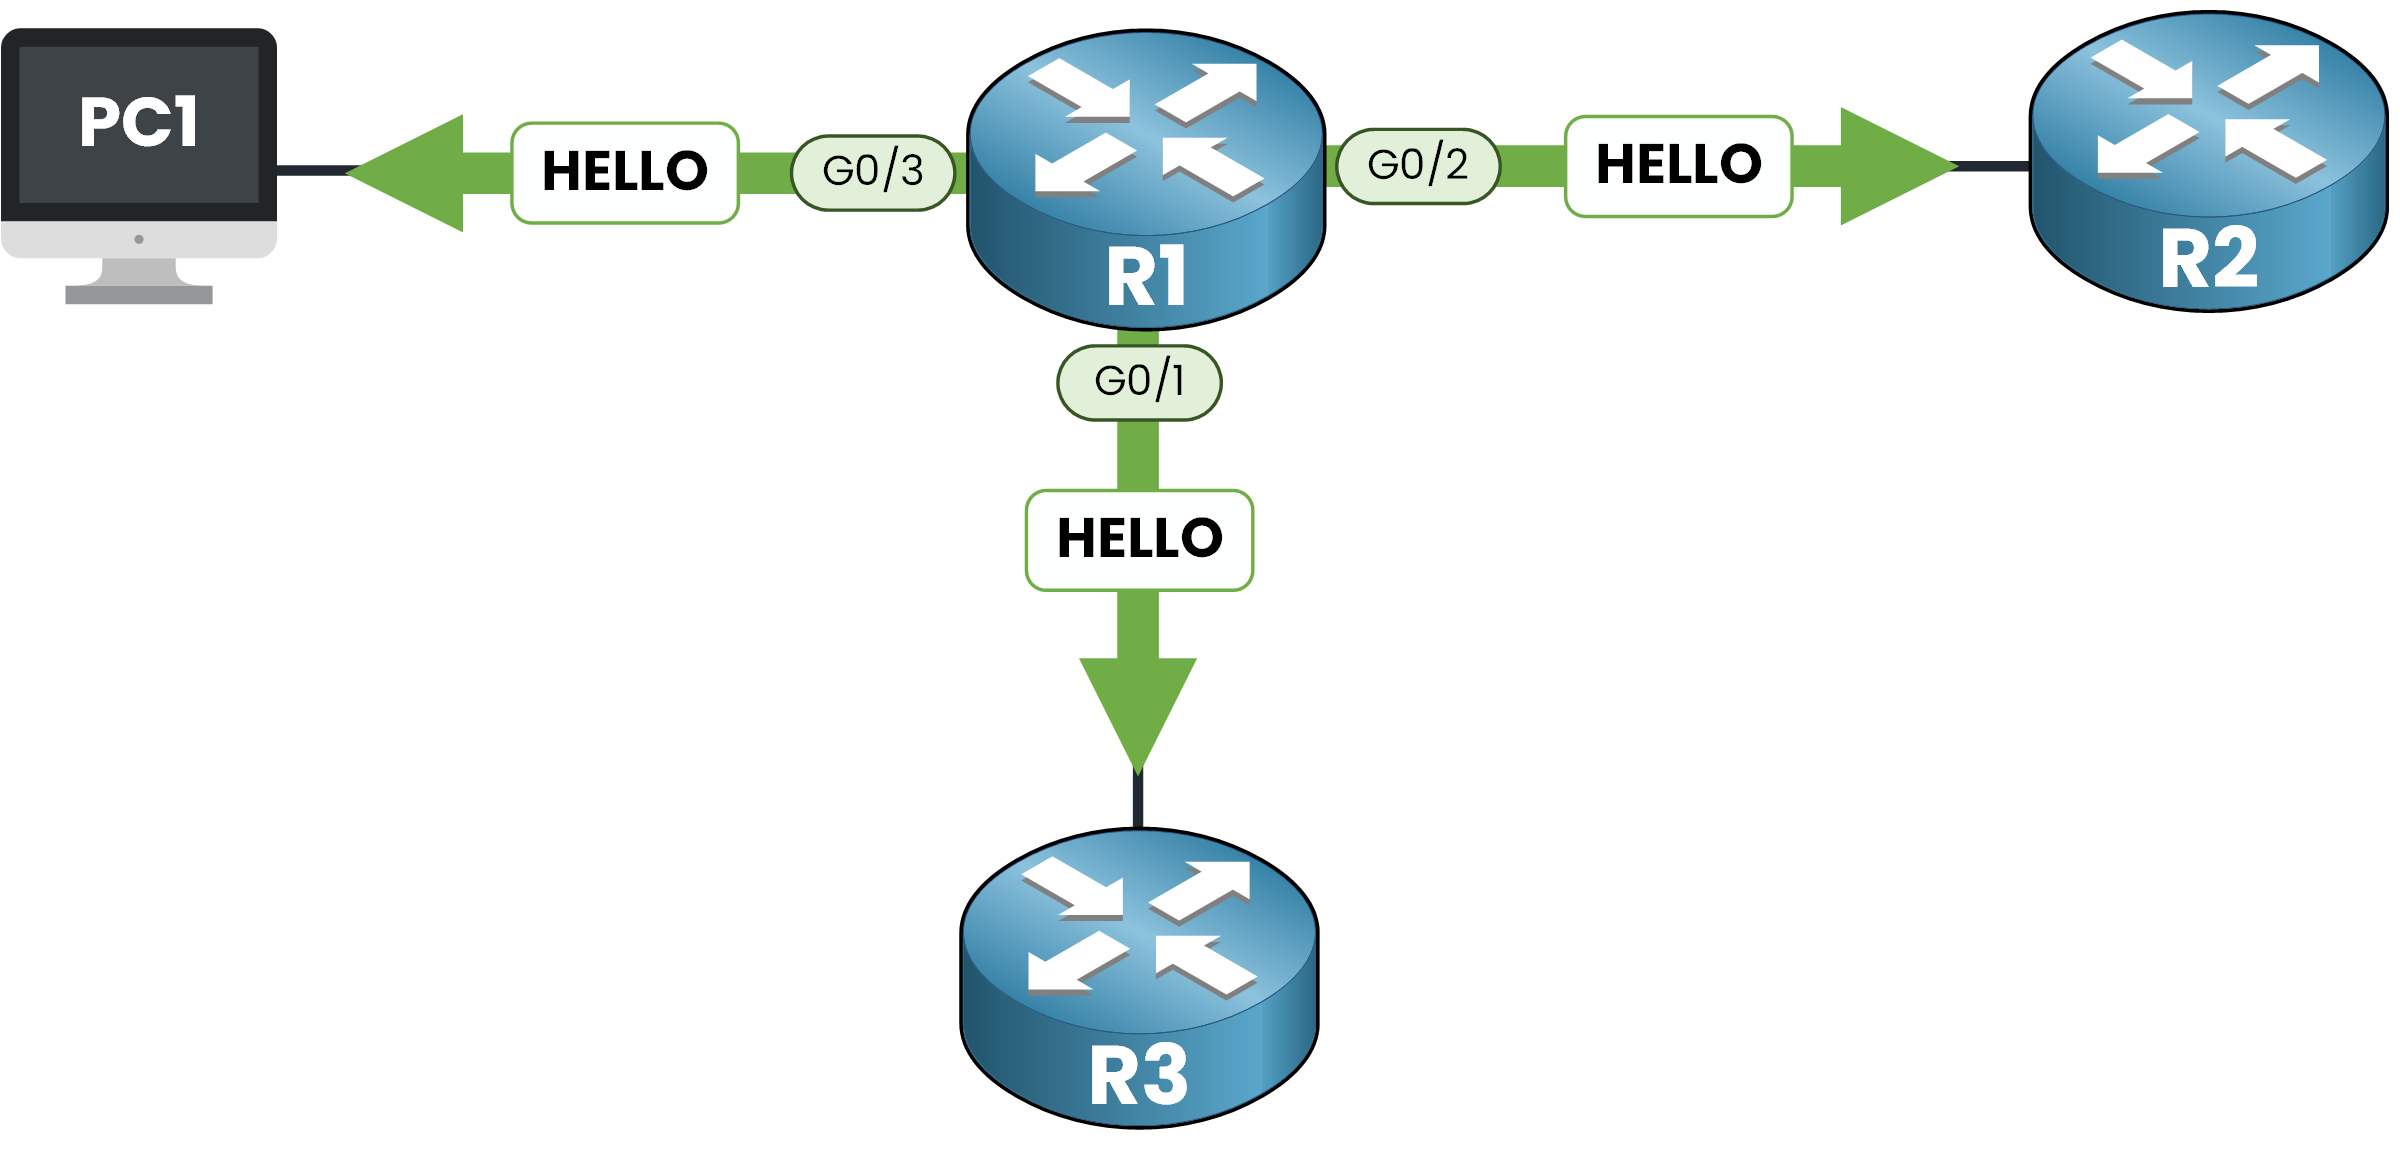
Figure 1 – OSPF Sending Hello Packets on All Interfaces by Default
However, not every interface needs to form OSPF neighbor relationships.
Take for example an interface connected to an end host, like PC1 in our diagram. There's no router on the other side, so forming a neighbor relationship is unnecessary. Sending Hello packets in that case is simply a waste of resources.
Here's the catch:
If you completely disable OSPF on the interface, the subnet will no longer be advertised and that breaks OSPF routing.That's where the Passive Interface feature comes in: it lets you keep the subnet in the OSPF database while preventing neighbor formation on that interface.
Answer the question below
A passive interface stops OSPF from sending which packets?
If we activate the passive interface on GigabitEthernet0/3, the interface facing PC1, what happens?
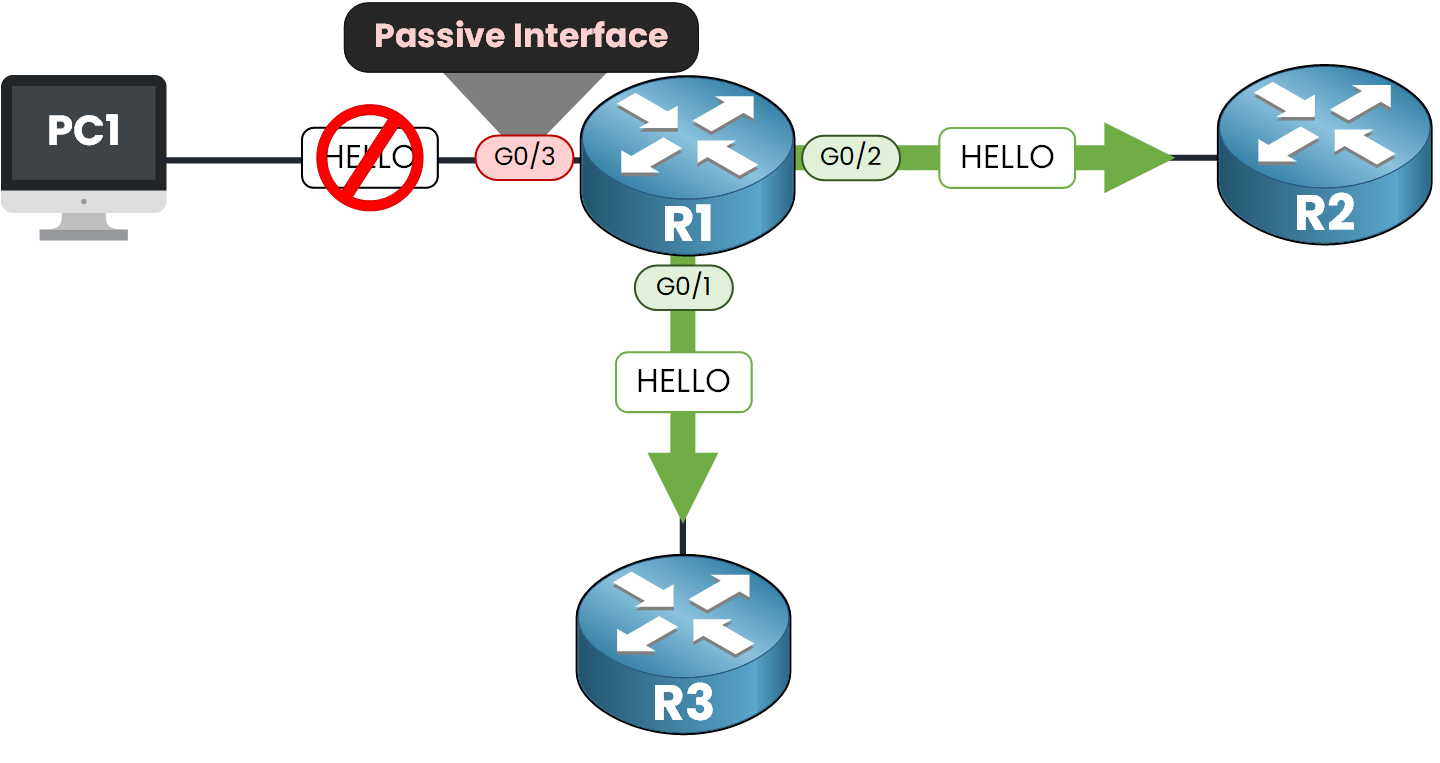
Figure 2 – OSPF Passive Interface Preventing Hello Packets on G0/3
✅ The subnet 192.168.10.0/24 is still shared with other routers through OSPF.
❌ R1 does not send Hello packets on interface G0/3.
❌ If R1 receives Hello packets on G0/3, it ignores them.
❌ R1 does not form any OSPF neighbor on this interface.This behavior is exactly what we want for interfaces that connect to end devices, not to other routers.
Now let's move on to the configuration on a Cisco router.Answer the question below
On a passive interface, is the subnet still advertised?
In this lab, we'll configure GigabitEthernet0/3 on Router R1 as a passive OSPF interface.
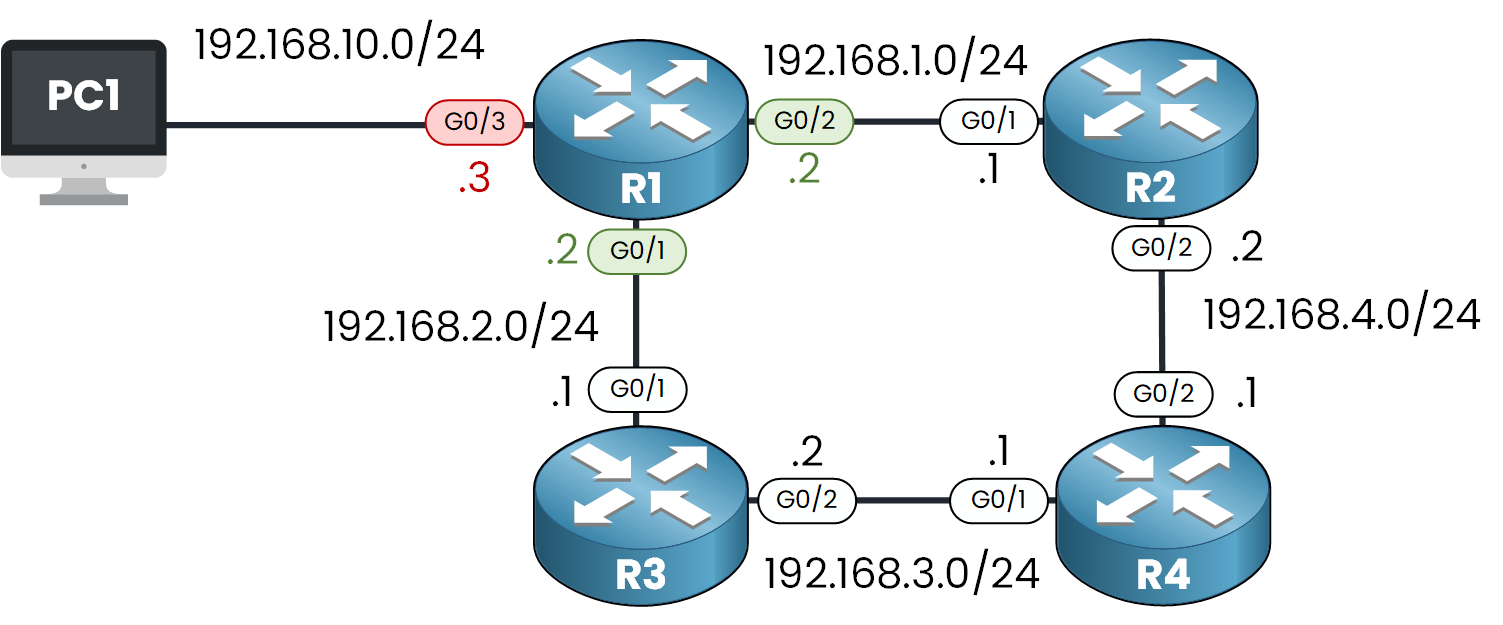
Figure 3 - Topology used to configure OSPF Passive Interface
Before changing anything, we need to verify what networks are included in the OSPF process.
R1# show run | s ospf
router ospf 1
 log-adjacency-changes
 network 192.168.1.0 0.0.0.255 area 0
 network 192.168.2.0 0.0.0.255 area 0
 network 192.168.10.0 0.0.0.255 area 0
In this case, interface G0/3 is already part of OSPF.
Configure OSPF Passive Interface
There are two main methods to configure Passive Interfaces in OSPF:
Method 1 – Per Interface
The first method is ideal when you want to manually select an individual interface to be passive.
In our case, we want to configure GigabitEthernet0/3 (connected to PC1) as passive.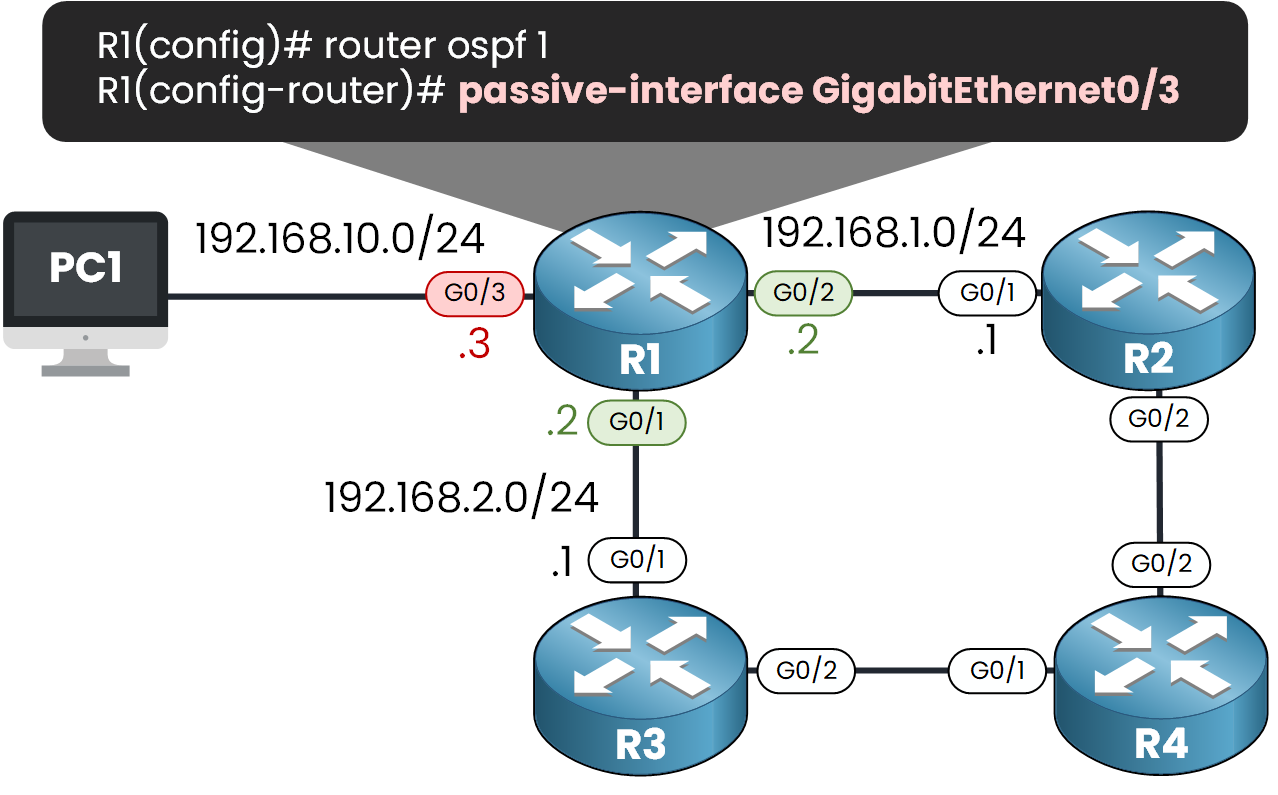
Figure 4 – Configuring OSPF Passive Interface on G0/3 Manually
R1# conf t
Enter configuration commands, one per line.  End with CNTL/Z.
R1(config)# router ospf 1
R1(config-router)# passive-interface g0/3
R1(config-router)# end
We can now verify the passive status:
R1# show ip ospf int G0/3

GigabitEthernet0/3 is up, line protocol is up
  Internet address is 192.168.10.3/24, Area 0
  Process ID 1, Router ID 172.16.1.0, Network Type BROADCAST, Cost: 1
  Transmit Delay is 1 sec, State WAITING, Priority 1
  No designated router on this network
  No backup designated router on this network
  Timer intervals configured, Hello 10, Dead 40, Wait 40, Retransmit 5
    No Hellos (Passive interface)
  Index 3/3, flood queue length 0
  Neighbor Count is 0, Adjacent neighbor count is 0
You can see the line
No Hellos (Passive interface)confirms that the interface is passive. The subnet is still advertised, but no OSPF neighbor is formed on that interface.Method 2 – Default All Passive, Then Exclude Interfaces
This method is efficient when most interfaces should be passive. We start by making all interfaces passive:
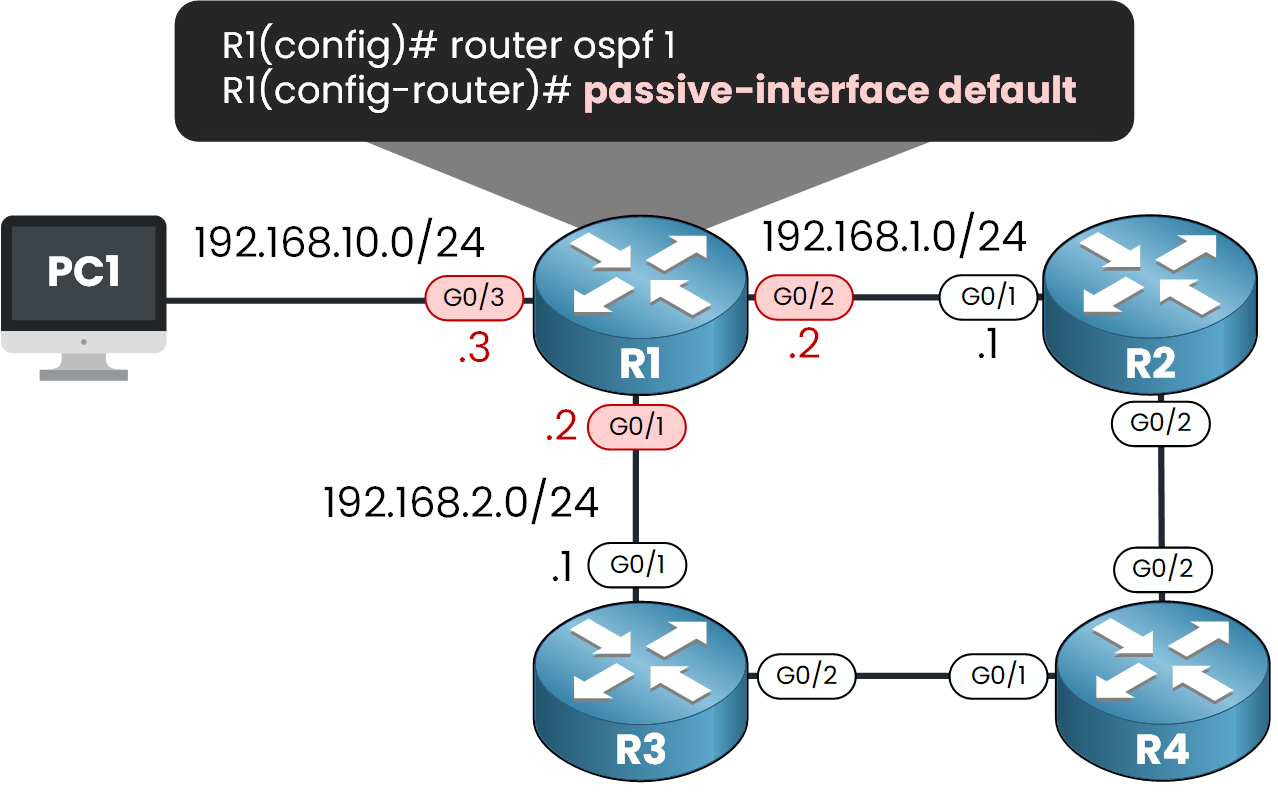
Figure 5 – OSPF Passive-Interface Default: All Interfaces Made Passive
R1# conf t
Enter configuration commands, one per line.  End with CNTL/Z.
R1(config)# router ospf 1
R1(config-router)# passive-interface default
R1(config-router)# end
In the console output we can see that we just lost the OSPF adjacency with the two neighbors R2 and R3:
%OSPF-5-ADJCHG: Process 1, Nbr 192.168.3.2 on GigabitEthernet0/1 from FULL to DOWN, Neighbor Down: Interface down or detached
%OSPF-5-ADJCHG: Process 1, Nbr 192.168.4.2 on GigabitEthernet0/2 from FULL to DOWN, Neighbor Down: Interface down or detached
Then we can reactivate interfaces G0/2 and G0/1, which face the OSPF neighbors:
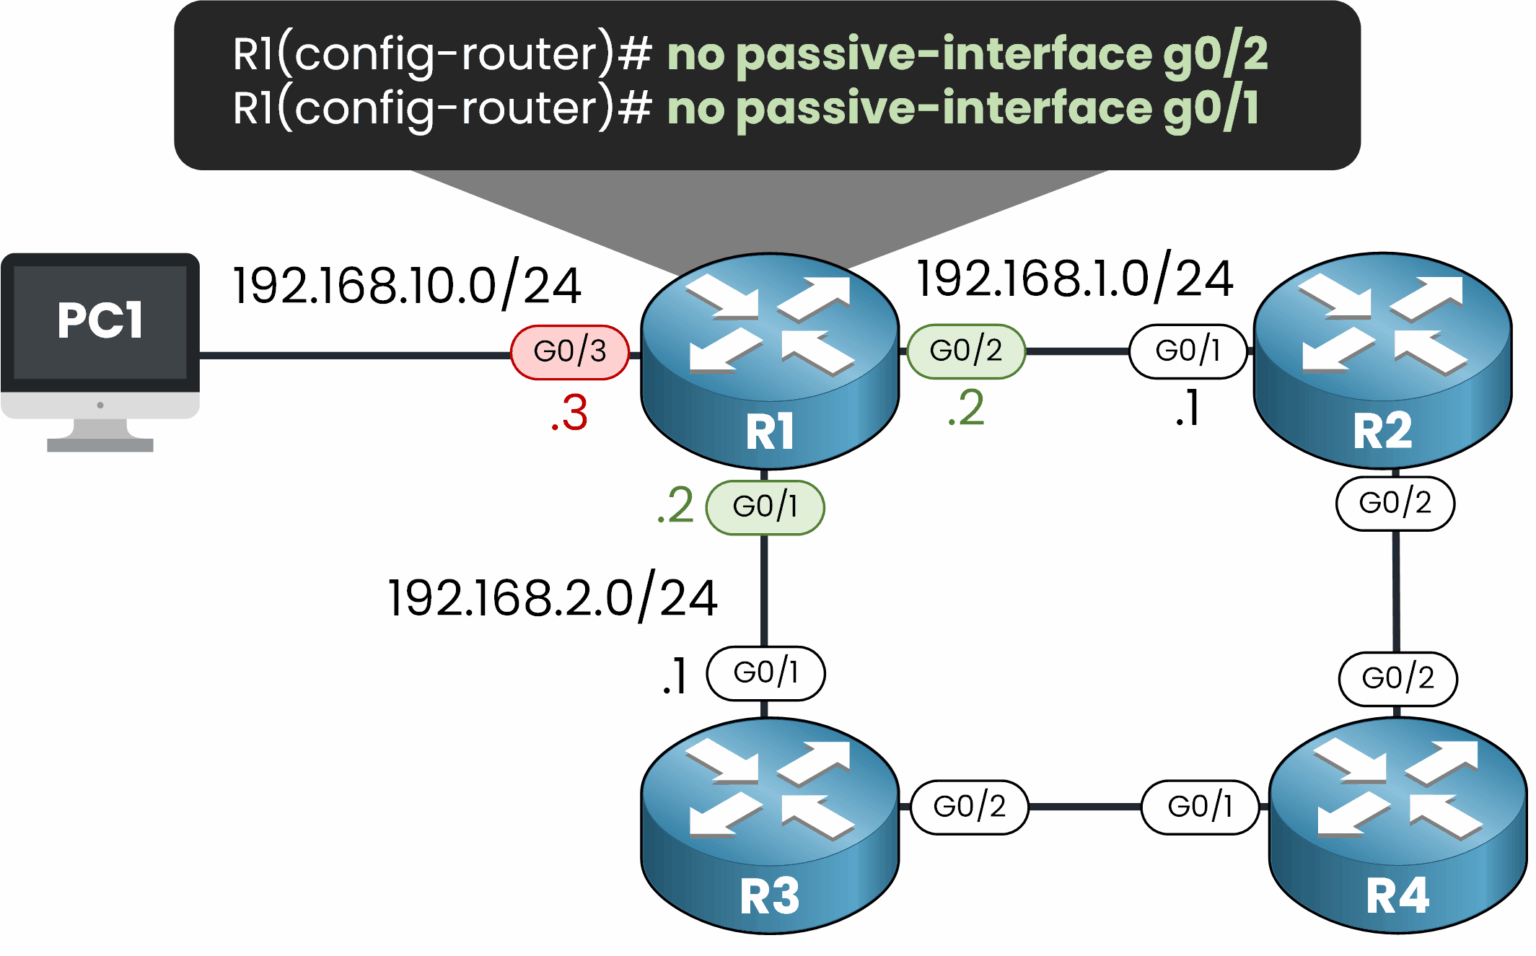
Figure 6 – Reactivating OSPF on Interfaces G0/2 and G0/1 with "no passive-interface"
R1(config-router)# no passive-interface g0/2
R1(config-router)# no passive-interface g0/1

%OSPF-5-ADJCHG: Process 1, Nbr 192.168.3.2 on GigabitEthernet0/1 from LOADING to FULL, Loading Done
%OSPF-5-ADJCHG: Process 1, Nbr 192.168.4.3 on GigabitEthernet0/2 from LOADING to FULL, Loading Done
OSPF adjacencies are restored normally.
We can check the OSPF neighbor table:
R1(config-router)# end
R1# show ip ospf neighbor

Neighbor ID     Pri   State          Dead Time   Address      Interface
192.168.4.2     1     FULL/DR        00:00:37    192.168.1.1  GigabitEthernet0/2
192.168.3.2     1     FULL/DROTHER   00:00:38    192.168.2.1  GigabitEthernet0/1
Everything is working as expected. The two OSPF interfaces facing R2 and R3 are enabled again.
Answer the question below
Which IOS command makes all OSPF interfaces passive at once?
🔹 OSPF Passive Interface Feature
The OSPF Passive Interface feature disables the sending and receiving of Hello packets on a specific interface, while still advertising the connected subnet in the OSPF process.
🔹 When to Use this feature :
When the interface is connected to an end device (like a PC or server).
When you don't want OSPF neighbors on that link, but still want the network to be reachable in OSPF.
🔹 How to Configure It
Method 1 – On a specific interface:
R1# conf t
Enter configuration commands, one per line.  End with CNTL/Z.
R1(config)# router ospf 1
R1(config-router)# passive-interface g0/3
R1(config-router)# end
Method 2 – Default all interfaces to passive, then allow neighbors where needed:
R1# conf t
Enter configuration commands, one per line.  End with CNTL/Z.
R1(config)# router ospf 1
R1(config-router)# passive-interface default
R1(config-router)# no passive-interface G0/1
R1(config-router)# no passive-interface G0/2
R1(config-router)# end
Answer the question below
Click 'Complete' to continue