In this lesson, you will configure DHCP on a Cisco router so that devices in the LAN can automatically obtain their IP addressing information. You will also learn how to verify DHCP assignments and test the behavior of the DHCP server.
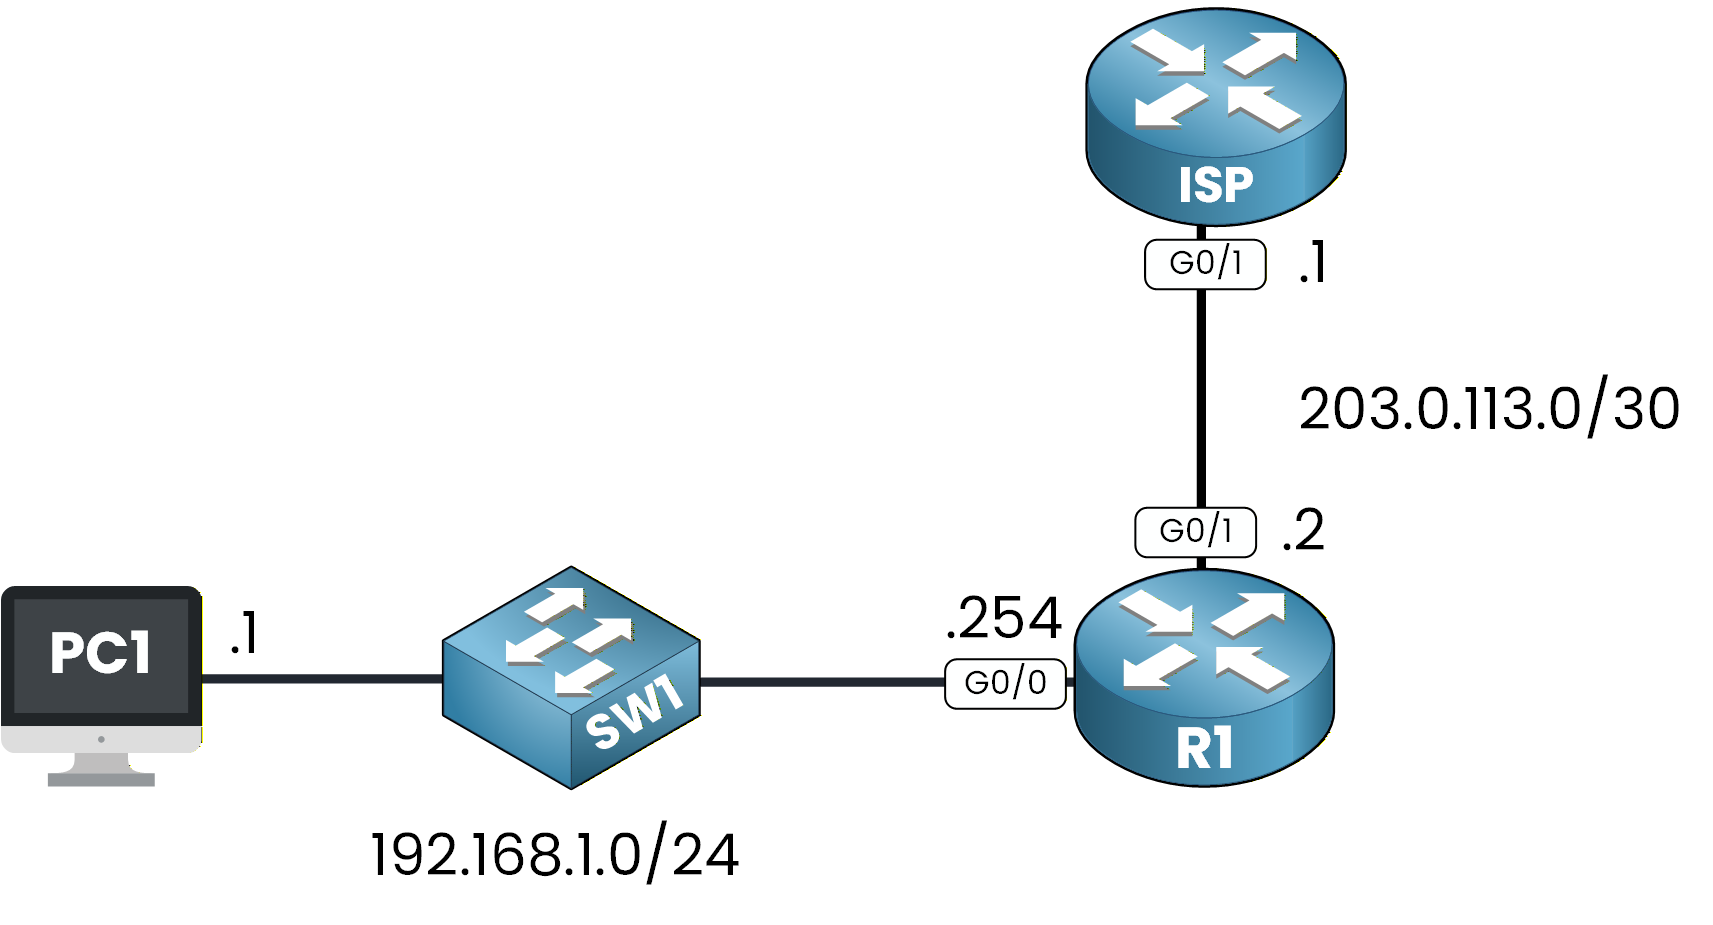
Figure 1 - DHCP Configuration Topology
This is the network topology we will use throughout the lesson.
Answer the question below
Click 'Complete' to continue
The LAN Side
In this first task, you are the network administrator of the internal LAN.
Your objective is to configure a DHCP pool that will automatically assign IP addresses to users in the 192.168.1.0/24 network.Before we configure anything, look at the topology:
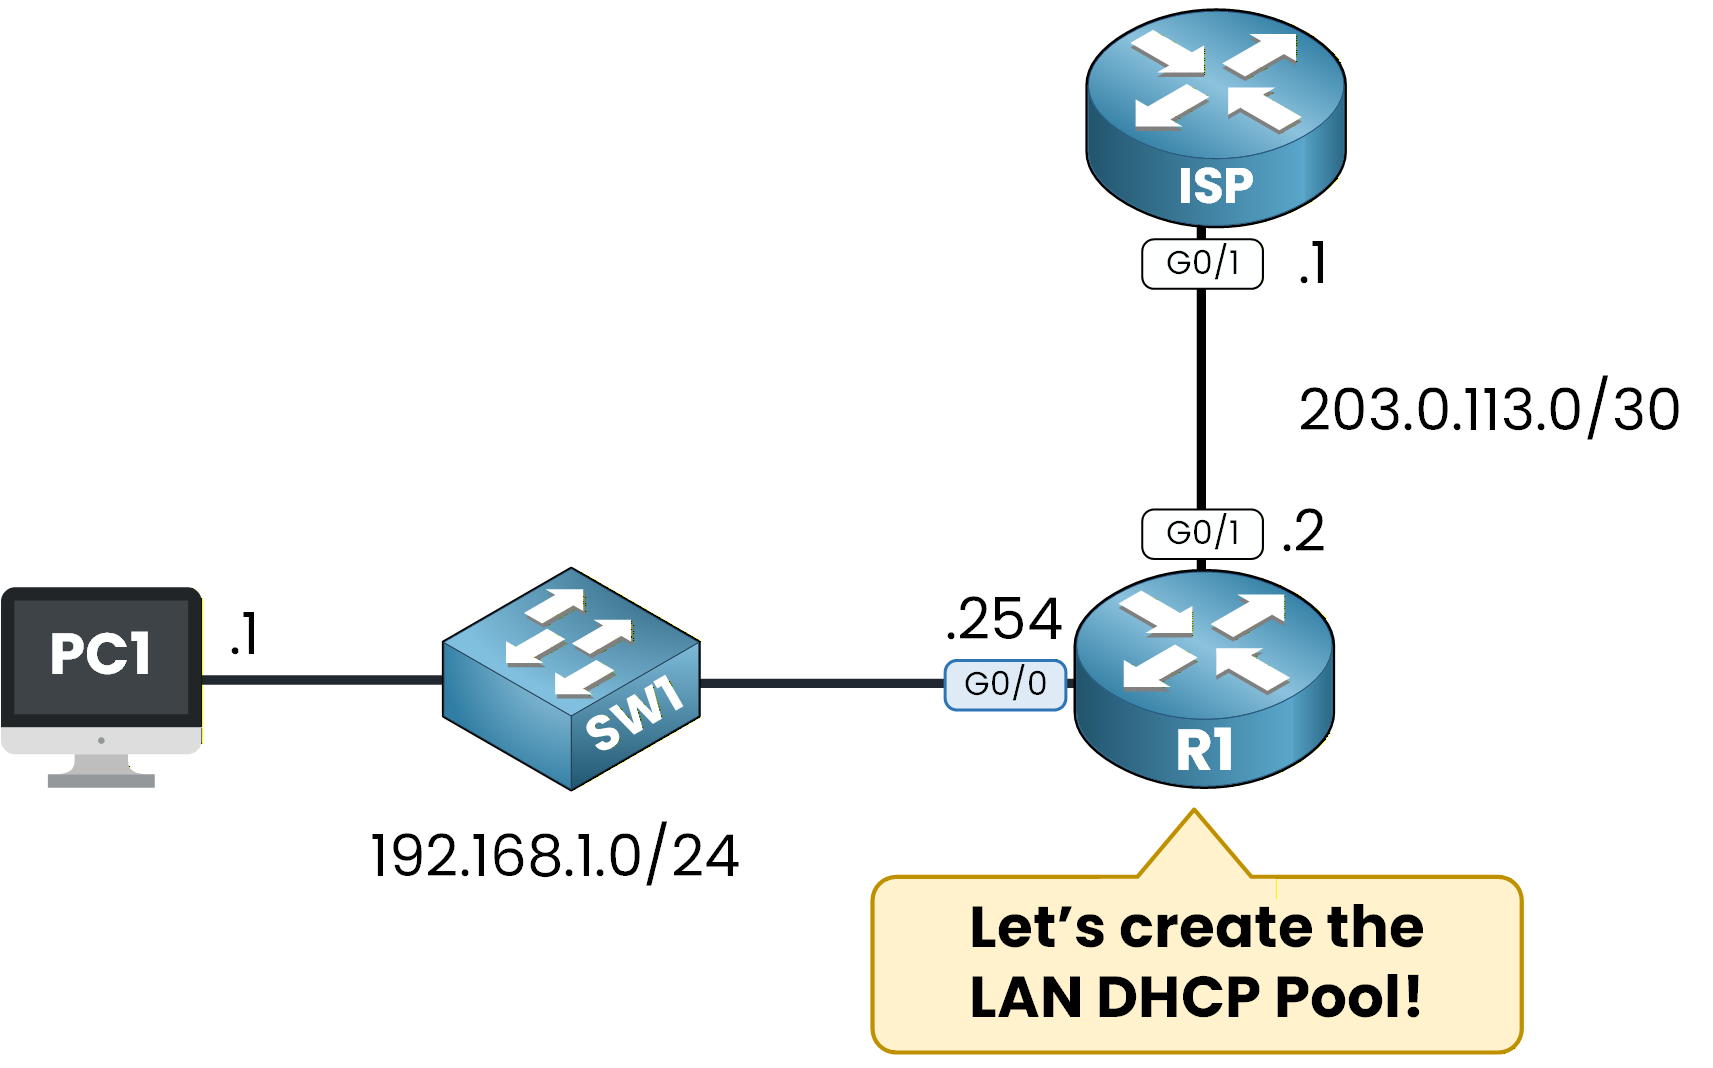
Figure 2 - DHCP Topology
The LAN has:
PC1 in the 192.168.1.0/24 network
SW1 acting as a Layer 2 switch
R1 acting as the default gateway (192.168.1.254)
We want R1 to serve as the DHCP server for this network.
Exclude Reserved IP Addresses
In every network, some IP addresses must remain reserved.
These addresses are used by devices that require a static IP address, such as:routers
servers
printers
To prevent IP conflicts, these addresses must be excluded from the DHCP scope.
In our lab, the only reserved IP is the default gateway: 192.168.1.254.Here is how you define it:
R1# conf t
Enter configuration commands, one per line.  End with CNTL/Z.
R1(config)# ip dhcp ?
  excluded-address  Prevent DHCP from assigning certain addresses
  pool              Configure DHCP address pools
  relay             DHCP relay agent parameters

R1(config)# ip dhcp excluded-address 192.168.1.254
This ensures that 192.168.1.254 will never be assigned to a client.
Create the DHCP Pool
Now we create the DHCP pool that will assign IP addresses to clients.
A DHCP pool is simply a named configuration where you define the settings the router will provide to DHCP clients.Before creating it, let’s look at the available DHCP commands:
R1(config)# ip dhcp ?
  excluded-address  Prevent DHCP from assigning certain addresses
  pool              Configure DHCP address pools
  relay             DHCP relay agent parameters
To create a pool, you must give it a name.
The router guides you:R1(config)# ip dhcp pool ? WORD Pool nameWe will name it LAN_POOL, because this pool will serve our internal LAN:
R1(config)# ip dhcp pool LAN_POOLAt this point, you enter DHCP pool configuration mode, where all DHCP options can be configured:
R1(dhcp-config)# ?
  default-router  Default routers
  dns-server      Set name server
  domain-name     Domain name
  exit            Exit from DHCP pool configuration mode
  network         Network number and mask
  no              Negate a command or set its defaults
  option          Raw DHCP options
Define the Network Range
Next, you must tell the router which subnet this pool will serve.
This step defines the network from which IP addresses will be assigned to DHCP clients.In our case, the LAN uses the 192.168.1.0/24 network, so we link the pool to this subnet:
R1(dhcp-config)# network 192.168.1.0 255.255.255.0This tells the router that DHCP clients should receive addresses inside this subnet.
Configure the Default Router
DHCP clients also need a default gateway to reach external networks.
This is the IP address of the router interface connected to the LAN.Here, the default gateway is 192.168.1.254, so we configure:
R1(dhcp-config)# default-router 192.168.1.254This value will be automatically provided to clients when they obtain their IP address.
Configure the DNS Server
Clients must also know which DNS server to use to resolve domain names.
We configure Google’s public DNS server:R1(dhcp-config)# dns-server 8.8.8.8This ensures that clients can immediately resolve domain names after receiving their configuration.
Set the Domain Name (Optional but Recommended)
Setting a domain name is optional, but it is common practice in enterprise networks and helps identify the LAN.
We set the domain name to pingmynetwork.com:
R1(dhcp-config)# domain-name pingmynetwork.com
R1(dhcp-config)# end
Verify the Configuration
Now that the DHCP pool is configured, you can verify it using:
R1# show run | section dhcp
ip dhcp excluded-address 192.168.1.254
ip dhcp pool LAN_POOL
 network 192.168.1.0 255.255.255.0
 default-router 192.168.1.254
 dns-server 8.8.8.8
 domain-name pingmynetwork.com
This output confirms that the DHCP pool is fully configured and ready to assign IP addresses to LAN clients.
Answer the question below
Look at the output of show run | section dhcp. Give the IP address that is excluded from the DHCP pool.
Now that our DHCP Pool is configured on R1, we need to check if everything is working correctly.
On PC1, we will run theipconfig /renewcommand to initiate the DHCP process.C:\> ipconfig /renew IP Address......................: 192.168.1.1 Subnet Mask.....................: 255.255.255.0 Default Gateway.................: 192.168.1.254 DNS Server......................: 8.8.8.8The DHCP process begins by sending a DHCP DISCOVER message.
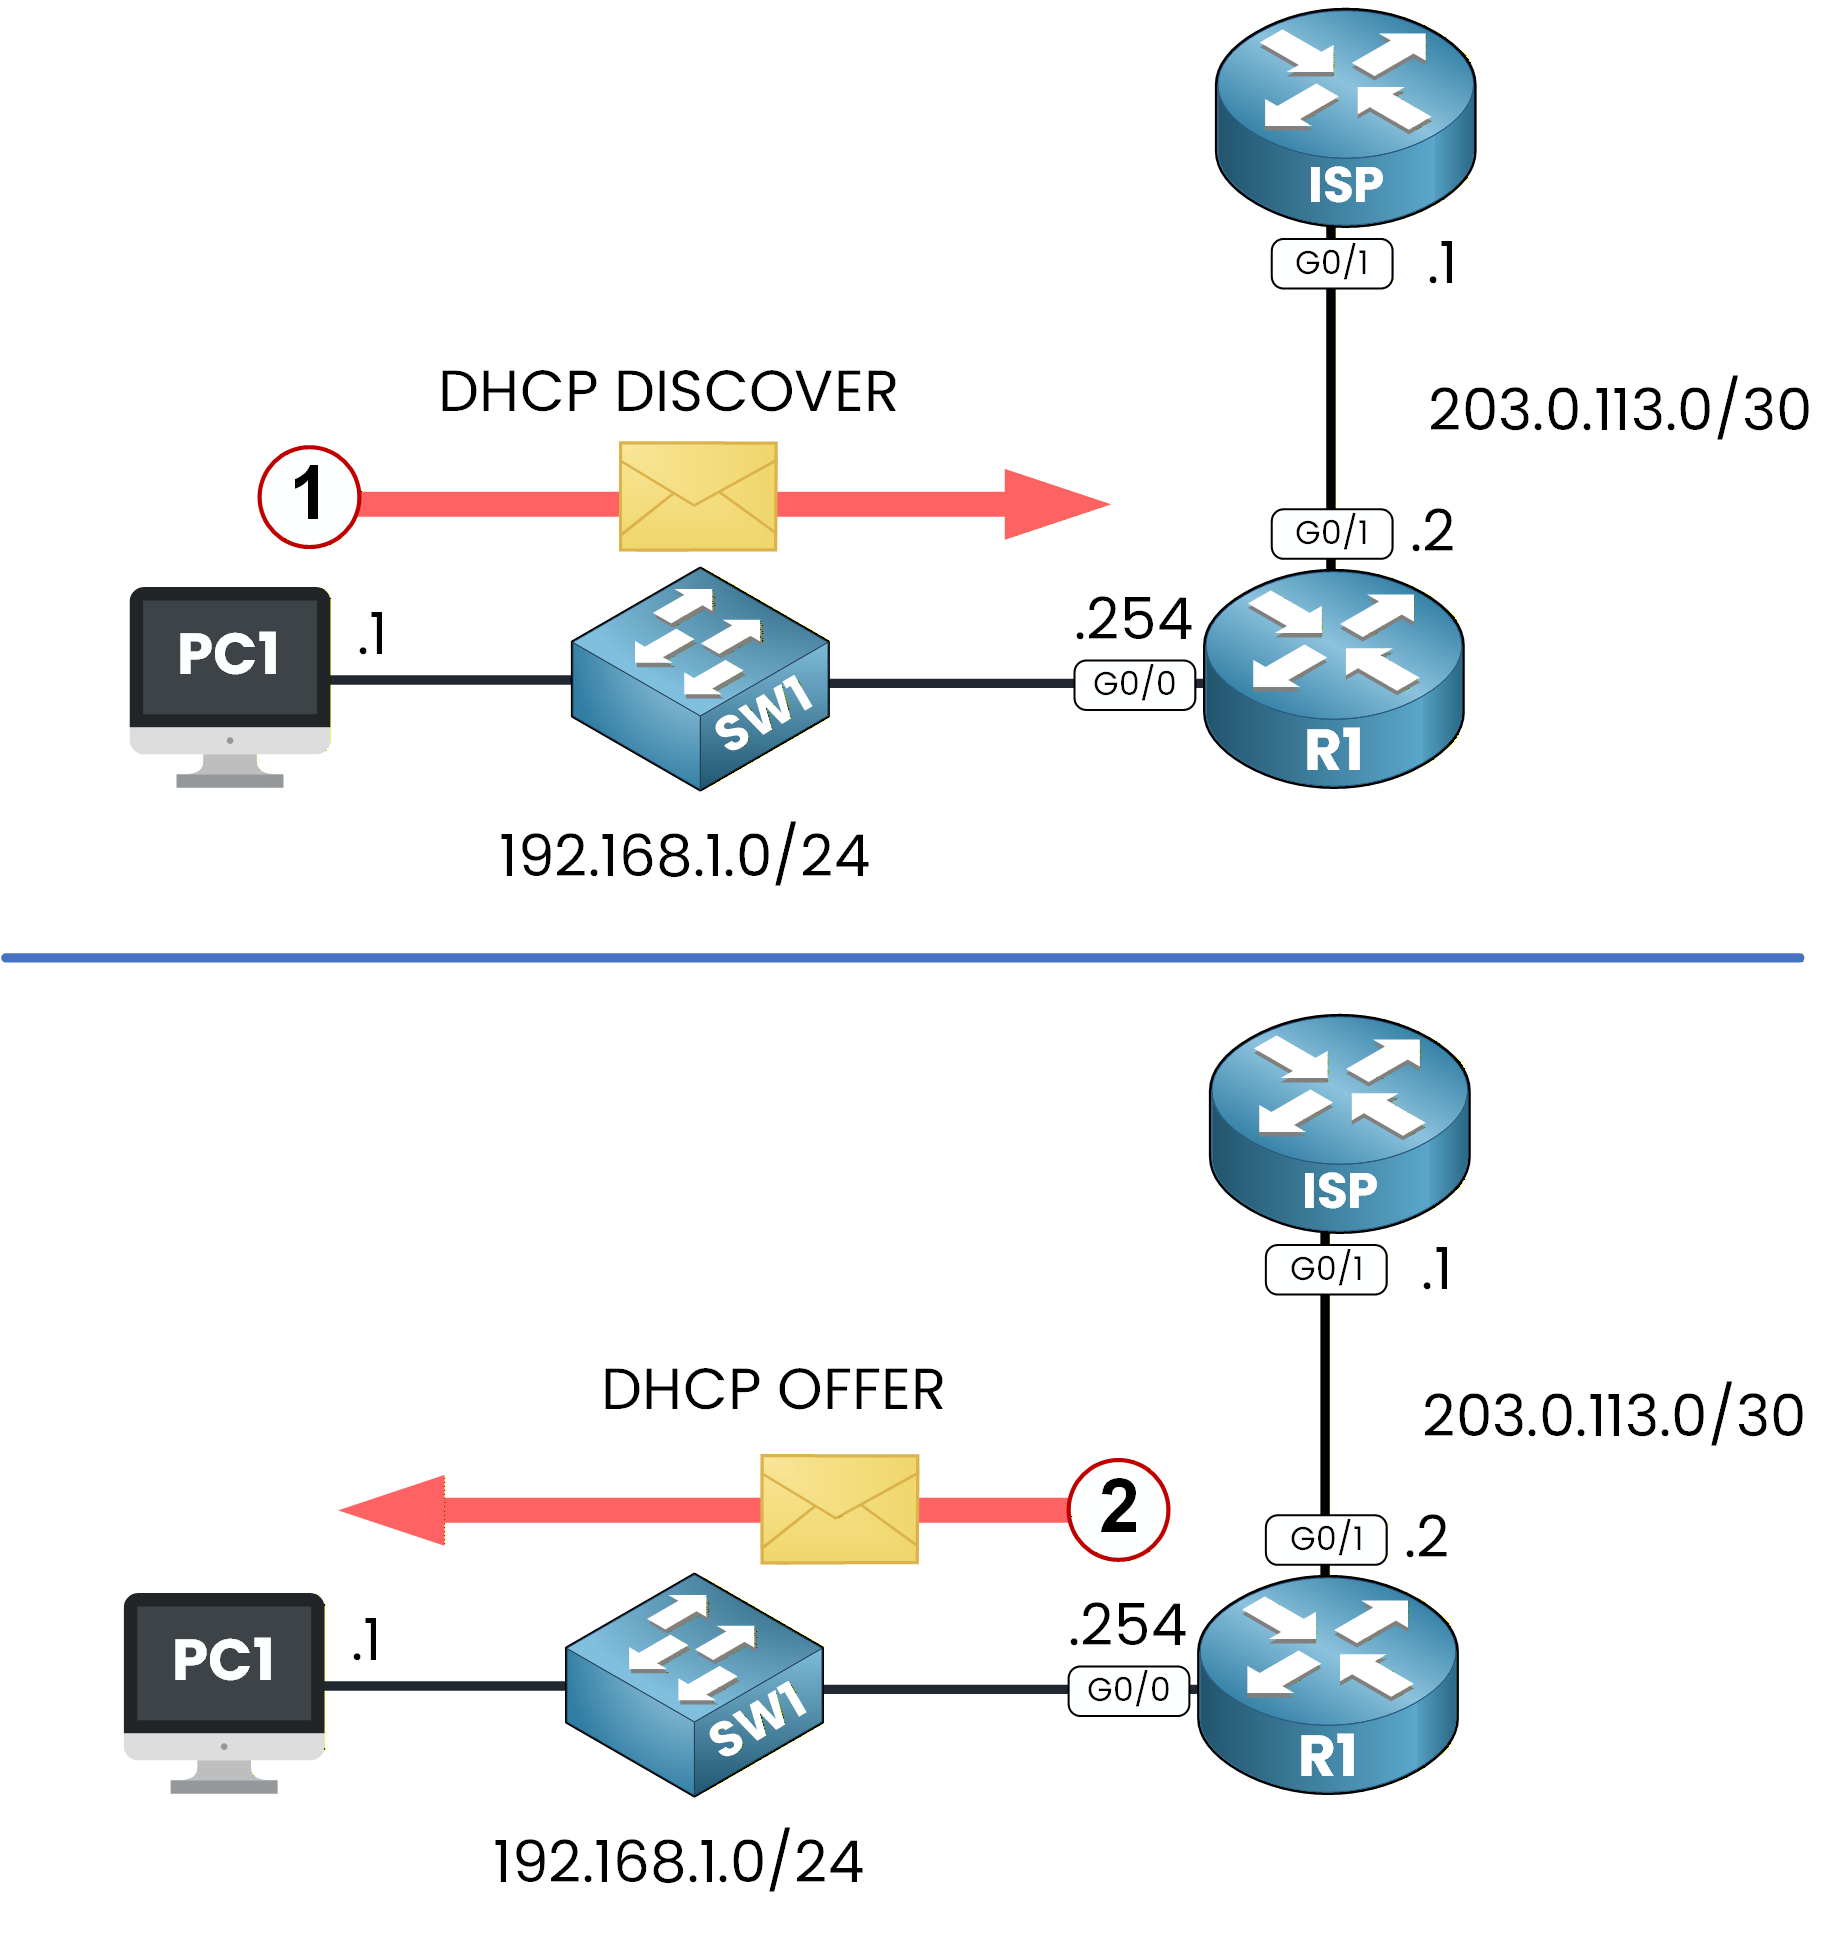
Figure 3 - DHCP DISCOVER and OFFER
The server responds with a DHCP OFFER from the LAN_POOL.
PC1 then sends a DHCP REQUEST to accept the offer.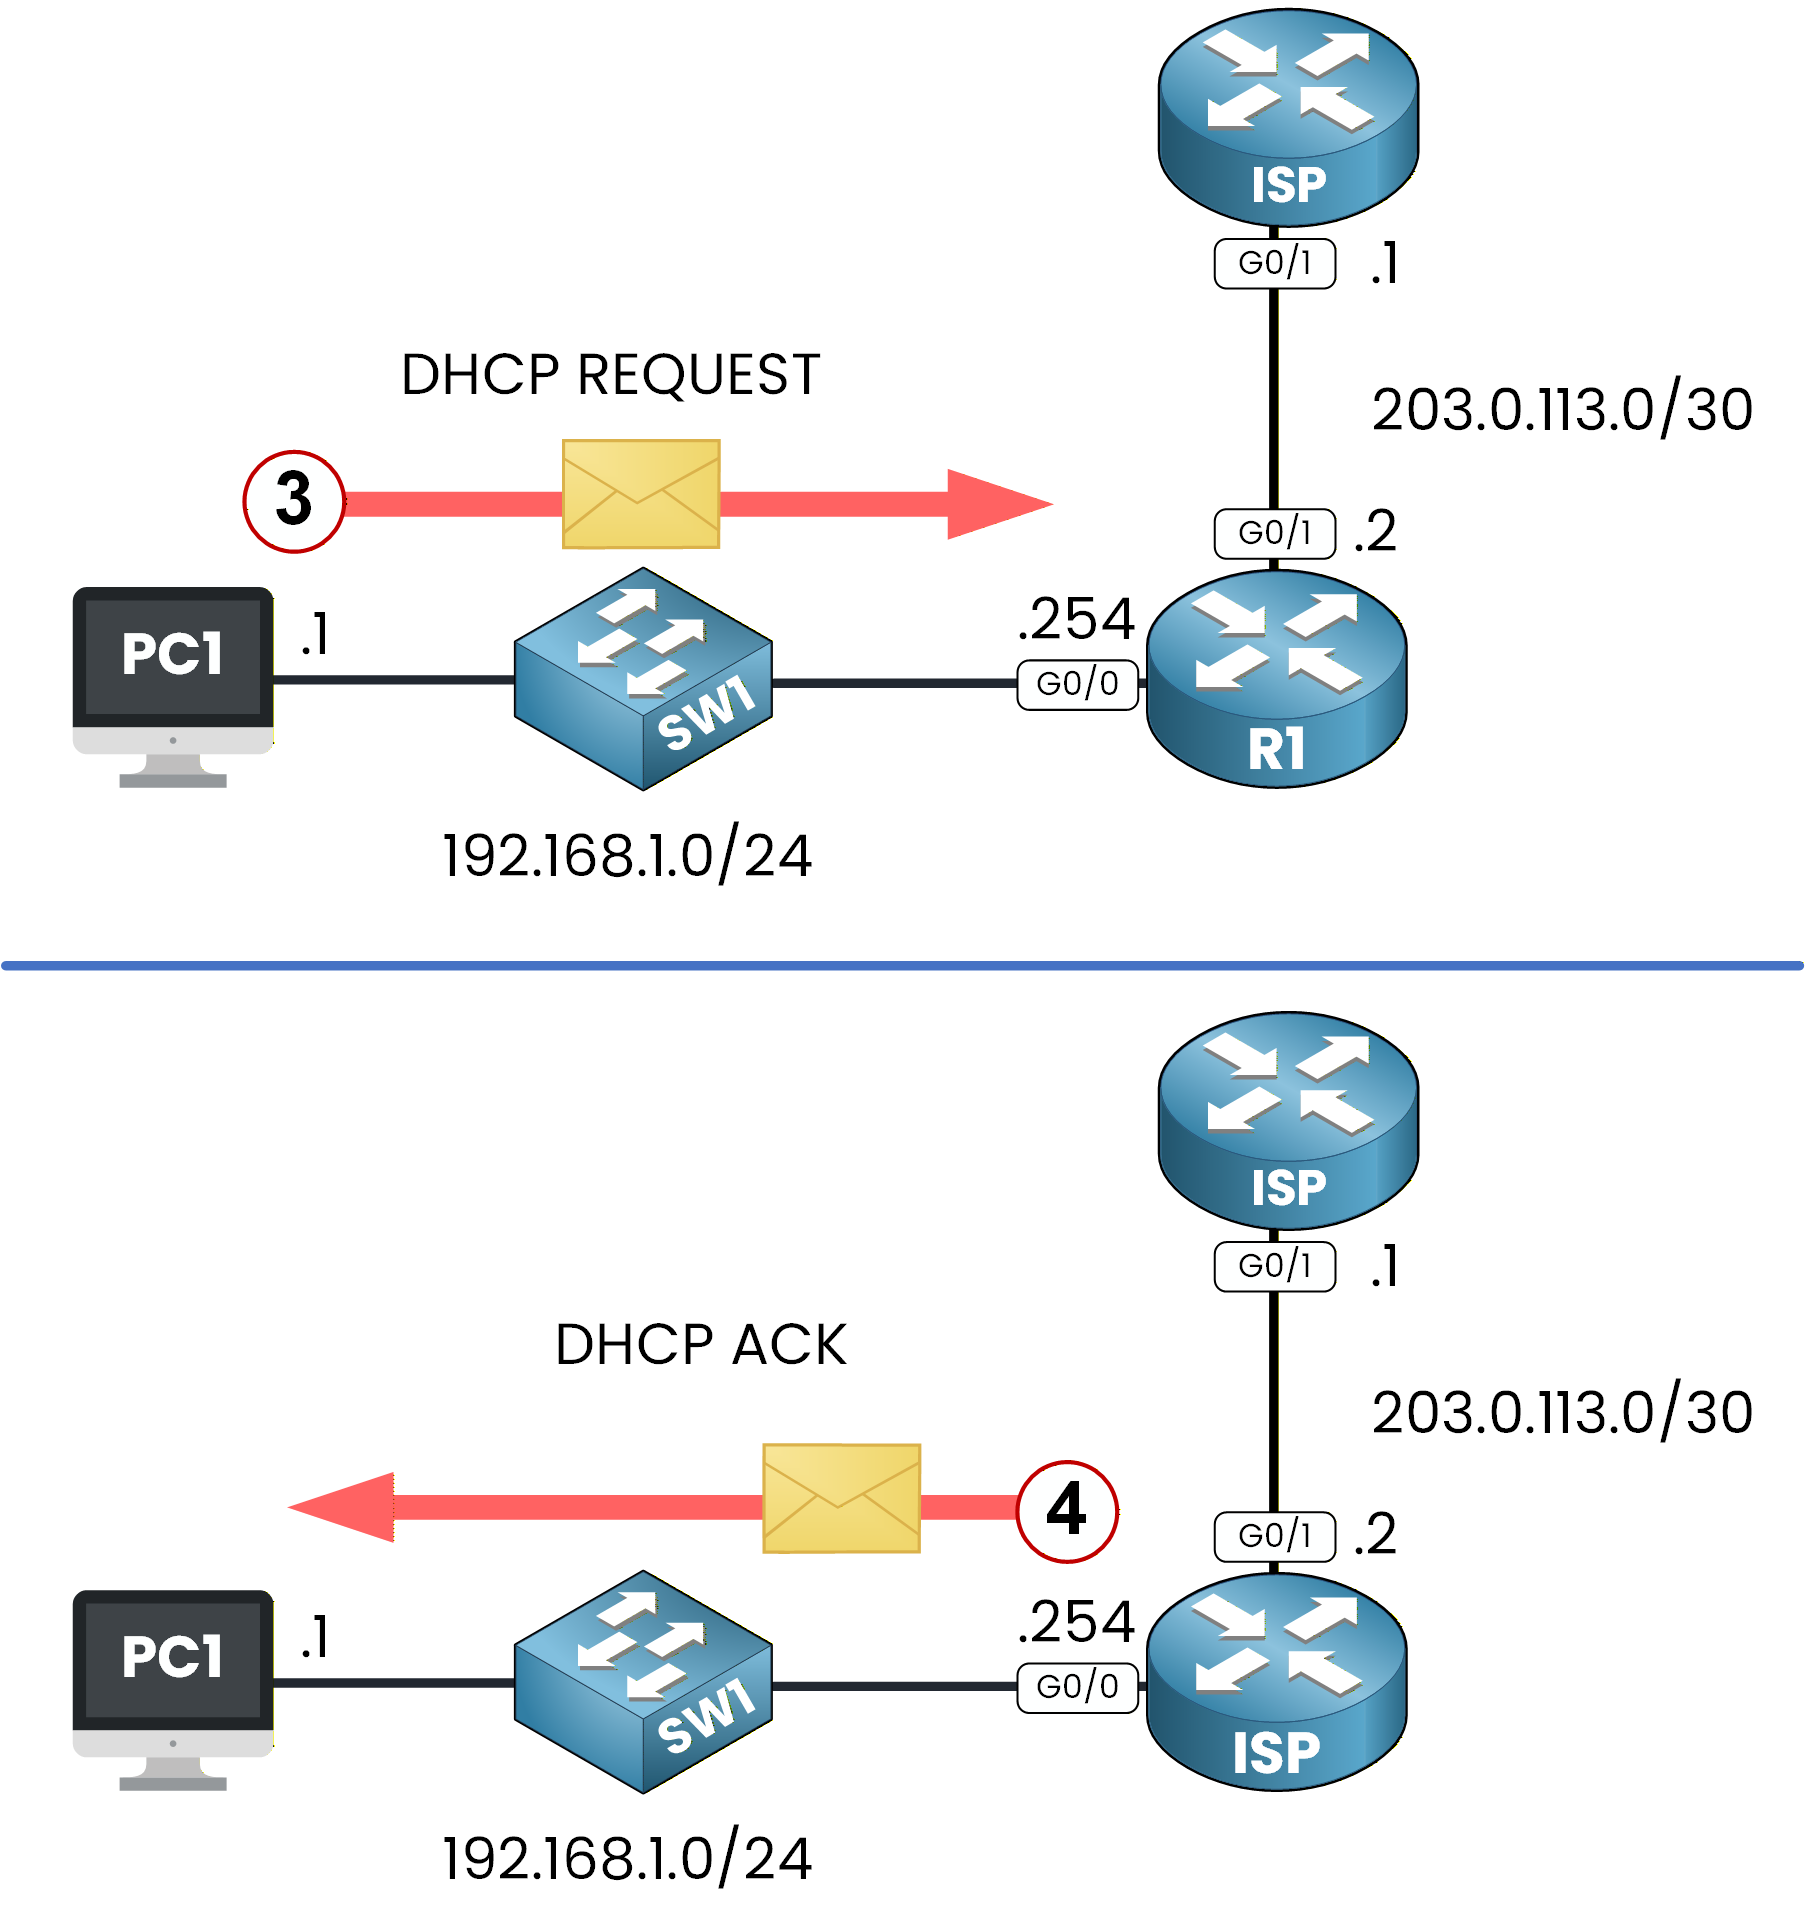
Figure 4 - DHCP REQUEST and ACK
Finally, the server assigns the IP address to PC1 using a DHCP ACK.
Check the DHCP Configuration Received
You can now check the full IP configuration that PC1 received.
To do this, use the commandipconfig /all.C:\> ipconfig /all FastEthernet0 Connection:(default port) Connection-specific DNS Suffix..: pingmynetwork.com Physical Address................: 0010.119E.A64E IPv4 Address....................: 192.168.1.1 Subnet Mask.....................: 255.255.255.0 Default Gateway.................: 192.168.1.254 DHCP Servers....................: 192.168.1.254 DNS Servers.....................: 8.8.8.8As you can see:
PC1 received the IP address 192.168.1.1
The default gateway is correctly set to 192.168.1.254
The DNS server is 8.8.8.8.
The domain name is pingmynetwork.com.
Test Connectivity to R1
Now that PC1 has a valid IP configuration, we can send a ping from PC1 to R1 to confirm that communication works.
C:\> ping 192.168.1.254

Pinging 192.168.1.254 with 32 bytes of data:

Reply from 192.168.1.254: bytes=32 time<1ms TTL=255
Reply from 192.168.1.254: bytes=32 time<1ms TTL=255
Reply from 192.168.1.254: bytes=32 time<1ms TTL=255
Reply from 192.168.1.254: bytes=32 time<1ms TTL=255

Ping statistics for 192.168.1.254:
    Packets: Sent = 4, Received = 4, Lost = 0 (0% loss),
Approximate round trip times in milli-seconds:
    Minimum = 0ms, Maximum = 0ms, Average = 0ms
The ping works perfectly, confirming that DHCP is functioning correctly and that PC1 can communicate with R1.
Answer the question below
Open the ipconfig /all output from PC1 and report the IPv4 address assigned by the DHCP server.
Now let’s move to the other side of the network.
Imagine that you are working for an Internet Service Provider.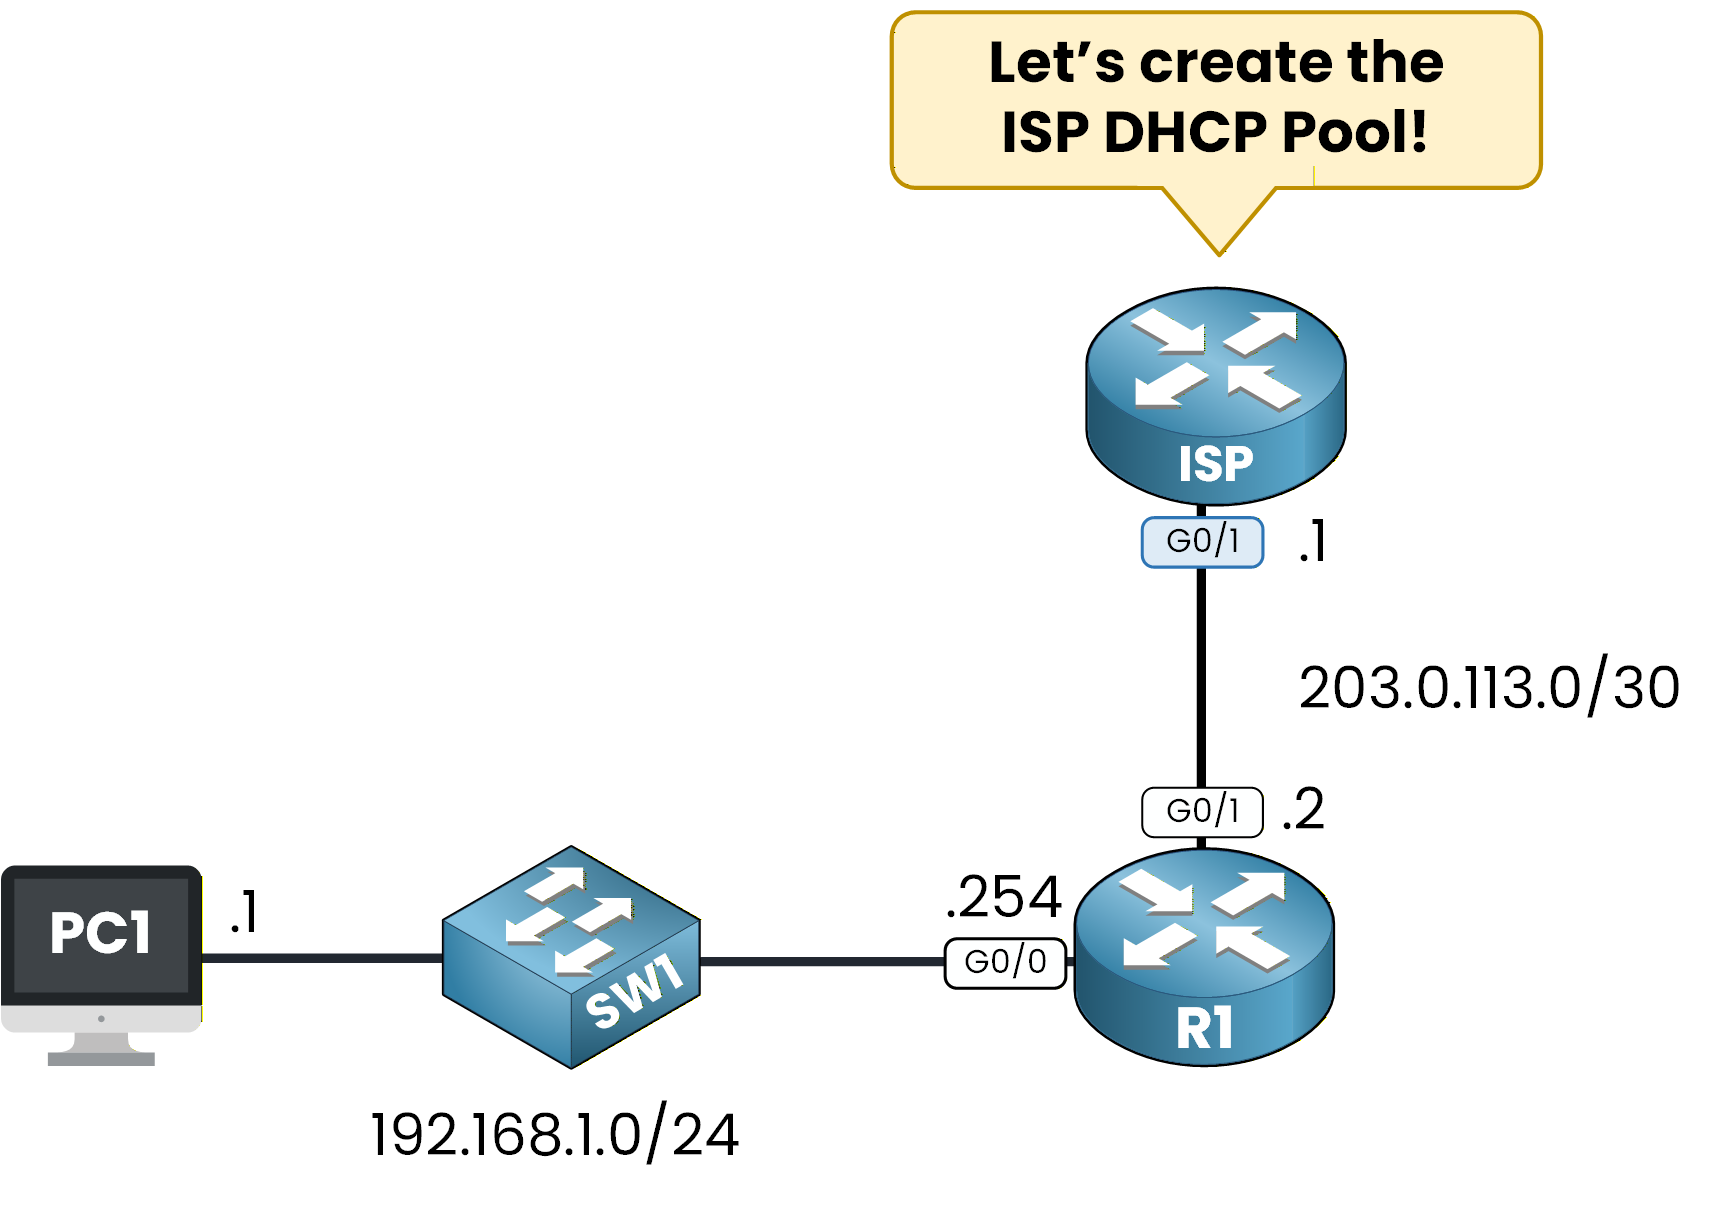
Figure 5 - ISP DHCP POOL Configuration
Your task is to configure the ISP router so it can assign a DHCP IP address to R1 on the enterprise side.
Yes, this is completely possible.
Routers can receive their IP addresses using DHCP, especially on WAN links.Excluded Address
The first step is to exclude the IP address that should not be assigned dynamically.
In this scenario, the first usable IP in the /30 network is already used by the ISP router, so we must exclude it.ISP# conf t Enter configuration commands, one per line. End with CNTL/Z. ISP(config)# ip dhcp excluded-address 203.0.113.1This ensures that the DHCP server will not try to assign an IP address already in use by the ISP router.
Create DHCP Pool
Now we create the DHCP pool that will assign an IP address to R1.
This pool will serve the 203.0.113.0/30 network used for the point-to-point link between ISP and R1.ISP(config)# ip dhcp pool ISP_POOL ISP(dhcp-config)# network 203.0.113.0 255.255.255.252 ISP(dhcp-config)# endRequest the Address on R1
On the enterprise side, we now need to request an IP address for interface
G0/1on R1.
This interface should receive its WAN IP via DHCP from the ISP router.R1# conf t Enter configuration commands, one per line. End with CNTL/Z. R1(config)# int g0/1 R1(config-if)# ip address ? A.B.C.D IP address dhcp IP Address negotiated via DHCP R1(config-if)# ip address dhcp R1(config-if)# end R1# %SYS-5-CONFIG_I: Configured from console by console %DHCP-6-ADDRESS_ASSIGN: Interface GigabitEthernet0/1 assigned DHCP address 203.0.113.2, mask 255.255.255.252, hostname R1We can see in the log message that R1 received the IP address 203.0.113.2/30 from the ISP router.
This confirms that the DHCP process on the WAN side is working correctly.If we check the interface, we can verify that the address was indeed assigned by DHCP:
R1# show ip interface g0/1
GigabitEthernet0/1 is up, line protocol is up (connected)
  Internet address is 203.0.113.2/30
  Broadcast address is 255.255.255.255
  Address determined by DHCP
  MTU is 1500 bytes
  Helper address is not set
Answer the question below
Which IP address did the ISP router hand out to interface G0/1?
At this stage, both the LAN and ISP DHCP pools are configured and working.
As a network administrator, you also have the ability to verify DHCP assignments directly on the router.
This is an important skill because it helps you confirm that clients are receiving the correct IP addresses and that the DHCP server is operating properly.Verify DHCP Allocation
To check which IP addresses have been assigned by the DHCP server, use the following command:
show ip dhcp binding.R1# show ip dhcp binding IP address Client-ID/ Lease expiration Type Hardware address 192.168.1.1 0010.119E.A64E -- AutomaticHere’s what this output shows:
IP Address: The router assigned 192.168.1.1 to the client.
Client-ID / Hardware Address: This is the MAC address of PC1.
Type: Indicates that the address was assigned automatically via DHCP.
This command gives you a quick overview of the devices currently receiving IP addresses.
DHCP Pool Details
You can also check the status of the entire DHCP pool using the command:
show ip dhcp pool.R1# show ip dhcp pool Pool LAN_POOL : Utilization mark (high/low) : 100 / 0 Subnet size (first/next) : 0 / 0 Total addresses : 254 Leased addresses : 1 Excluded addresses : 1 Pending event : none 1 subnet is currently in the pool Current index IP address range Leased/Excluded/Total 192.168.1.1 192.168.1.1 - 192.168.1.254 1 / 1 / 254Here’s what this output tells us:
Pool Name: The DHCP pool is named LAN_POOL
Total Addresses: The pool has 254 IP addresses, but 192.168.1.254 is reserved for the default gateway (R1)
Leased Addresses: Only 1 IP (192.168.1.1) has been assigned to a client.
IP Address Range: Assignable addresses start from 192.168.1.1.
This command helps verify the DHCP pool configuration and ensure enough addresses are available for clients. Combine it with
show ip dhcp bindingfor a full overview of assigned IP addresses!Answer the question below
Based on the show ip dhcp pool output, how many IP addresses in the 192.168.1.0/24 network can actually be leased to clients?
What's Next?
Now that you know how to configure DHCP on a Cisco router, we will take it further.
In the next lesson, you will learn what a DHCP Relay Agent is and why it is necessary when clients and the DHCP server are not in the same network.Ready for the next step?
Answer the question below
Click 'Complete' to continue