In this lab, you will learn how to configure Static NAT (Network Address Translation) on a router to provide a permanent one-to-one mapping between private and public IP addresses.
Static NAT is an important CCNA topic because it ensures that internal devices can reach external networks using dedicated public IP addresses.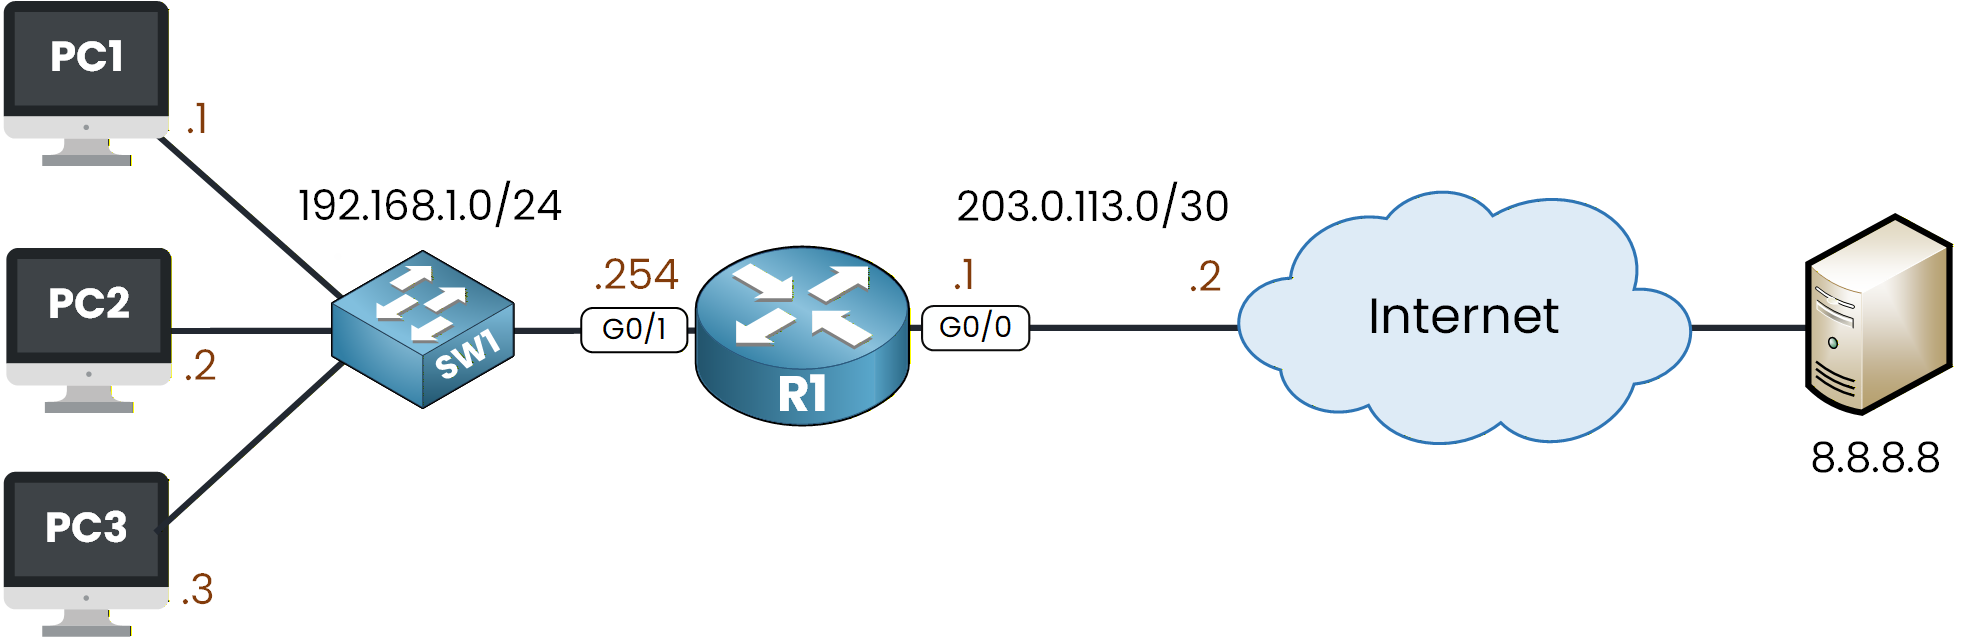
Figure 1 - Static NAT Configuration Topology
This lab will guide you through the configuration, verification, and testing of Static NAT so you understand exactly how the translation process works.
How to Begin
The topology above is already set up for you with all the necessary IP addressing in place.
You can focus entirely on the Static NAT configuration and run every command directly in the integrated CLI below.Lab Overview
Here’s the structure we will follow throughout this lab:
Step 1 – Configure Static NAT
Step 2 – Test Static NAT Behavior
Step 3 – Clear and Observe the Static NAT TableLet’s get started!
Answer the question below
Click 'Complete' to continue
Before we can begin configuring the Static NAT, we first need to determine the inside and outside NAT interfaces.
In your topology, interface G0/1 is connected to the inside network and G0/0 to the outside network.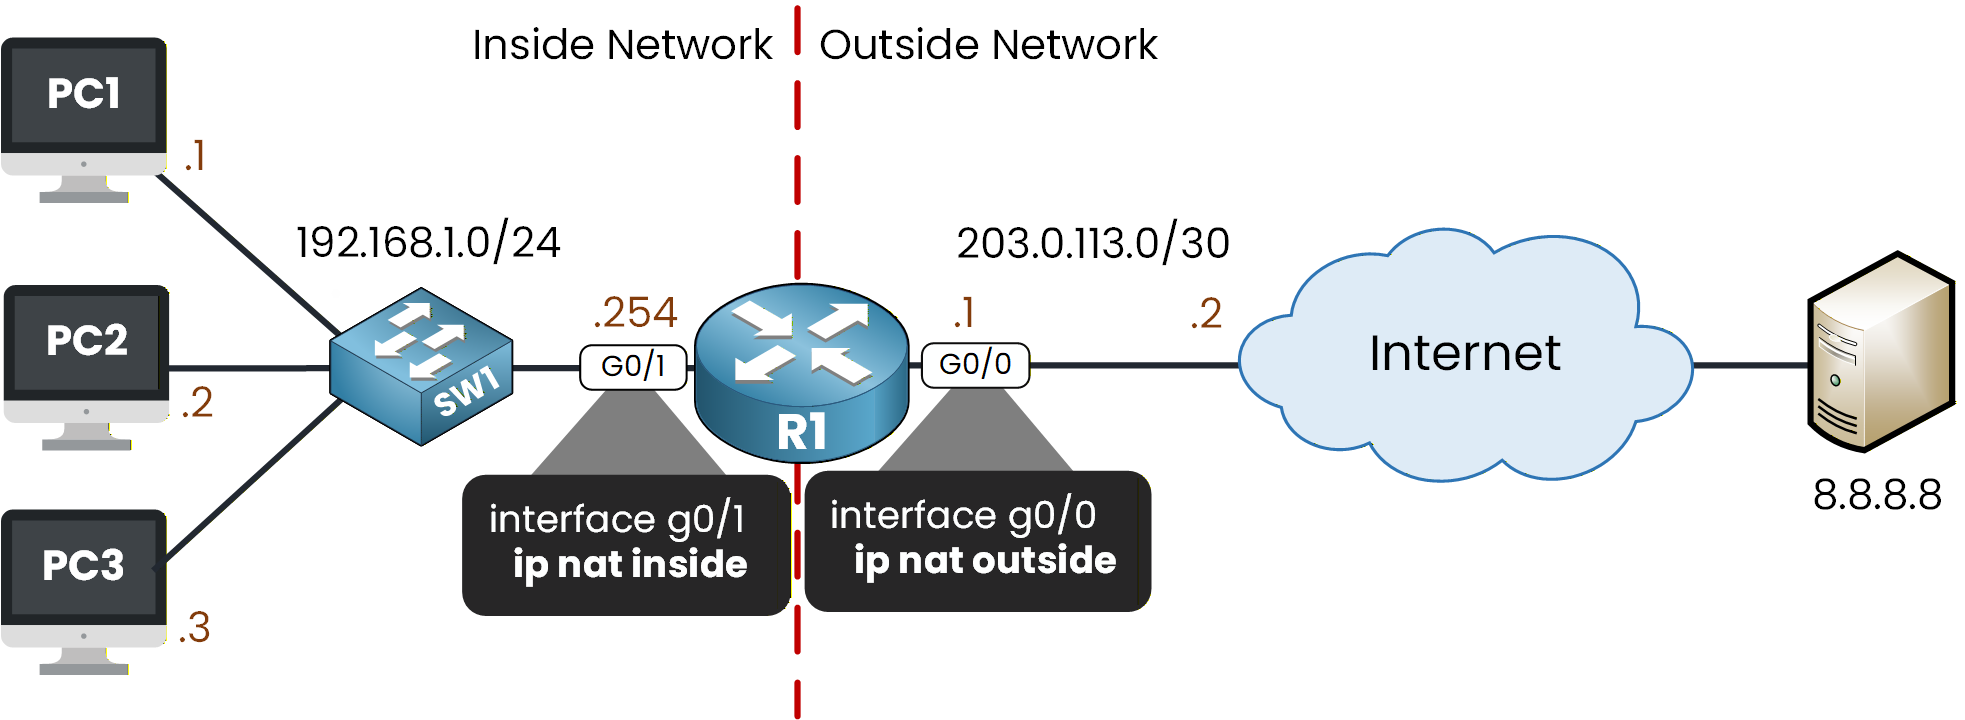
Figure 2 - IP NAT Inside and Outside Placement
Configure NAT Roles on the Interfaces
To define the NAT boundary on the router, apply
ip nat insideon G0/1 andip nat outsideon G0/0.R1# conf t Enter configuration commands, one per line. End with CNTL/Z. R1(config)# interface g0/1 R1(config-if)# ip nat inside R1(config-if)# exit R1(config)# interface g0/0 R1(config-if)# ip nat outside R1(config-if)# exitNow that the NAT roles are configured, we can set up a static NAT entry for each PC in the topology.
We have three inside hosts, so we will create three one-to-one mappings, each translating a private IP address to a public IP address from the 50.0.0.0/24 range.Static NAT Mappings
Let’s walk through the first example together.
In the command below, the private address 192.168.1.1 is mapped to the public address 50.0.0.1 whenever traffic leaves toward the outside network:R1(config)# ip nat inside source static 192.168.1.1 50.0.0.1This ensures that PC1 always uses 50.0.0.1 as its public identity when accessing external destinations.
We then create the static translations for PC2 and PC3:R1(config)# ip nat inside source static 192.168.1.2 50.0.0.2 R1(config)# ip nat inside source static 192.168.1.3 50.0.0.3 R1(config)# exitVerifying the Static NAT Rules
With all three static mappings configured, let’s verify that the router has registered them correctly.
Use the commandshow ip nat translations.R1# show ip nat translations Pro Inside global Inside local Outside local Outside global --- 50.0.0.1 192.168.1.1 --- --- --- 50.0.0.2 192.168.1.2 --- --- --- 50.0.0.3 192.168.1.3 --- ---These entries confirm that each private IP address has a permanent one-to-one relationship with its public address.
They appear immediately, even before any traffic is sent, which is one of the key characteristics of Static NAT.To get additional information, you can also run
show ip nat statistics:R1# show ip nat statistics Total translations: 3 (3 static, 0 dynamic, 0 extended) Outside Interfaces: GigabitEthernet0/0 Inside Interfaces: GigabitEthernet0/1 Hits: 0 Misses: 0 Expired translations: 0 Dynamic mappings:This output confirms:
3 static NAT mappings are installed.
The inside and outside interfaces are correctly recognized.
Everything is now ready for testing.
Let’s move on to Step 2 and see how Static NAT behaves in practice.
Answer the question below
Which command marks an interface as the outside NAT interface?
Start from PC1 and send a ping to 8.8.8.8, which represents an external server on the Internet:
C:\> ping 8.8.8.8 Pinging 8.8.8.8 with 32 bytes of data: Request timed out. Request timed out. Reply from 8.8.8.8: bytes=32 time<1ms TTL=126 Reply from 8.8.8.8: bytes=32 time<1ms TTL=126 Ping statistics for 8.8.8.8: Packets: Sent = 4, Received = 2, Lost = 2 (50% loss), Approximate round trip times in milli-seconds: Minimum = 0ms, Maximum = 0ms, Average = 0msThe first two ping requests fail.
This is normal.Before R1 can forward any packet to the Internet, it must first learn the MAC address of the next-hop router (203.0.113.2) using ARP. During this short moment, the router cannot forward the ICMP requests yet, which explains the initial timeouts.
Understanding What Happens During Static NAT
In this diagram below, you can clearly see how the NAT router processes PC1’s traffic.
When PC1 sends a packet toward 8.8.8.8, it uses its private source address 192.168.1.1.
As the packet reaches R1 on the inside interface (G0/1), the router applies the static NAT translation you configured.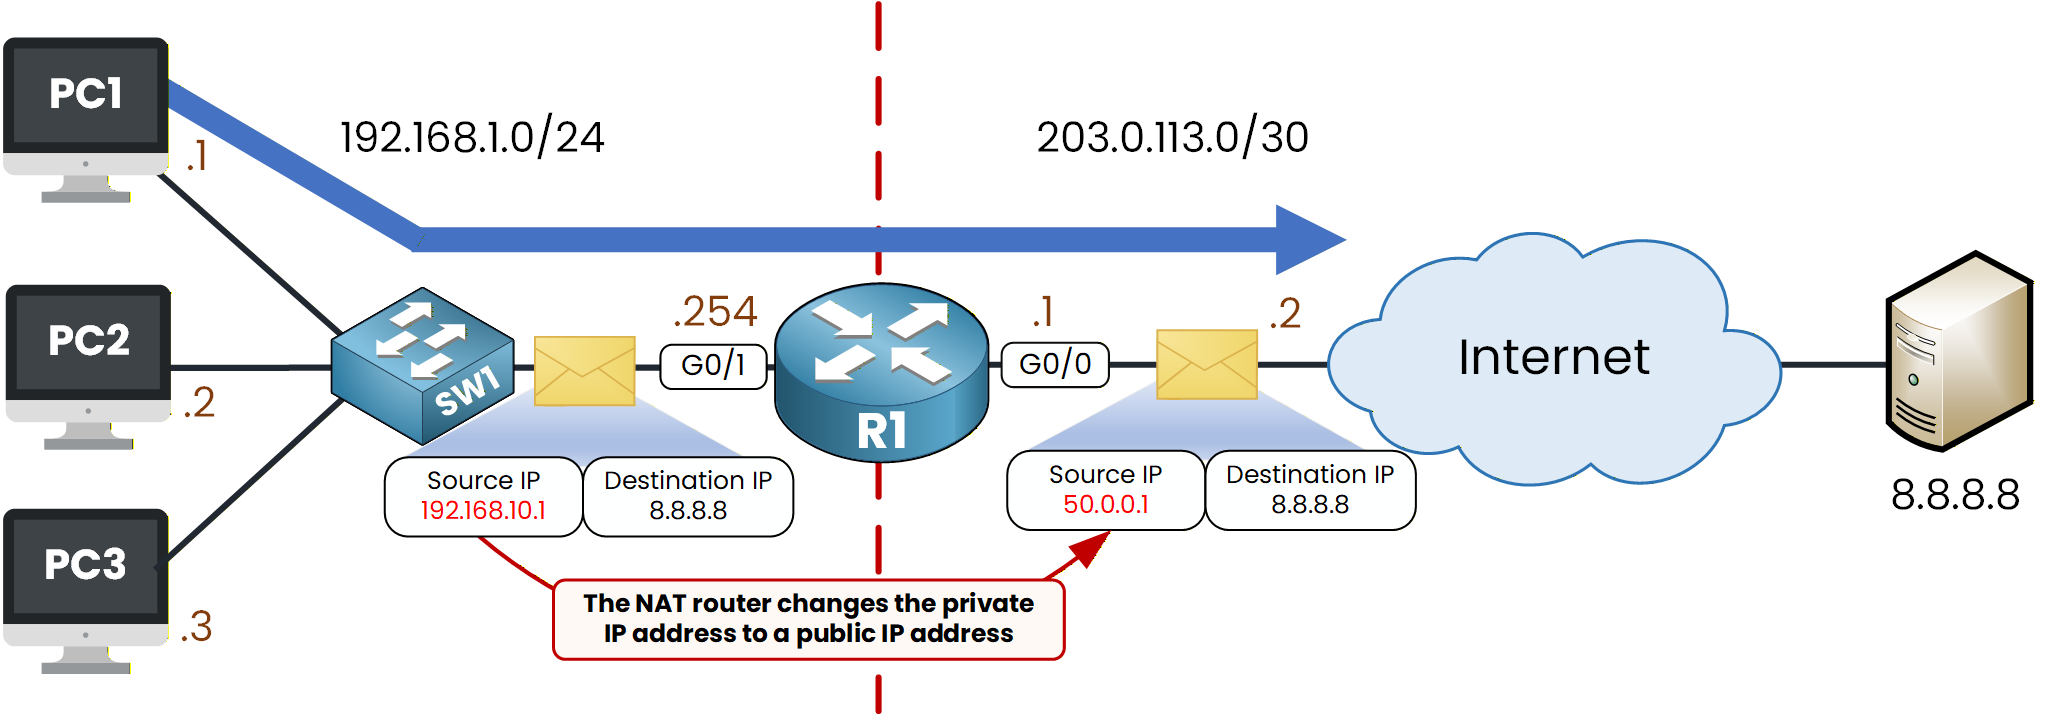
Figure 3 - Static NAT Process for PC1R1 replaces the private source IP with the public IP 50.0.0.1 before sending the packet out of G0/0 toward the Internet.
The destination IP (8.8.8.8) remains unchanged.How the Reply Finds Its Way Back
Hold on: when 8.8.8.8 sends its reply to 50.0.0.1, why would that packet reach R1 instead of some other router?
R1's WAN interface is 203.0.113.1, and the 50.0.0.0/24 block is a separate public range that your ISP must statically route toward R1 (the 203.0.113.0/30 is only the transit link, not the NAT pool).With that ISP-side route in place, the reply lands on R1, which then performs the reverse translation back to 192.168.1.1.
This is exactly how Static NAT works: the private address is permanently mapped to a public address, so the packet always leaves the network with the same public identity.
We can repeat the same test with PC2.
C:\> ping 8.8.8.8 Pinging 8.8.8.8 with 32 bytes of data: Reply from 8.8.8.8: bytes=32 time<1ms TTL=126 Reply from 8.8.8.8: bytes=32 time<1ms TTL=126 Reply from 8.8.8.8: bytes=32 time<1ms TTL=126 Reply from 8.8.8.8: bytes=32 time<1ms TTL=126 Ping statistics for 8.8.8.8: Packets: Sent = 4, Received = 4, Lost = 0 (0% loss), Approximate round trip times in milli-seconds: Minimum = 0ms, Maximum = 0ms, Average = 0msHere, all the replies work instantly.
Since the router already resolved the ARP entry thanks to PC1’s ping, it can forward PC2’s traffic immediately without any delay.Let’s test PC3 as well:
C:\> ping 8.8.8.8 Pinging 8.8.8.8 with 32 bytes of data: Reply from 8.8.8.8: bytes=32 time<1ms TTL=126 Reply from 8.8.8.8: bytes=32 time<1ms TTL=126 Reply from 8.8.8.8: bytes=32 time<1ms TTL=126 Reply from 8.8.8.8: bytes=32 time=1ms TTL=126 Ping statistics for 8.8.8.8: Packets: Sent = 4, Received = 4, Lost = 0 (0% loss), Approximate round trip times in milli-seconds: Minimum = 0ms, Maximum = 1ms, Average = 0msThe result is the same: PC3 can also reach the public destination with no loss.
At this point, all three PCs are successfully using their assigned public IP address through Static NAT.Viewing the NAT Translations on R1
Now let’s take a look at how R1 translated the traffic generated by the three PCs.
To display the current translation table, use the following command:show ip nat translations.R1# show ip nat translations Pro Inside global Inside local Outside local Outside global icmp 50.0.0.1:10 192.168.1.1:10 8.8.8.8:10 8.8.8.8:10 icmp 50.0.0.1:11 192.168.1.1:11 8.8.8.8:11 8.8.8.8:11 icmp 50.0.0.1:12 192.168.1.1:12 8.8.8.8:12 8.8.8.8:12 icmp 50.0.0.1:9 192.168.1.1:9 8.8.8.8:9 8.8.8.8:9 icmp 50.0.0.2:5 192.168.1.2:5 8.8.8.8:5 8.8.8.8:5 icmp 50.0.0.2:6 192.168.1.2:6 8.8.8.8:6 8.8.8.8:6 icmp 50.0.0.2:7 192.168.1.2:7 8.8.8.8:7 8.8.8.8:7 icmp 50.0.0.2:8 192.168.1.2:8 8.8.8.8:8 8.8.8.8:8 icmp 50.0.0.3:5 192.168.1.3:5 8.8.8.8:5 8.8.8.8:5 icmp 50.0.0.3:6 192.168.1.3:6 8.8.8.8:6 8.8.8.8:6 icmp 50.0.0.3:7 192.168.1.3:7 8.8.8.8:7 8.8.8.8:7 icmp 50.0.0.3:8 192.168.1.3:8 8.8.8.8:8 8.8.8.8:8 --- 50.0.0.1 192.168.1.1 --- --- --- 50.0.0.2 192.168.1.2 --- --- --- 50.0.0.3 192.168.1.3 --- ---At the bottom, you can clearly see the three permanent static NAT entries you configured earlier.
Above them, you see the temporary ICMP translations created when the PCs pinged 8.8.8.8.This confirms that Static NAT is working exactly as expected.
Answer the question below
What stays unchanged when traffic is translated by Static NAT?
To finish the lab, let’s clear the current NAT translations so we can observe what remains afterward.
Use the following command to remove all active NAT entries:R1# clear ip nat translation *Now check the NAT table again:
R1# show ip nat translations Pro Inside global Inside local Outside local Outside global --- 50.0.0.1 192.168.1.1 --- --- --- 50.0.0.2 192.168.1.2 --- --- --- 50.0.0.3 192.168.1.3 --- ---This is exactly how Static NAT behaves:
The temporary entries created during communication are removed when the table is cleared.
The static mappings stay in place at all times because they are configured manually and never expire.
Perfect: you now clearly see how Static NAT persists even after clearing the NAT table.
Let’s move on to the summary.
Answer the question below
What remains after clearing the NAT table?
Congratulations, you have finished the Static NAT Lab!
This lab is only the beginning of the NAT technologies you will encounter in your CCNA journey.
In the next lessons, we will continue with Dynamic NAT so you can compare the behavior between static and dynamic translations.Below, you will find the main commands used in this lab and their meaning.
Useful Commands to Remember
ip nat inside
=> Defines the interface as the inside NAT interface.ip nat outside
=> Defines the interface as the outside NAT interface.ip nat inside source static 192.168.1.1 50.0.0.1
=> Creates a static one-to-one mapping between the private IP and the public IP.show ip nat translations
=> Displays all NAT entries currently in the router’s table.show ip nat statistics
=> Shows the total number of NAT entries and the inside/outside interface roles.clear ip nat translation *
=> Removes the temporary NAT entries created during traffic (static entries stay).Let’s continue together with the Dynamic NAT lesson.
Answer the question below
Click 'Complete' to continue