By default, all switch interfaces on a Cisco device are enabled.
This means any physically connected device can instantly gain network access.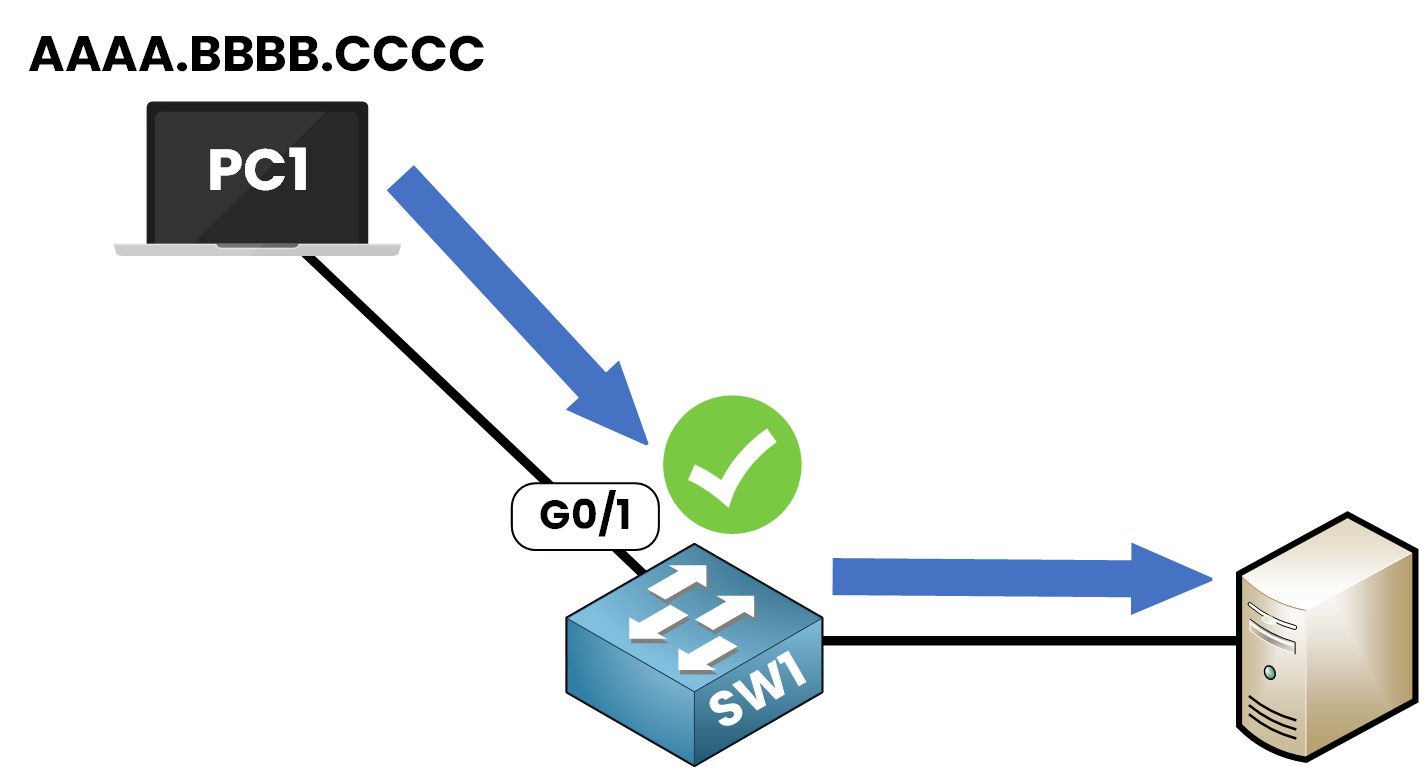
Figure 1 – Default Behavior of a Cisco Switch Port
This behavior may seem convenient, but it exposes the network to risk.
In shared offices, public spaces, or uncontrolled environments, anyone could plug in a rogue device and gain access.
Without restrictions, the switch would accept the connection, allowing unauthorized traffic or even malicious activity.
To prevent this, we use Port Security.
This feature allows you to control which MAC addresses are allowed to send traffic on each port.
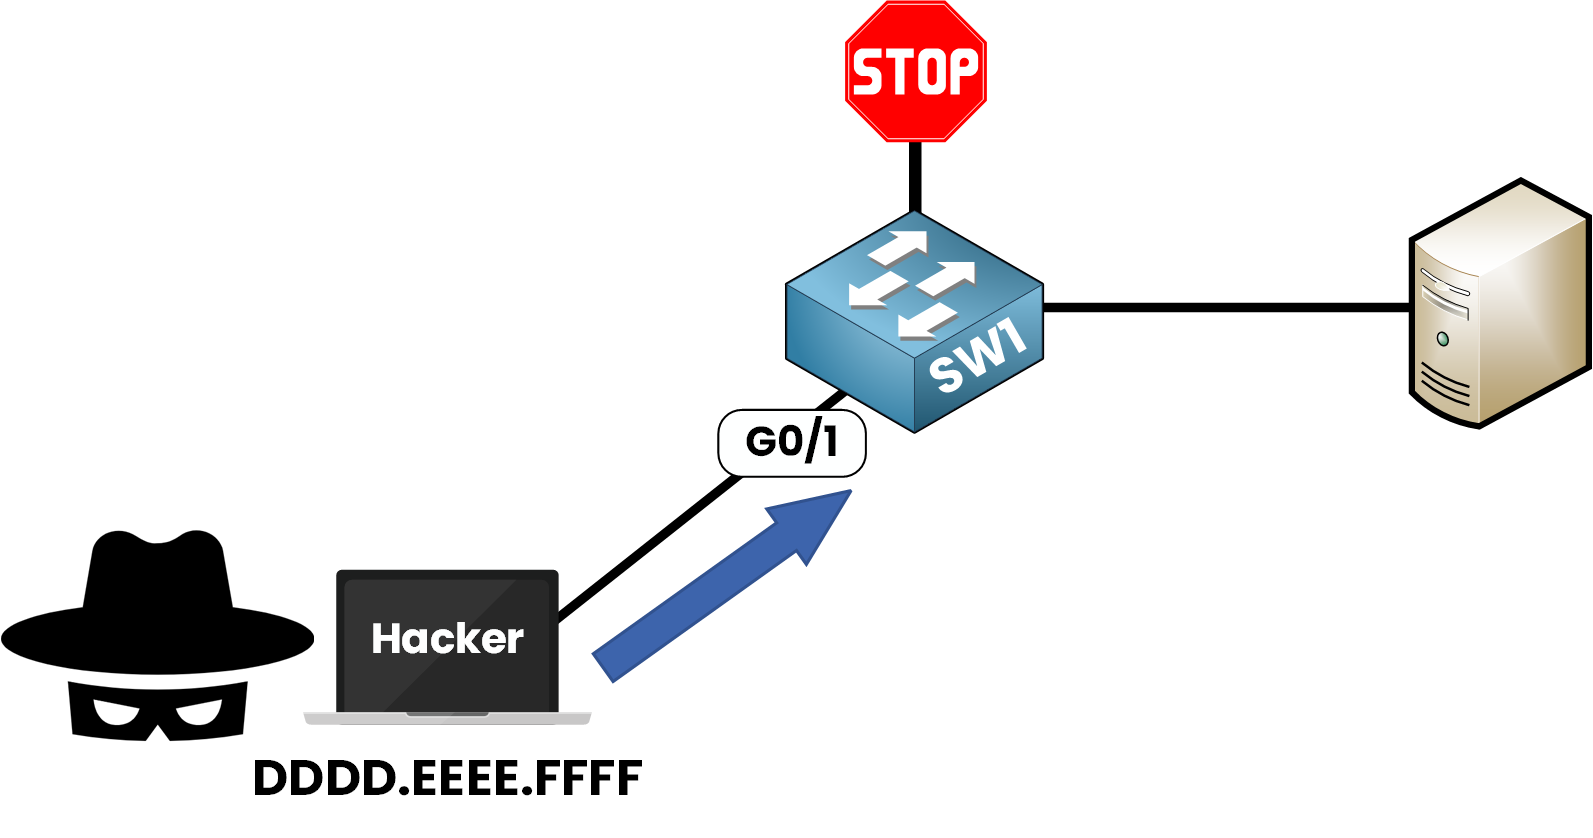
Figure 2 – Unauthorized Device Blocked by Port Security
How Port Security Works
Port Security is a Layer 2 feature.
It verifies the source MAC address of each incoming frame and checks if it matches an allowed address for that port.
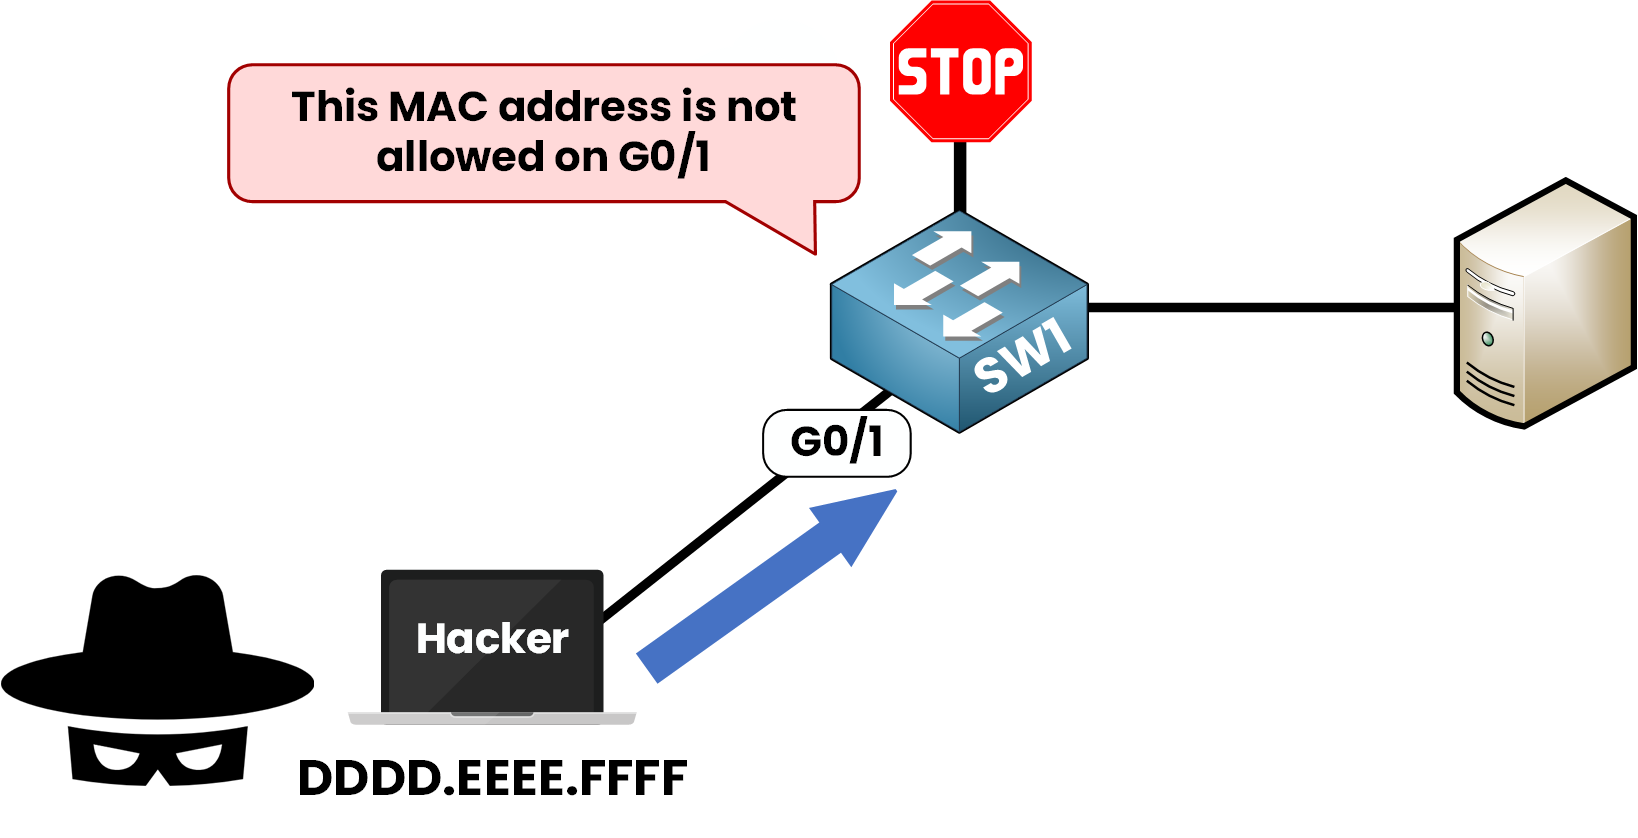
Figure 3 – MAC Address Violation Detected by Port Security
With Port Security, administrators can:
Choose what happens when a violation occurs
Define which devices are allowed on which ports
Limit the number of MAC addresses per port
Answer the question below
Which type of address does Port Security verify to control access on a switch port?
When configuring Port Security, you can decide how the switch will recognize trusted devices.
Cisco supports three key methods:Dynamic learning (automatic)
Static assignment (manual)
Multiple MAC addresses per port (for shared ports)
Let's explore each option with simple examples.
Dynamic Learning (Default)
The default method is called Dynamic Learning.
We enable Port Security on the interface.
The legitimate device is connected and sends traffic through the port.
The switch dynamically learns the MAC address and considers it trusted.
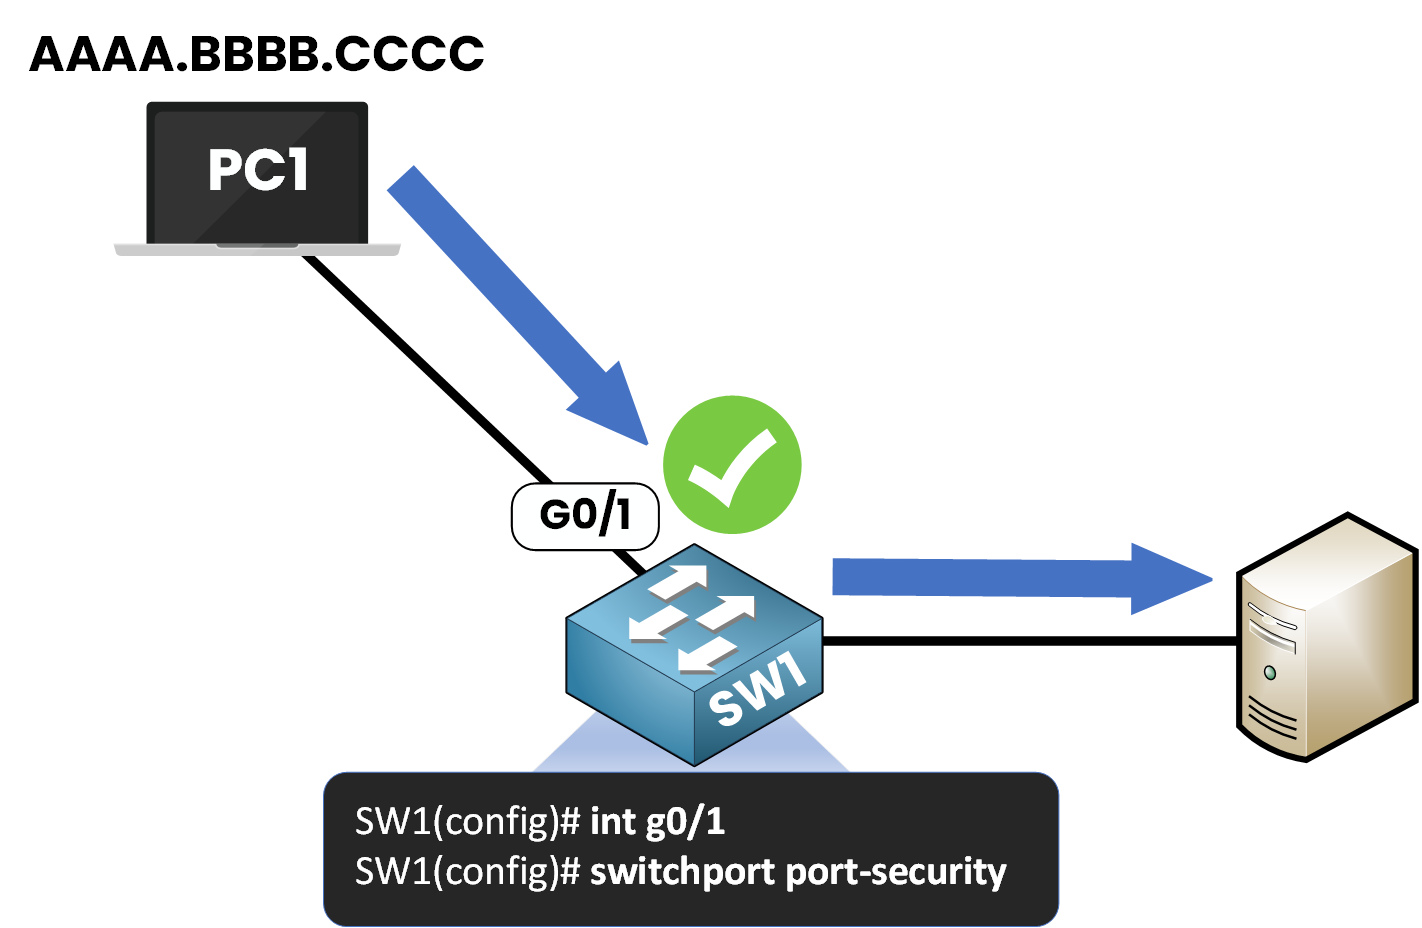
Figure 4 – Dynamic Learning of MAC Address with Port Security
By default, only one MAC address is allowed per port. Any additional device will cause a violation.
Static Configuration
In environments where strict control is needed, you can manually assign the MAC address allowed on a port.
For example, if we have a device with MAC address AAAA.BBBB.CCCC, we can statically configure the switch port to only accept frames from this MAC address.
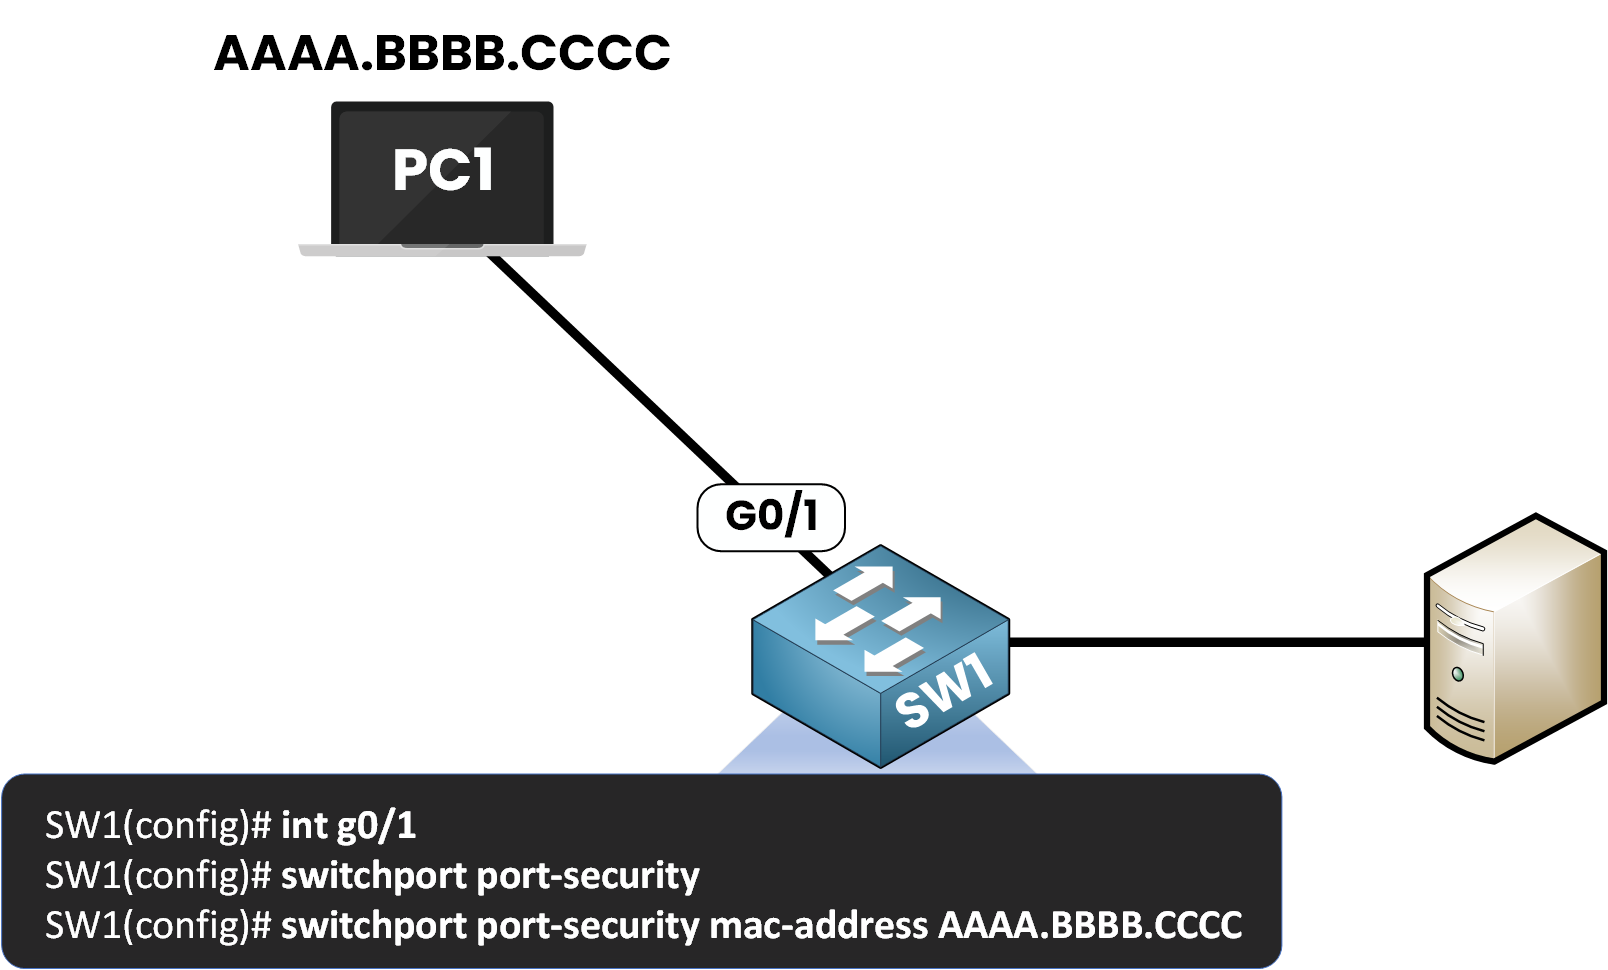
Figure 5 – Static MAC Address Configuration with Port Security
This means only the device with MAC AAAA.BBBB.CCCC will be accepted.
This method is very strict, but it requires more manual effort, especially when managing many interfaces.
Number of Allowed MAC Addresses
By default, only one MAC address is permitted per port.
However, in cases where multiple devices share a port (a PC and an IP phone connected to the same port), we can modify the maximum number of allowed MAC addresses.
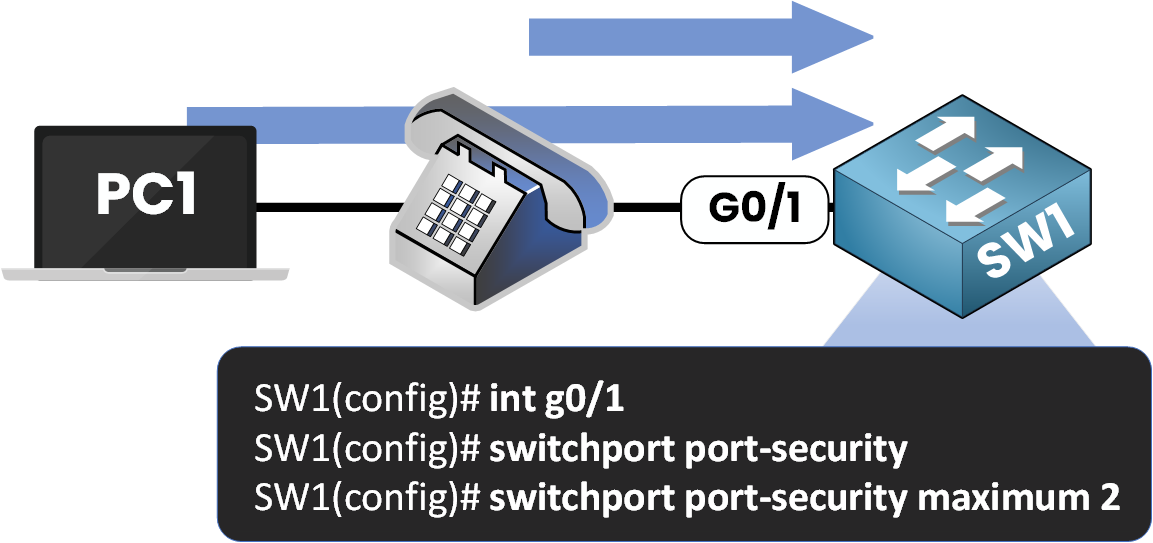
Figure 6 – Allowing Multiple MAC Addresses on a Single Port
In this example, the switch is configured to dynamically learn and allow two MAC addresses on the same port.
Answer the question below
What's the default number of MAC addresses allowed per port?
Now that you've configured Port Security, let's examine how the switch reacts under default settings and what happens when an unauthorized device connects.
Step 1 – Understanding the Default Behavior
Imagine PC1 is connected to SW1 on interface g0/1.
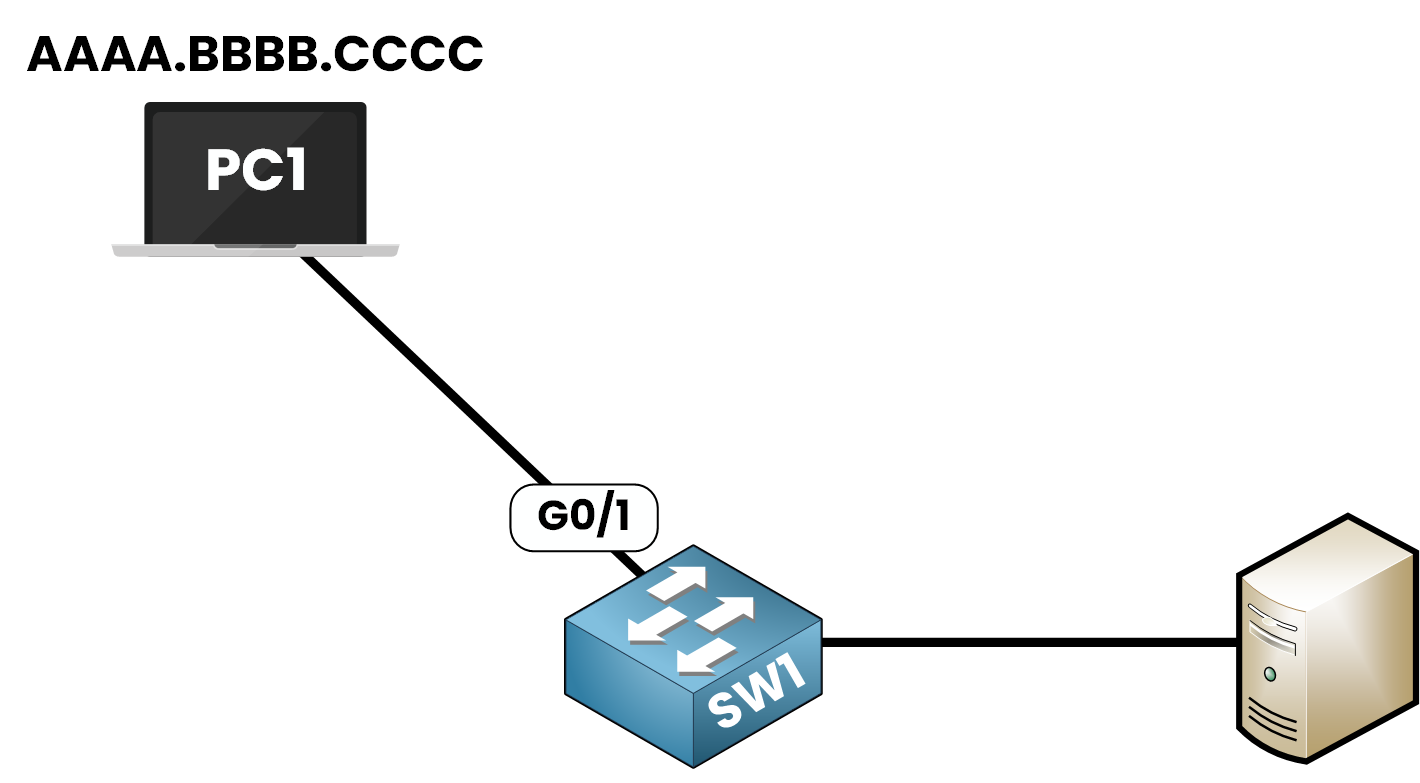
Figure 7 – Port Security Topology
When Port Security is enabled with default settings:
✅ The first MAC address that sends traffic is learned and trusted.
🚫 Any other MAC address on the same port causes a security violation.Step 2 – Enabling Port Security
Let's try enabling Port Security:
SW1# conf t
Enter configuration commands, one per line.  End with CNTL/Z.
SW1(config)# int g0/1
SW1(config-if)# switchport port-security
Command rejected: GigabitEthernet0/1 is a dynamic port.
You might get this error:
This happens because Port Security cannot be enabled on a port in dynamic auto mode.Step 3 – Fixing the Interface Mode
Set the interface to access or trunk mode before enabling Port Security.
First, verify the current mode:
SW1(config-if)# end
SW1# show interfaces g0/1 switchport
Name: Gi0/1
Switchport: Enabled
Administrative Mode: dynamic auto
Operational Mode: static access
!!! Output omitted !!!
Now reconfigure the interface:
SW1# conf t
Enter configuration commands, one per line.  End with CNTL/Z.
SW1(config)# int g0/1
SW1(config-if)# switchport mode access
We can enable Port Security:
SW1(config-if)# switchport port-security
SW1(config-if)# end
Step 4 – Verifying Port Security
To check the current configuration:
SW1# show port-security interface g0/1
Port Security              : Enabled
Port Status                : Secure-up
Violation Mode             : Shutdown
Aging Time                 : 0 mins
Aging Type                 : Absolute
SecureStatic Address Aging : Disabled
Maximum MAC Addresses      : 1
Total MAC Addresses        : 0
Configured MAC Addresses   : 0
Sticky MAC Addresses       : 0
Last Source Address:Vlan   : 0000.0000.0000:0
Security Violation Count   : 0
At this stage:
The port is active.
No MAC address has been learned yet.
The port is waiting for traffic to identify the first device.
Step 5 – When Traffic Is Detected
As soon as PC1 sends a frame, the switch learns its MAC address:
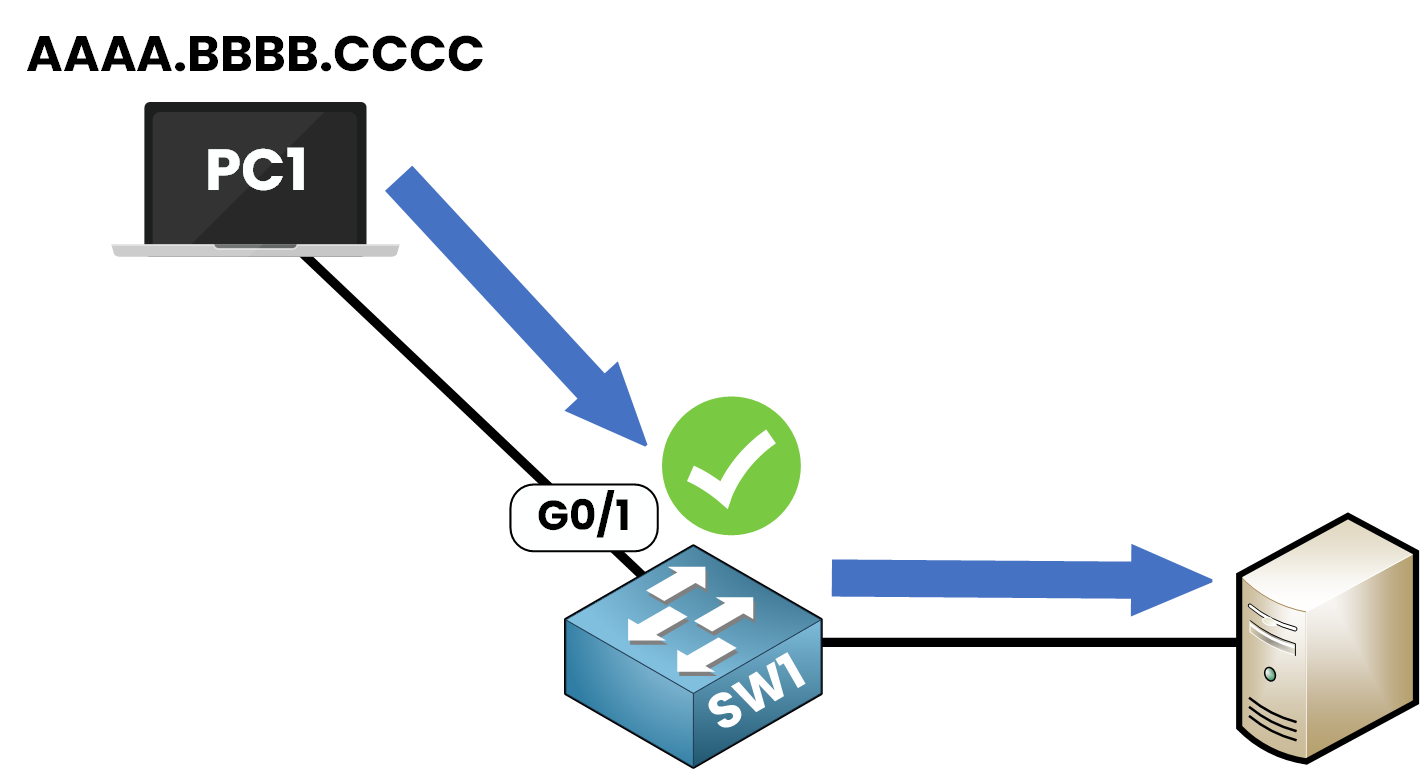
Figure 8 – MAC Address Learned After Traffic Detection
Check the updated status:
SW1# show port-security interface g0/1
Port Security              : Enabled
Port Status                : Secure-up
Violation Mode             : Shutdown
Aging Time                 : 0 mins
Aging Type                 : Absolute
SecureStatic Address Aging : Disabled
Maximum MAC Addresses      : 1
Total MAC Addresses        : 1
Configured MAC Addresses   : 0
Sticky MAC Addresses       : 0
Last Source Address:Vlan   : AAAA.BBBB.CCCC:1
Security Violation Count   : 0
✅ The MAC address AAAA.BBBB.CCCC is now trusted.
🚫 Any other MAC address will trigger a violation.Step 6 – What If an Unauthorized Device Connects?
Let's say someone plugs in a second device using MAC DDDD.EEEE.FFFF.
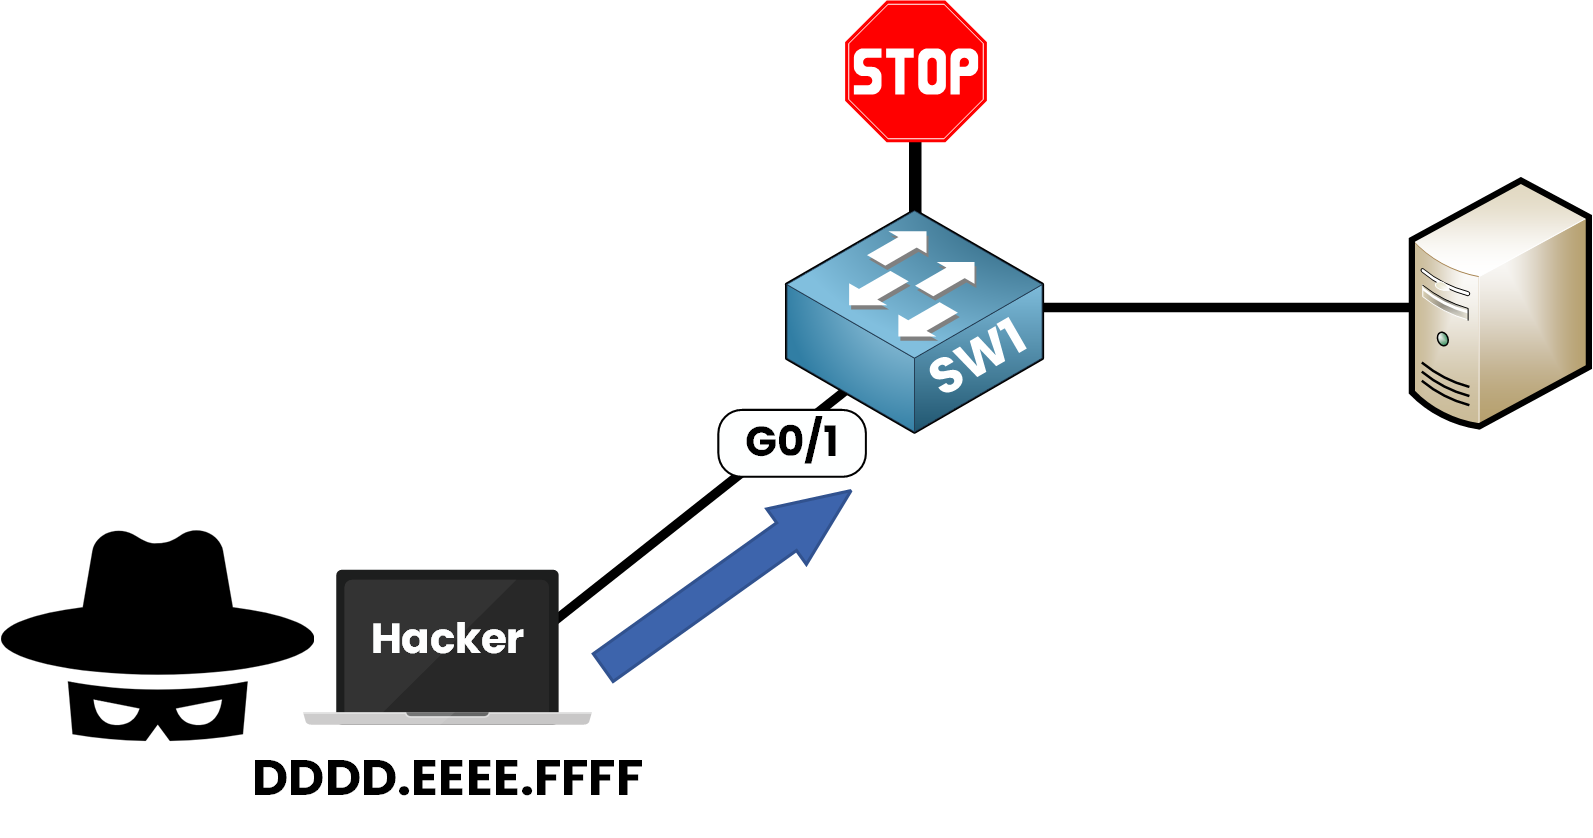
Figure 9 – Security Violation Triggered by Unauthorized MAC Address
Because this MAC address differs from the trusted one, the switch triggers a security violation and shuts down the port.
*Jan 21 11:21:46.891: %PM-4-ERR_DISABLE: psecure-violation error detected o
n Gi0/1, putting Gi0/1 in err-disable state

*Jan 21 11:21:46.894: %PORT_SECURITY-2-PSECURE_VIOLATION: Security violatio
n occurred, caused by MAC address DDDD.EEEE.FFFF on port GigabitEthernet0/1


*Jan 21 11:21:48.893: %LINK-3-UPDOWN: Interface GigabitEthernet0/1, changed
 state to down
The interface is now in err-disabled state. No traffic will pass through this port until it is recovered.
Step 7 – Checking the Interface After Violation
To investigate the security violation, start by checking the Port Security status of the interface:
SW1# show port-security interface g0/1
Port Security              : Enabled
Port Status                : Secure-shutdown
Violation Mode             : Shutdown
Aging Time                 : 0 mins
Aging Type                 : Absolute
SecureStatic Address Aging : Disabled
Maximum MAC Addresses      : 1
Total MAC Addresses        : 0
Configured MAC Addresses   : 0
Sticky MAC Addresses       : 0
Last Source Address:Vlan   : DDDD.EEEE.FFFF:1
Security Violation Count   : 1
Here's what we observe:
Port Status is Secure-shutdown → The switch has shut down the port in response to a violation.
Last Source Address shows the unauthorized MAC address (DDDD.EEEE.FFFF).
Security Violation Count is 1, meaning one unauthorized device has been detected.
To confirm that the interface is disabled, check its operational status with:
SW1# show interfaces status

Port      Name               Status       Vlan       Duplex  Speed Type
Gi0/0                        connected    1            auto   auto RJ45
Gi0/1                        err-disabled 1            auto   auto RJ45
The interface Gi0/1 is now in an err-disabled state.
No traffic will be allowed through this port until the violation is cleared and the interface is manually or automatically recovered.
Answer the question below
By default, what happens to a port when a security violation occurs: does it stay up or get disabled?
When a security violation occurs, the interface enters the err-disabled state, completely shutting down the port. No traffic will pass until you take action.
There are two ways to bring the interface back online:
Manual Recovery — requires administrator action
Automatic Recovery — enabled through errdisable recovery
Let's break down both methods.
Manual Recovery
Manual recovery is the most direct way to bring an interface back up, but it requires human intervention.
This is done by issuing a shutdown followed by a no shutdown on the affected interface.
Step-by-step: Reset the interface
Enter interface configuration mode:
SW1# conf t
Enter configuration commands, one per line.  End with CNTL/Z.
SW1(config)# int g0/1
2. Shut down the port:
SW1(config-if)# shutdown
%LINK-5-CHANGED: Interface GigabitEthernet0/0, changed state to administratively down
%LINEPROTO-5-UPDOWN: Line protocol on Interface GigabitEthernet0/0, changed state to down
3. Reactivate the port:
SW1(config-if)# no shutdown
%LINK-5-CHANGED: Interface GigabitEthernet0/0, changed state to up
%LINEPROTO-5-UPDOWN: Line protocol on Interface GigabitEthernet0/0, changed state to up
SW1(config-if)# end
⚠️ Important prerequisite
Before reactivating the interface, you must physically disconnect the unauthorized device.
If the same MAC address is still connected when the port comes back up, the violation will immediately occur again, putting the port back into the err-disabled state.Now, verify the port security status:
SW1# show port-security interface g0/1
Port Security              : Enabled
Port Status                : Secure-up
Violation Mode             : Shutdown
Aging Time                 : 0 mins
Aging Type                 : Absolute
SecureStatic Address Aging : Disabled
Maximum MAC Addresses      : 1
Total MAC Addresses        : 0
Configured MAC Addresses   : 0
Sticky MAC Addresses       : 0
Last Source Address:Vlan   : 0000.0000.0000:0
Security Violation Count   : 0
At this point:
The port is re-enabled and back to Secure-up status.
The MAC address that triggered the violation has been cleared.
The security violation count is reset to 0.
While this method works well, it requires manual intervention each time a violation occurs. In large networks, this can be impractical. That's where automatic recovery comes in.
Err-Disable Recovery
While manual recovery works well, it requires human intervention every time a violation occurs.
In large-scale networks, this can become tedious and inefficient.That's where Err-Disable Recovery comes in.
This feature allows the switch to automatically re-enable an interface that was shut down due to a security violation after a configurable timeout.
Checking the Current Err-Disable Recovery Configuration
By default, Err-Disable Recovery is disabled for all causes, including port security violations (psecure-violation).
To check which causes are currently being monitored:
SW1# show errdisable recovery
ErrDisable Reason            Timer Status
-----------------            --------------
arp-inspection               Disabled
bpduguard                    Disabled
channel-misconfig (STP)      Disabled
dhcp-rate-limit              Disabled
dtp-flap                     Disabled
gbic-invalid                 Disabled
inline-power                 Disabled
l2ptguard                    Disabled
link-flap                    Disabled
mac-limit                    Disabled
link-monitor-failure         Disabled
loopback                     Disabled
oam-remote-failure           Disabled
pagp-flap                    Disabled
port-mode-failure            Disabled
pppoe-ia-rate-limit          Disabled
psecure-violation            Disabled
security-violation           Disabled
sfp-config-mismatch          Disabled
storm-control                Disabled
udld                         Disabled
unicast-flood                Disabled
vmps                         Disabled
psp                          Disabled
dual-active-recovery         Disabled
evc-lite input mapping fa    Disabled
Recovery command: "clear     Disabled

Timer interval: 300 seconds

Interfaces that will be enabled at the next timeout:
Key Observations
Recovery for psecure-violation is disabled
Default recovery timer is 300 seconds (5 minutes)
No interfaces are scheduled for automatic recovery
Enabling Err-Disable Recovery
To enable automatic recovery for port security violations:
SW1# conf t
Enter configuration commands, one per line.  End with CNTL/Z.
SW1(config)# errdisable recovery cause psecure-violation
To reduce the wait time (for example, to 60 seconds):
SW1(config)# errdisable recovery interval 60
SW1(config)# end
This sets the recovery timer to 60 seconds.
Verifying Err-Disable Recovery
Run the same command again:
SW1# show errdisable recovery
ErrDisable Reason            Timer Status
-----------------            --------------
!!! Output omitted !!!
psecure-violation            Enabled
!!! Output omitted !!!

Timer interval: 60 seconds

Interfaces that will be enabled at the next timeout:

Interface       Errdisable reason       Time left(sec)
---------       -----------------       --------------
Gi0/1          psecure-violation           48
✅ psecure-violation recovery is now enabled.
✅ The recovery timer is set to 60 seconds.
✅ Interface Gi0/1 will automatically recover in 48 seconds.
Automatic Recovery in Action
Once the timer expires, the switch attempts to bring the interface back up. You'll see logs like:
*Jan 21 11:22:46.892: %PM-4-ERR_RECOVER: Attempting to recover from psecure-violation err-disable state on Gi0/1

*Jan 21 11:22:48.918: %LINK-3-UPDOWN: Interface GigabitEthernet0/1, changed state to up

*Jan 21 11:22:49.918: %LINEPROTO-5-UPDOWN: Line protocol on Interface GigabitEthernet0/1, changed state to up
The port is now active again without any manual action.
Important Reminder: Disconnect Unauthorized Devices!
While Err-Disable Recovery is convenient, you must disconnect the unauthorized device before the timer expires. Here's why:
1. If a static secure MAC is configured, the port will immediately go back to err-disabled as soon as the same MAC sends traffic.
2. If the secure MAC address was dynamically learned, it is cleared when the interface enters err-disabled mode.
If the unauthorized device is still connected when the port recovers, its MAC address may be learned as the new secure MAC, which compromises network security.
Recap
Feature
Manual Recovery
Err-Disable Recovery
Needs admin action
✅ Yes
❌ No
Command required
shutdown + no shutdown
errdisable recovery commands
Timeout configurable
❌ No (instant manual reset)
✅ Yes
Scales for large networks
❌ Not ideal
✅ Recommended
Still needs device removal
✅ Yes
✅ Yes
Table 1 – Manual vs Err-Disable Recovery in Port Security
Answer the question below
To recover an err-disabled port, do you type "shutdown" or "no shutdown" first?
Sometimes you want to secure ports automatically, without typing MAC addresses manually. That's exactly what Sticky Secure MAC Address is for.
This feature allows a switch to dynamically learn MAC addresses and automatically add them to the running configuration as secure addresses.
Why Use Sticky MAC?
It's perfect when:
You want automation but still need control.
You want to avoid typing each MAC by hand.
You want to "lock" the current device on the port once traffic is detected.
Once the configuration is saved, sticky addresses become as solid as static ones.
Enable Sticky MAC Learning
Here's how to activate it on an interface:
SW1# conf t
Enter configuration commands, one per line.  End with CNTL/Z.
SW1(config)# int g0/1
SW1(config-if)# switchport port-security
SW1(config-if)# switchport port-security mac-address sticky
SW1(config-if)# end
As soon as traffic is received on this port, the switch will:
Save it in the running configuration.
Learn the MAC address.
Secure it.
Verifying Sticky Learning
Before the port receives any traffic, you'll notice the sticky MAC address count is 0:
SW1# show port-security interface g0/1
Port Security              : Enabled
Port Status                : Secure-up
Violation Mode             : Shutdown
Aging Time                 : 0 mins
Aging Type                 : Absolute
SecureStatic Address Aging : Disabled
Maximum MAC Addresses      : 1
Total MAC Addresses        : 0
Configured MAC Addresses   : 0
Sticky MAC Addresses       : 0
Last Source Address:Vlan   : 0000.0000.0000:0
Security Violation Count   : 0
Now, let's say PC1 sends traffic through the switch.
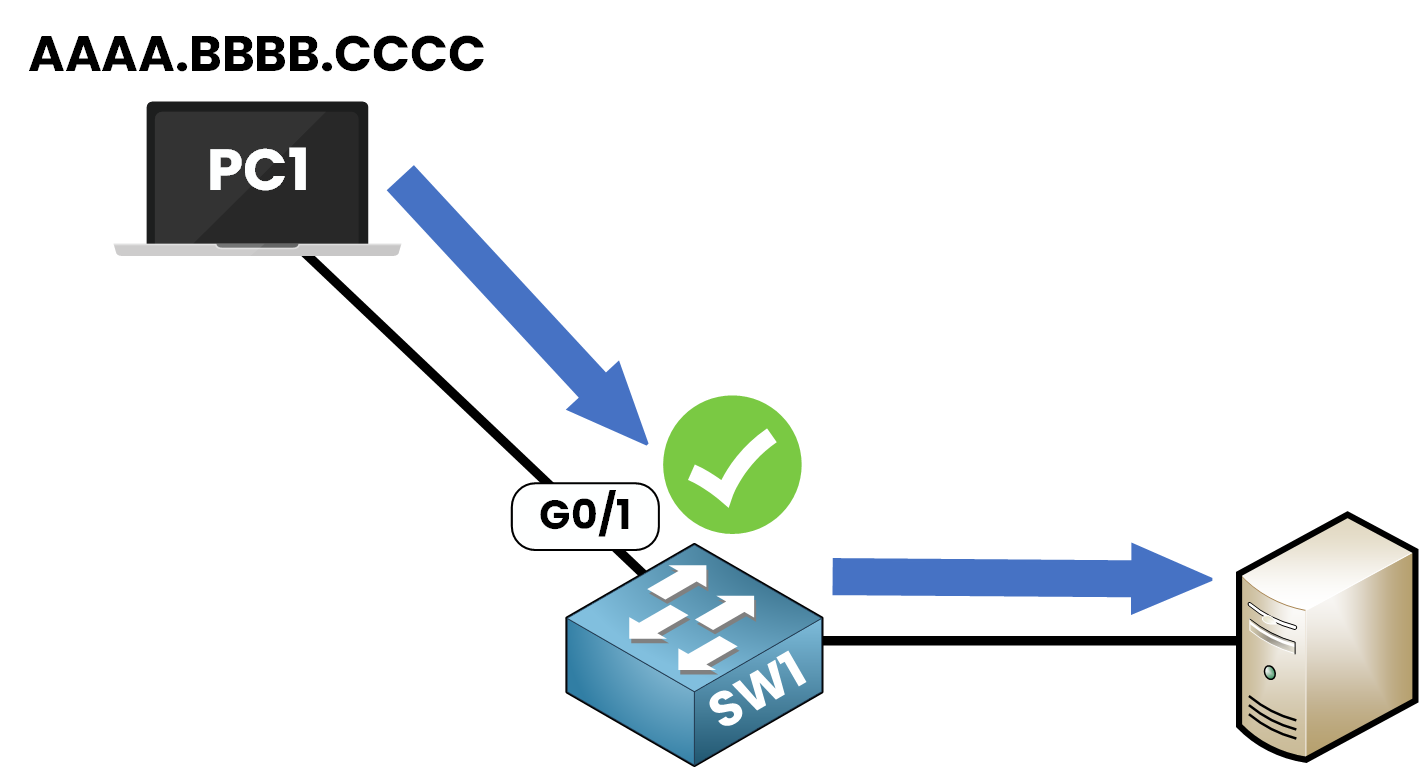
Figure 10 – Port Security Learns the MAC Address Upon Traffic Detection
The switch will dynamically learn its MAC address, and you can verify this:
SW1# show port-security interface g0/1
Port Security              : Enabled
Port Status                : Secure-up
Violation Mode             : Shutdown
Aging Time                 : 0 mins
Aging Type                 : Absolute
SecureStatic Address Aging : Disabled
Maximum MAC Addresses      : 1
Total MAC Addresses        : 1
Configured MAC Addresses   : 0
Sticky MAC Addresses       : 1
Last Source Address:Vlan   : AAAA.BBBB.CCCC:1
Security Violation Count   : 0
You see? The MAC address AAAA.BBBB.CCCC from PC1 is now learned and secured.
Checking the Running Configuration
You'll also find that the sticky MAC address is automatically added to the running configuration:
SW1# show run int g0/1

interface GigabitEthernet0/1
 switchport mode access
 switchport port-security mac-address sticky
 switchport port-security mac-address sticky AAAA.BBBB.CCCC
 switchport port-security
Sticky MAC addresses are only saved in the running configuration. If you restart the switch without saving, the configuration will be lost. Make sure to save your configuration using:
SW1# copy running-config startup-config
Building configuration...
[OK]
Answer the question below
What feature saves dynamically learned MACs to the config?
Let's quickly recap what you've learned about Port Security:
What is Port Security?
A security feature that restricts access to switch interfaces based on source MAC addresses. It prevents unauthorized devices from connecting to the network.
MAC Address Learning
Dynamic learning: the switch learns MAC addresses automatically.
Static configuration: you manually define the MAC addresses.
Sticky learning: dynamically learned addresses are added to the running configuration.
Number of Allowed Devices
You can limit how many MAC addresses are accepted per port, depending on your use case (example: PC + IP phone).
Recovering Interfaces
Manual recovery: use shutdown / no shutdown.
Automatic recovery: enable errdisable recovery to bring the port back after a timeout.
Sticky MAC Addresses
Sticky learning secures MAC addresses automatically.
Don't forget to save the config with:
copy running-config startup-configFor more information on Port Security
Next Steps
Now that you understand how Port Security controls access and how to recover from violations, let's move on to the violation modes and how each impacts the switch's behavior.
Answer the question below
Click 'Complete' to continue