In this lab, you will configure OSPF in a simple network made of four routers and two PCs.
This is your first hands-on OSPF configuration.
You don’t need to know any Cisco commands yet. Just follow the steps with me, type the commands as shown, and observe how OSPF behaves on real routers.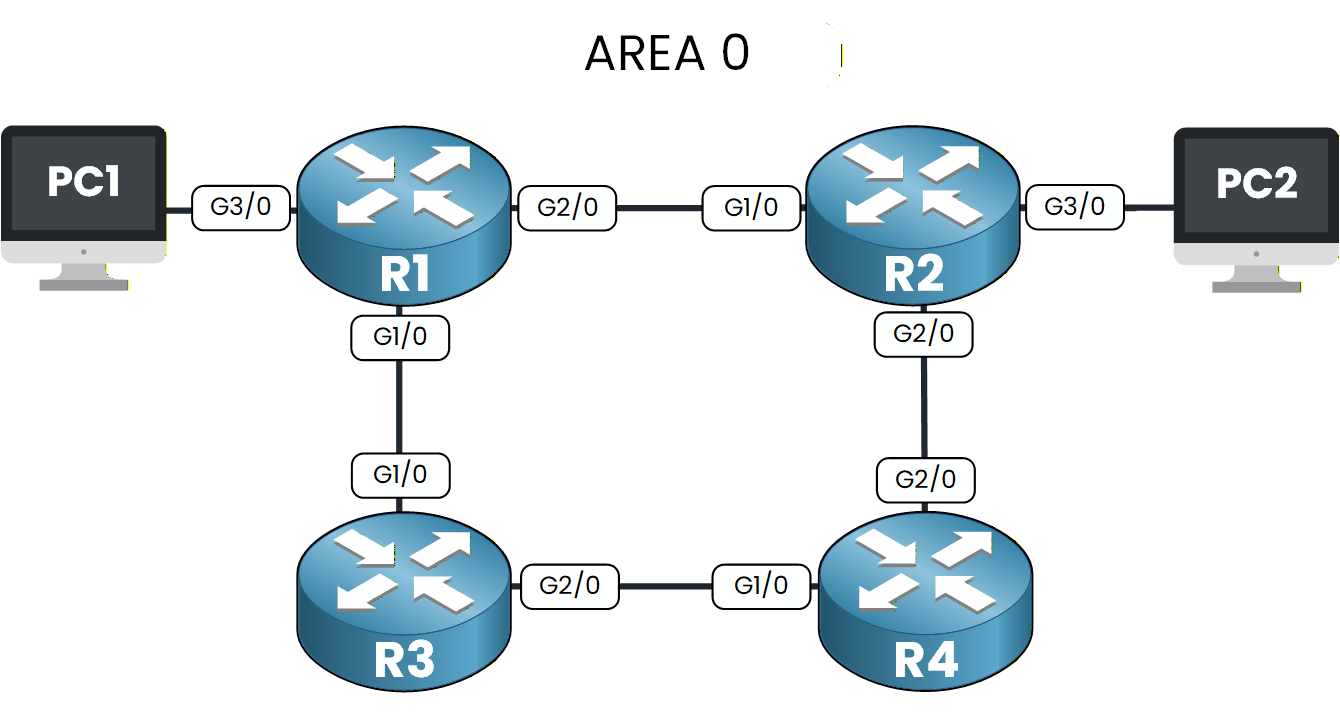
Figure 1 – OSPF Configuration Lab Topology
Your objective is to start the OSPF process, advertise networks, verify adjacencies, inspect learned routes, and finally test end-to-end connectivity between the two PCs.
We will walk through everything step by step together.
Lab Overview
Here is the structure we will follow throughout this lab:
Step 1 – Enable the OSPF process
Step 2 – Advertise networks in OSPF
Step 3 – Verify OSPF neighbor adjacencies
Step 4 – Verify OSPF learned routes
Step 5 – Test end-to-end connectivity
Let’s Get Started
Begin with Step 1 to enable OSPF on each router.
Follow each step carefully to configure, test, and fully understand how OSPF operates.Answer the question below
Before configuring anything, take a moment to look at the OSPF topology.
Every router belongs to Area 0, and all IP addresses are already configured.Your first task is to activate OSPF on each router.
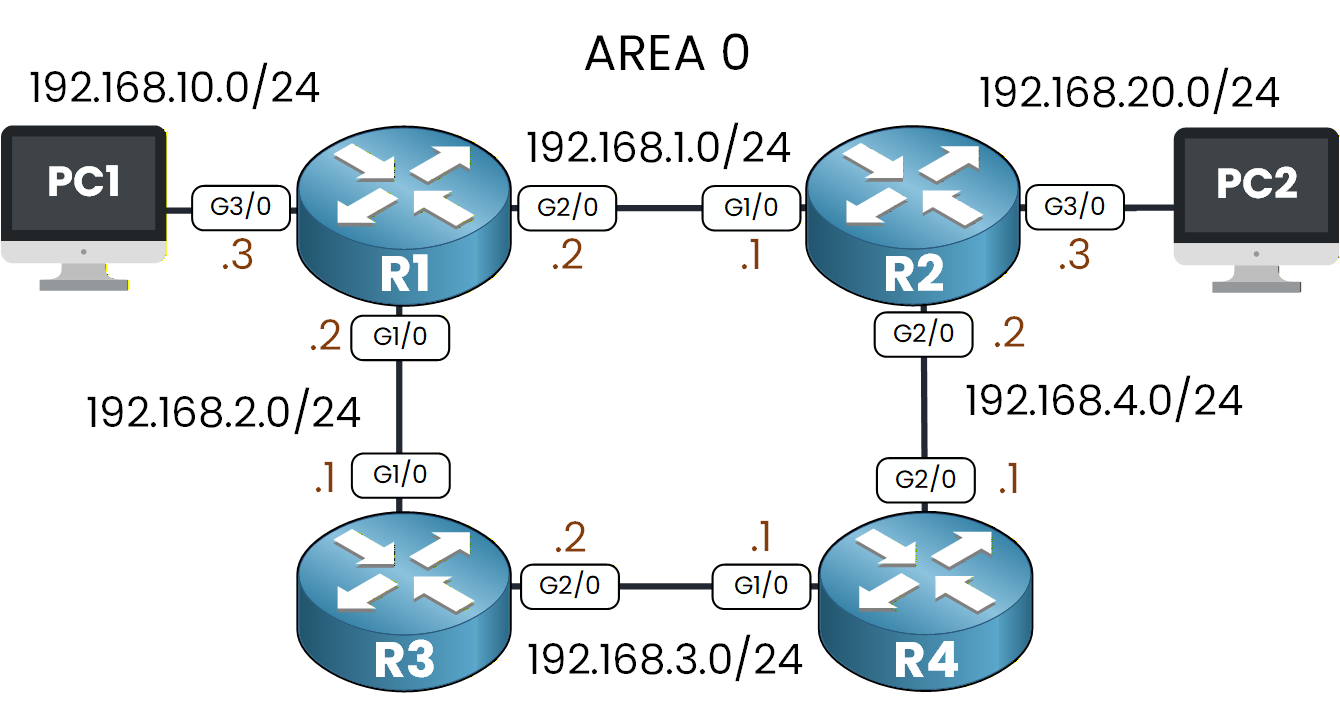
Figure 2 – OSPF Topology with IP Addressing
To enable OSPF, we need to create an OSPF process.
This tells the router to start running OSPF.
In our case, we will use OSPF process 1.Creating the OSPF Process
We start with router R1:
R1# conf t
Enter configuration commands, one per line.  End with CNTL/Z.
R1(config)# router ospf 1
R1(config-router)# end
This command enables OSPF using Process ID 1.
The Process ID is locally significant, which means you can choose any number.
It only matters on the router itself.To verify that the OSPF process is running, type:
R1# show ip ospf
 Routing Process "ospf 1" with ID 192.168.10.3
 Supports only single TOS(TOS0) routes
 Supports opaque LSA
 SPF schedule delay 5 secs, Hold time between two SPFs 10 secs
 Minimum LSA interval 5 secs. Minimum LSA arrival 1 secs
 Number of external LSA 0. Checksum Sum 0x000000
 Number of opaque AS LSA 0. Checksum Sum 0x000000
 Number of DCbitless external and opaque AS LSA 0
 Number of DoNotAge external and opaque AS LSA 0
 Number of areas in this router is 0. 0 normal 0 stub 0 nssa
 External flood list length 0
You don’t need to interpret the full output yet.
For now, just look for the first line Routing Process "ospf 1" .
If you see it, OSPF is active on the router.Now go ahead and repeat the exact same action on the remaining routers.
On R2, R3, and R4, enter:R2# conf t Enter configuration commands, one per line. End with CNTL/Z. R2(config)# router ospf 1R3# conf t Enter configuration commands, one per line. End with CNTL/Z. R3(config)# router ospf 1R4# conf t Enter configuration commands, one per line. End with CNTL/Z. R4(config)# router ospf 1Once you’ve done this on all routers, OSPF is enabled everywhere.
In the next step, you will tell each router which networks should participate in OSPF.Answer the question below
Look at the first line of the show ip ospf output on R1. What OSPF Process ID is displayed?
Now that OSPF is enabled on every router, the next step is to tell each router which networks should participate in OSPF.
Each router must advertise the networks that are directly connected to its interfaces.
By doing this, OSPF will discover the entire topology and exchange routes between all routers.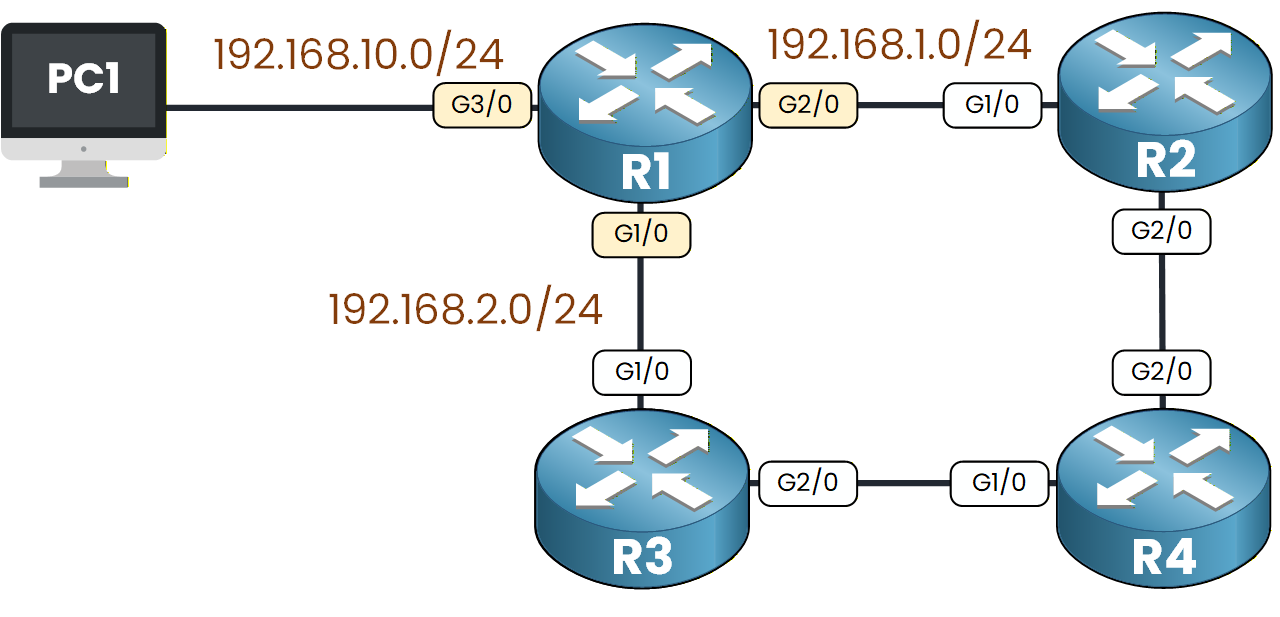
Figure 3 – OSPF Network Advertisement from R1
If we look at the topology, R1 is directly connected to:
192.168.1.0/24
192.168.2.0/24
192.168.10.0/24
How to Advertise a Network?
To advertise a network in OSPF, we use the
networkcommand inside OSPF router configuration mode.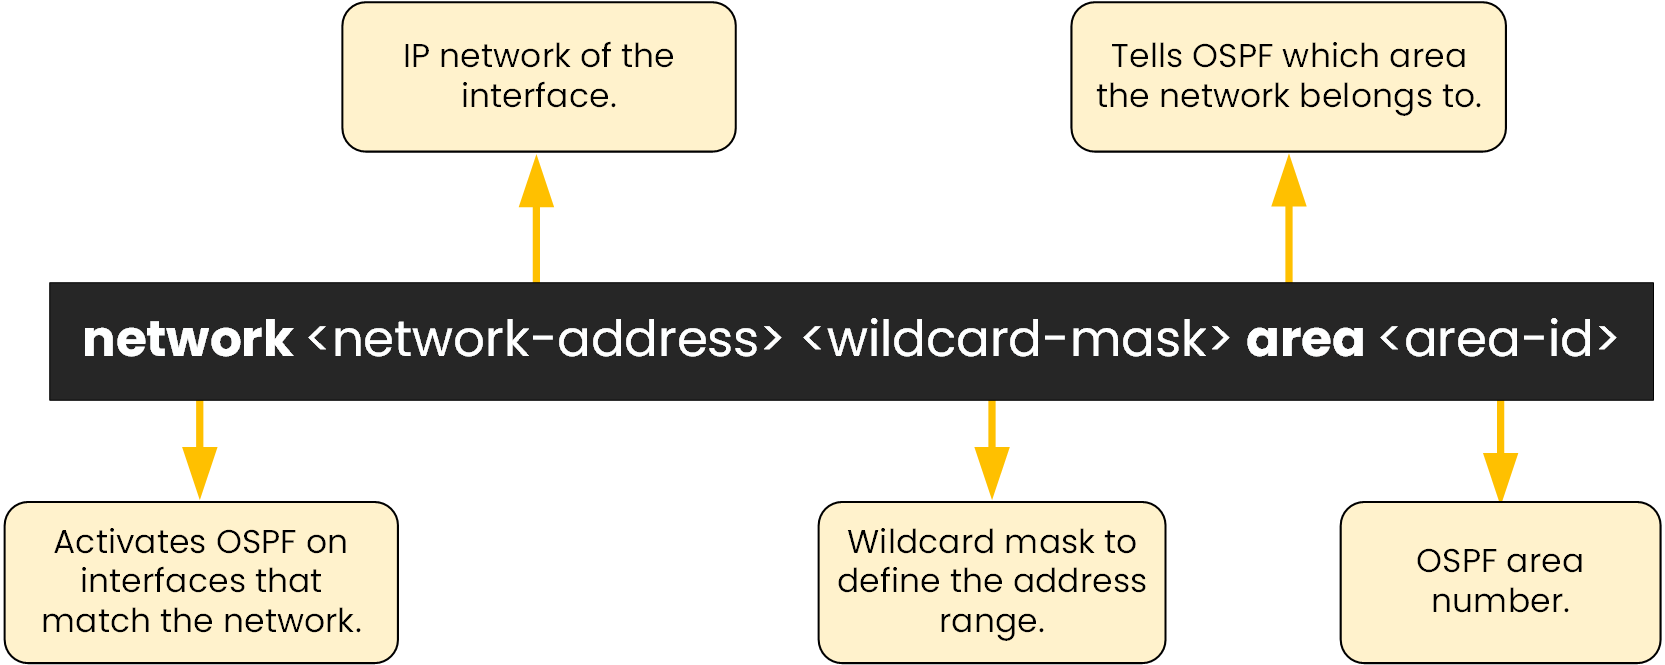
Figure 4 – OSPF Network Command Breakdown
This diagram shows the meaning of each part of the command.
A wildcard mask defines the range of IP addresses that OSPF should match.
It is simply the inverse of the subnet mask (255.255.255.0 → 0.0.0.255).
That’s all you need for now.Advertising the Networks on R1
To advertise the 192.168.1.0/24 network:
R1# conf t
Enter configuration commands, one per line.  End with CNTL/Z.
R1(config)# router ospf 1
R1(config-router)# network 192.168.1.0 0.0.0.255 area 0
This tells OSPF:
“Enable OSPF on any interface whose IP address is between 192.168.1.0 and 192.168.1.255.”
Then advertise the remaining networks:
R1(config-router)# network 192.168.2.0 0.0.0.255 area 0
R1(config-router)# network 192.168.10.0 0.0.0.255 area 0
R1(config-router)# end
Now, we can verify which interfaces are participating in OSPF:
R1# show ip ospf interface brief
Interface     PID   Area                     IP Address/Mask          Cost  State  Nbrs F/C
Gig2/0          1   0                      192.168.1.2/255.255.255.0   1     WAIT  0/0
Gig1/0          1   0                      192.168.2.2/255.255.255.0   1     WAIT  0/0
Gig3/0          1   0                     192.168.10.3/255.255.255.0   1     WAIT  0/0
Every interface connected to R1 is now participating in OSPF.
Next, we will advertise the networks on the remaining routers.Advertising Networks on the Other Routers
Repeat the exact same process on the remaining routers.
For each router, advertise all networks directly connected to its interfaces:40 % Complete: you’re making great progress
Unlock the rest of this lesson
If you’d like to continue your CCNA journey, simply create your free account.
Access all CCNA lessons
Practice with hands-on labs
Train with Practice exams and Quizzes
Progress tracking in your dashboard
Made by network engineers - CCNP certified
3632 learners globally