1. Introduction to IPv6 Static Route
An IPv6 static route is a manually configured route that tells the router how to reach a IPv6 remote network. Unlike dynamic routing protocols, Static Routes don’t adjust automatically they are fixed and must be maintained by the network administrator.
Just like in IPv4, the router needs a route to know where to forward packets. If no dynamic routing protocol is configured, a static route is required to connect different networks.
2. Problem Without Static Route
Let’s take the following topology:
Figure 1 – Initial IPv6 Topology
PC1 is in the
2001:DB8:1::/64
network.PC2 is in the
2001:DB8:2::/64
network.R1 and R2 are connected via
2001:DB8:10::/64
.
PC1 want to sends traffic to PC2. R1 receives the packet but doesn’t know how to reach the destination network, because 2001:DB8:2::/64
network is not in his IPv6 Routing Table.
Figure 2 – Missing Static Route on R1
Without any static or dynamic route configured, R1 drops the packets and the communication between PC1 and PC2 fails.
3. Solution – Adding IPv6 Static Route
To fix the issue, as a network administrator we can configure a IPv6 static route on R1, pointing to R2’s IPv6 address 2001:db8:1::2
.
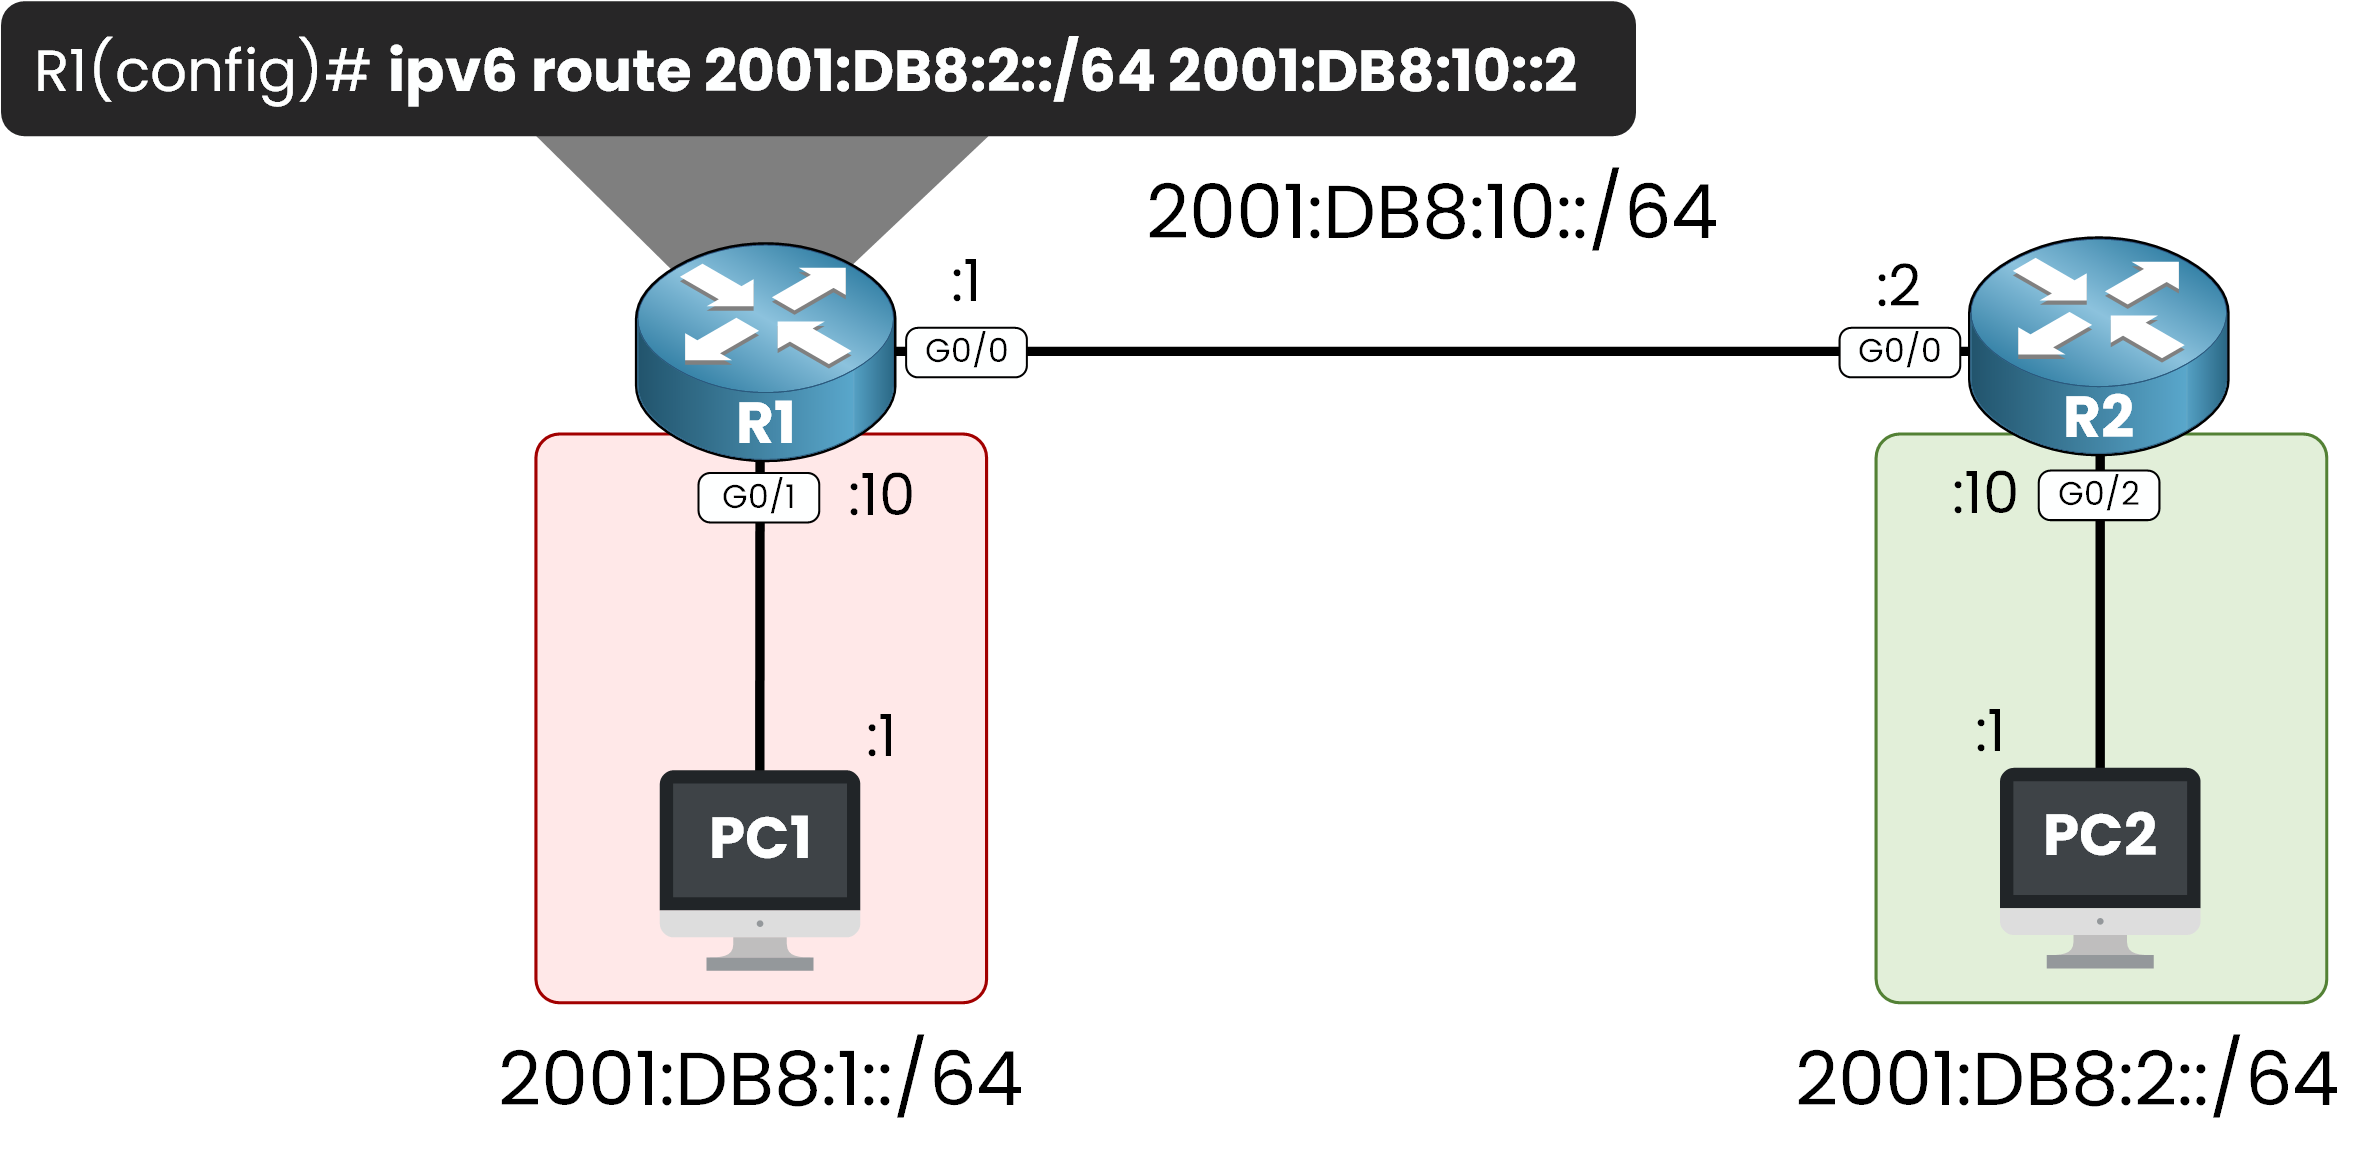
Figure 3 – Adding an IPv6 Static Route on R1
At this point, R1 is now able to forward traffic destinated to 2001:db8:2::/64 to his next hop 2001:db8:10::2.
However, R2 still doesn’t know how to reach the 2001:DB8:1::/64 network.
To complete the communication, we must add a return IPv6 static route on R2, pointing to R1.
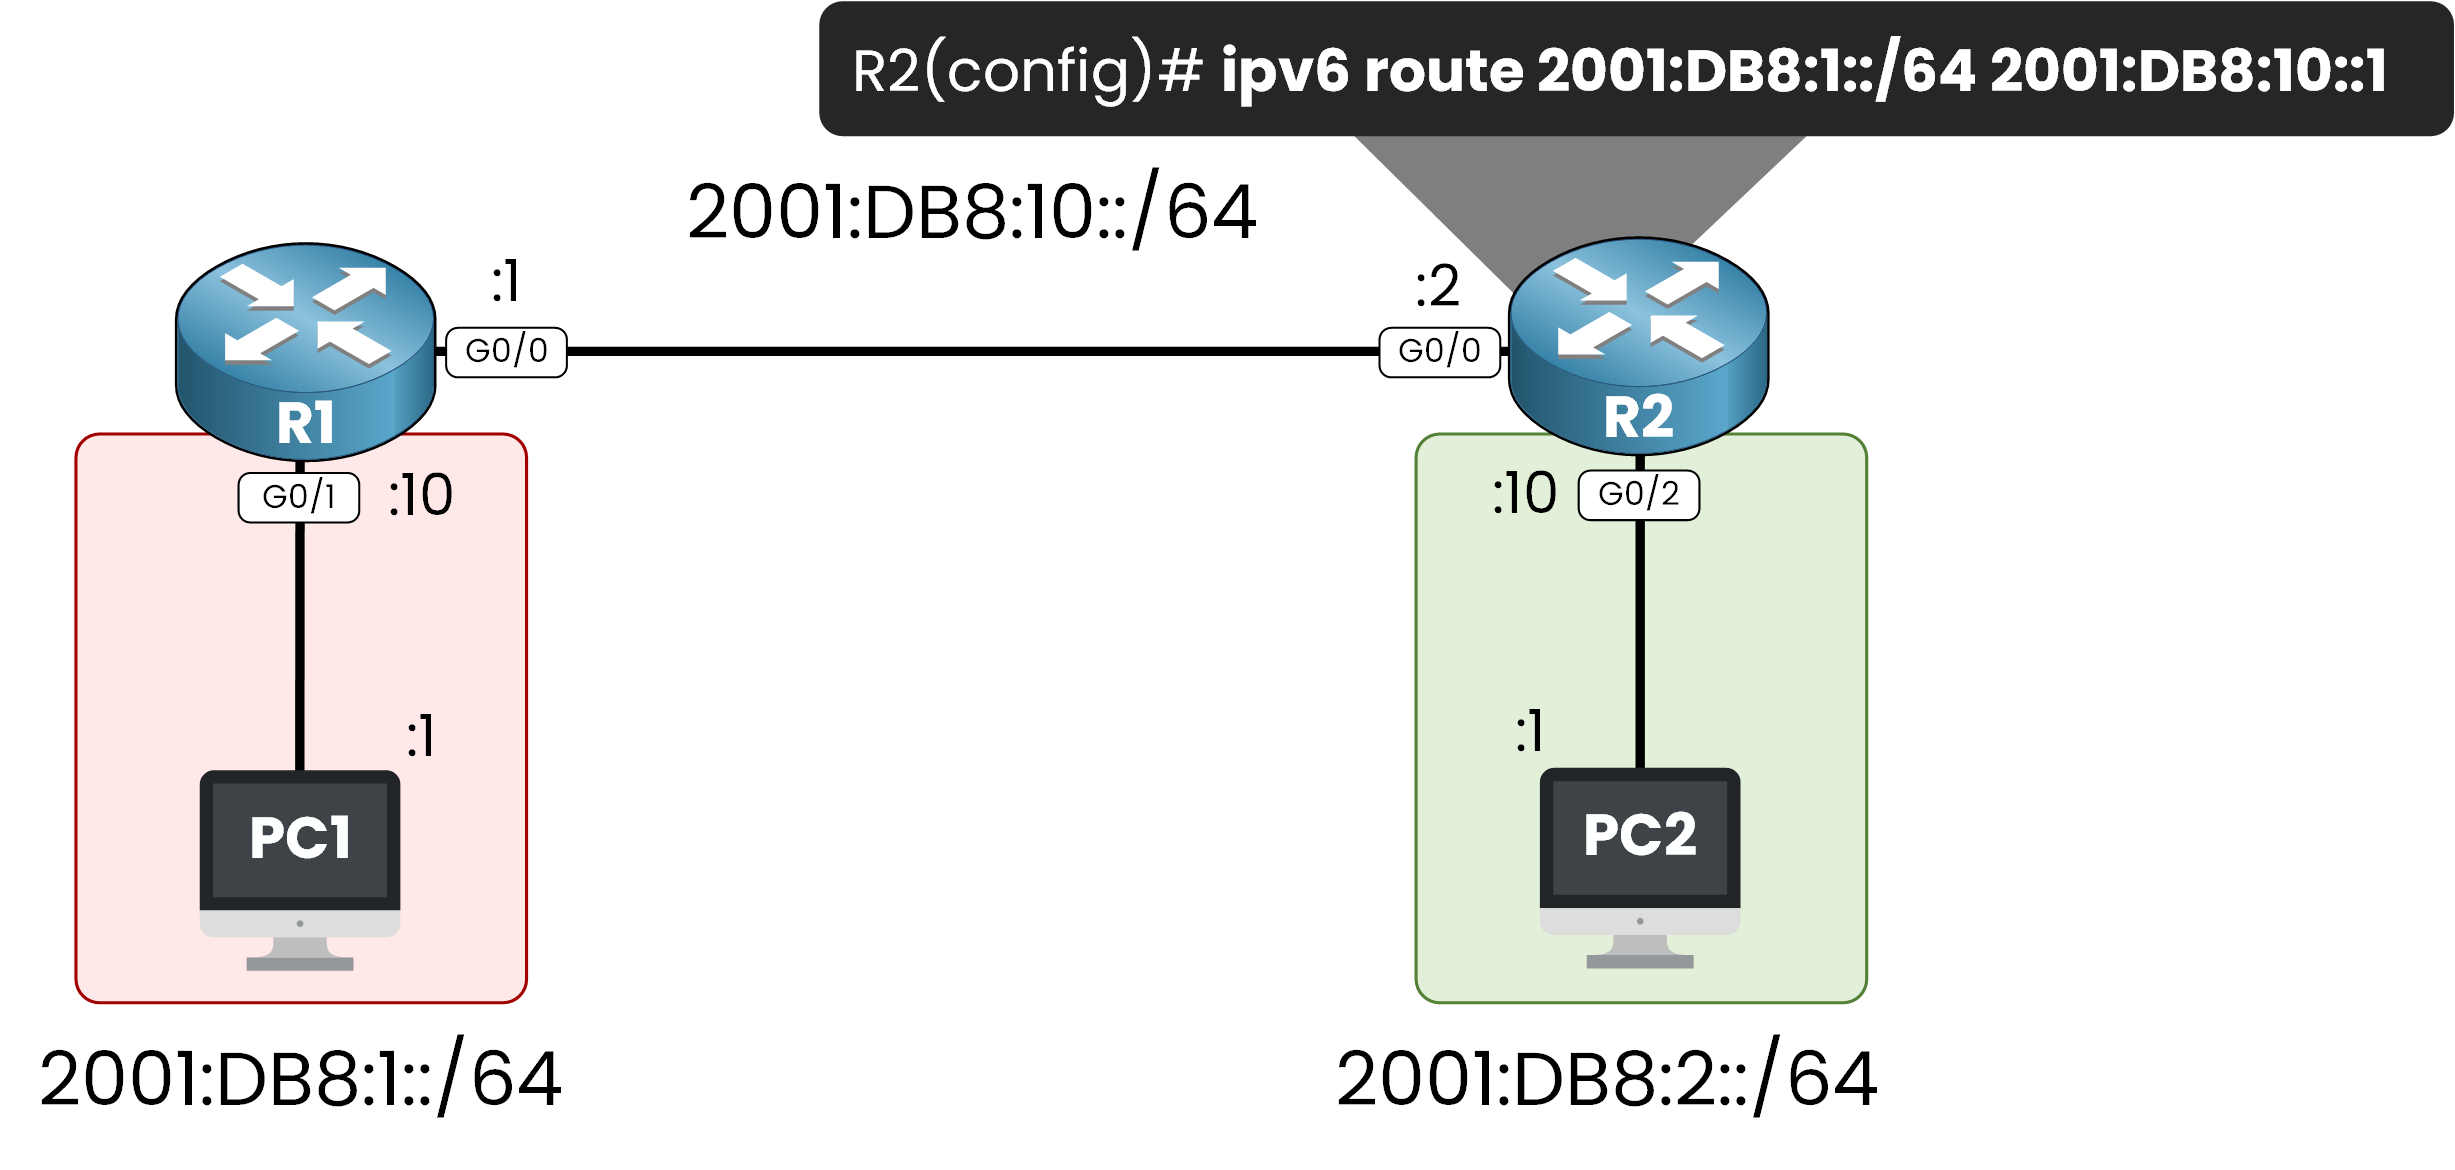
Figure 4 – IPv6 Static Route on R2
With static routes now configured on both routers, communication is possible between PC1 and PC2.
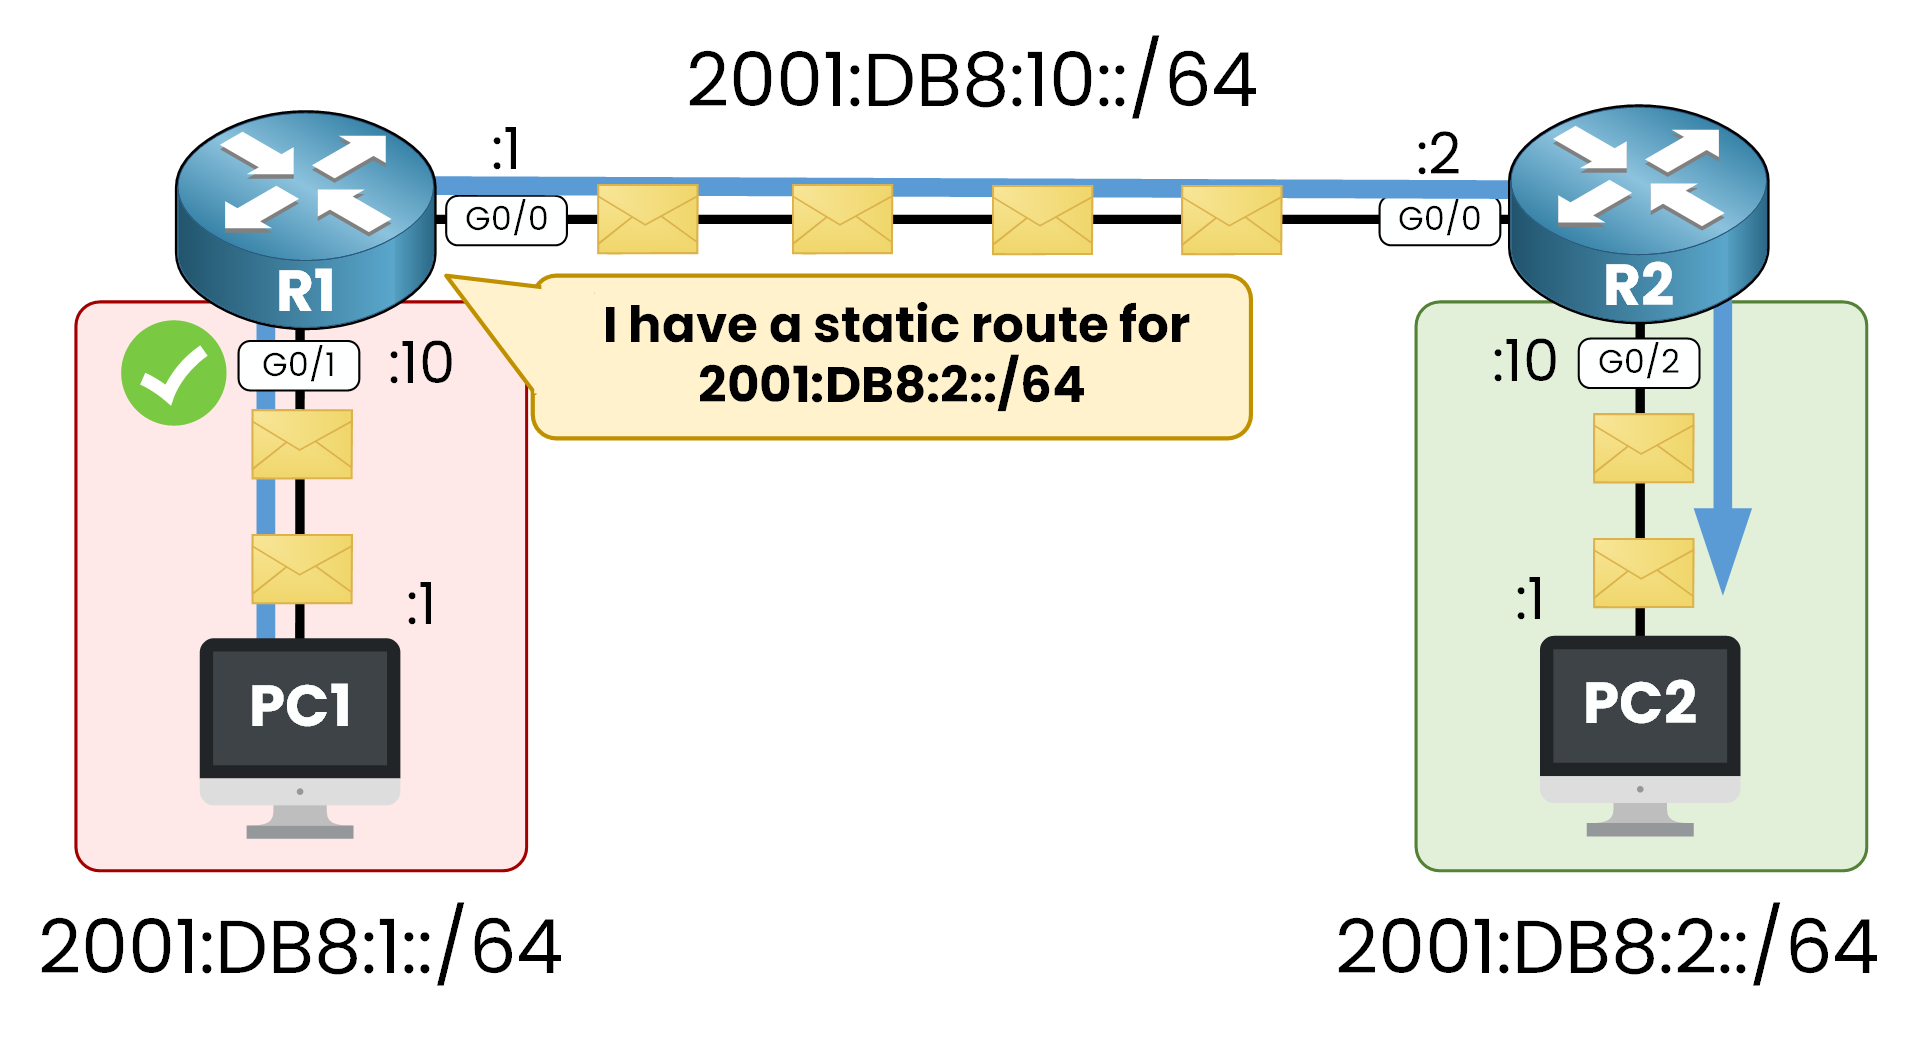
Figure 5 – IPv6 Static Route on R1 Working
Traffic from PC1 reaches PC2 by using R1 and R2.
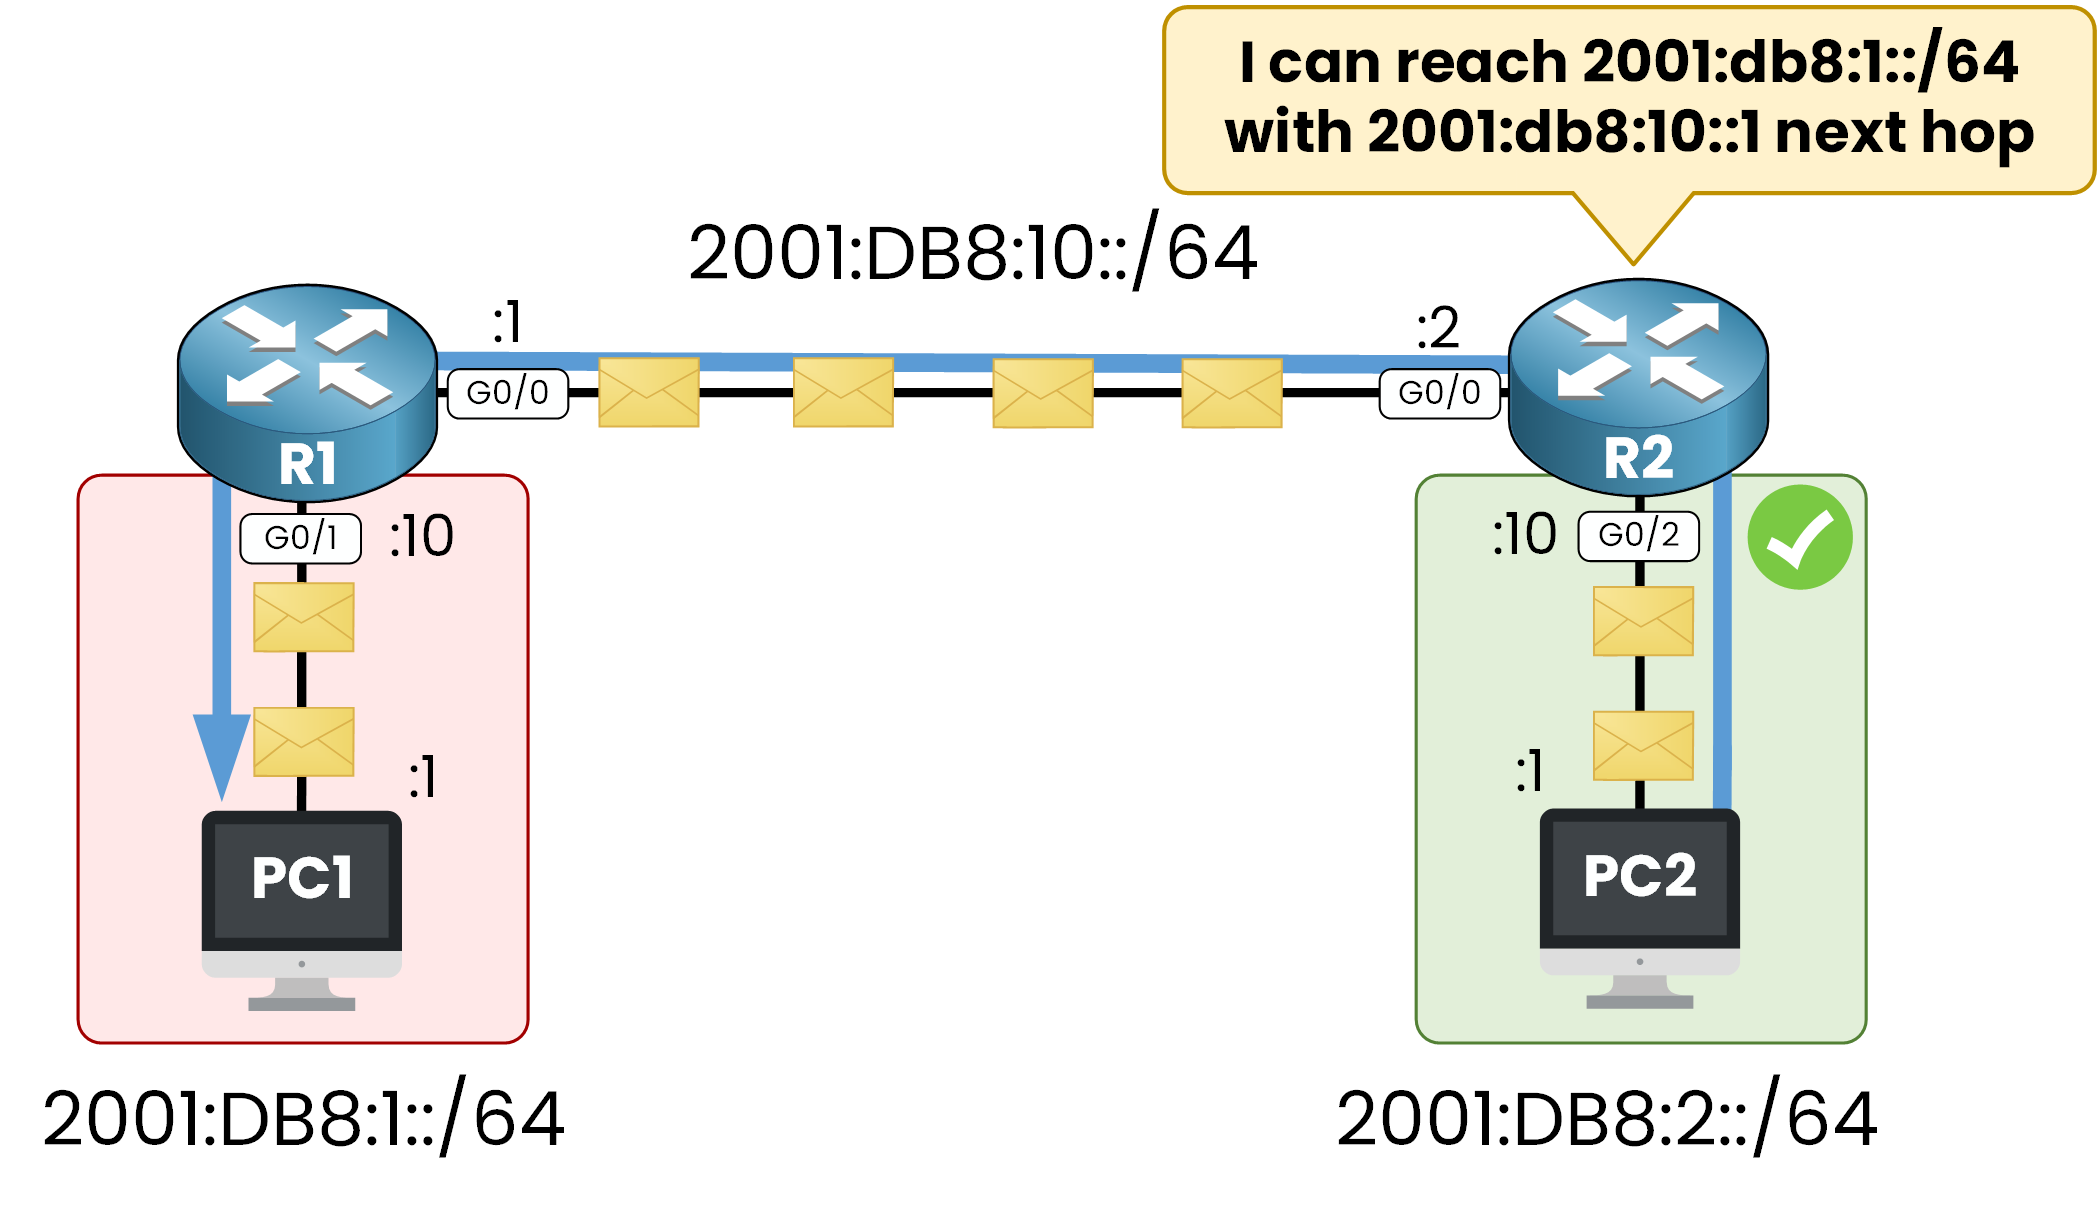
Figure 6 – IPv6 Static Route on R2 for Return Path
Reply packets from PC2 are returned to PC1 using the static route on R2 pointing to R1.
4. Configure IPv6 Static Route
Enough theory let's move into the Cisco IOS Cli to show you every step to configure a IPv6 Static Route.
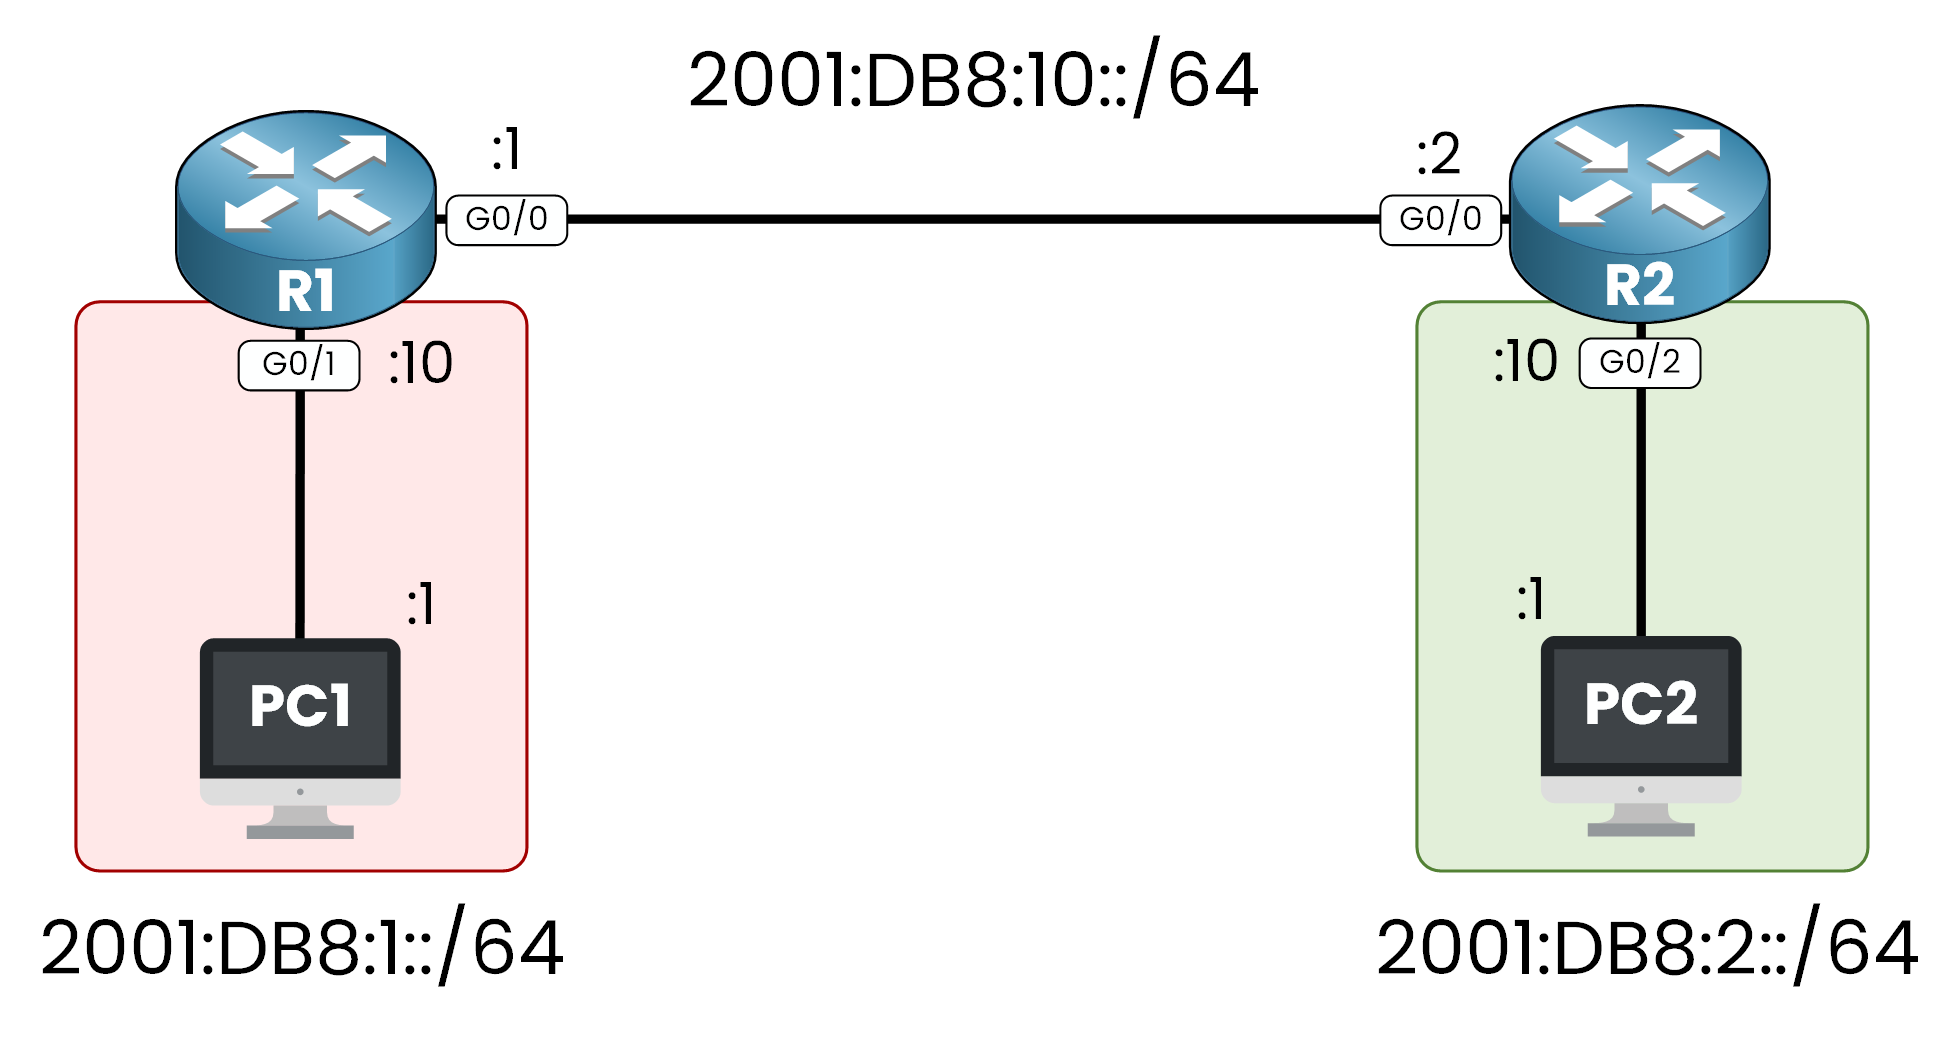
Figure 7 – Lab Topology IPv6 Static Route
Step 1 – Enable IPv6 Routing
First, you need to know that Cisco router don't have IPv6 routing by default.
We must activate this feature on both routers R1 and R2 using the command ipv6 unicast-routing
R1(config)# ipv6 unicast-routing
R2(config)# ipv6 unicast-routing
If this command is not configured, the router will still accept and assign IPv6 addresses to its interfaces. Local communication may work, but the router will not forward IPv6 packets between interfaces, and routing will not occur.
Step 2 – Configure IPv6 Addresses
Now let’s assign IPv6 addresses to the router interfaces based on the topology.
R1 Configuration
R1# configure terminal
R1(config)# interface g0/0
R1(config-if)# ipv6 address 2001:DB8:10::1/64
R1(config-if)# no shutdown
R1(config-if)# exit
R1(config)# interface g0/1
R1(config-if)# ipv6 address 2001:DB8:1::10/64
R1(config-if)# no shutdown
R1(config-if)# exit
R2 Configuration
R2# configure terminal
R2(config)# interface g0/0
R2(config-if)# ipv6 address 2001:DB8:10::2/64
R2(config-if)# no shutdown
R2(config-if)# exit
R2(config)# interface g0/1
R2(config-if)# ipv6 address 2001:DB8:2::10/64
R2(config-if)# no shutdown
R2(config-if)# exit
After configuring the interfaces, the router will automatically learn:
A connected route for each subnet (
C
)A local route for each interface IP (
L
)
You can check on the IPv6 Routing Table by using show ipv6 route
R1# show ipv6 route
IPv6 Routing Table - 5 entries
Codes: C - Connected, L - Local, S - Static, R - RIP, B - BGP
U - Per-user Static route, M - MIPv6
I1 - ISIS L1, I2 - ISIS L2, IA - ISIS interarea, IS - ISIS summary
ND - ND Default, NDp - ND Prefix, DCE - Destination, NDr - Redirect
O - OSPF intra, OI - OSPF inter, OE1 - OSPF ext 1, OE2 - OSPF ext 2
ON1 - OSPF NSSA ext 1, ON2 - OSPF NSSA ext 2
D - EIGRP, EX - EIGRP external
C 2001:DB8:1::/64 [0/0]
via GigabitEthernet0/1, directly connected
L 2001:DB8:1::10/128 [0/0]
via GigabitEthernet0/1, receive
C 2001:DB8:10::/64 [0/0]
via GigabitEthernet0/0, directly connected
L 2001:DB8:10::1/128 [0/0]
via GigabitEthernet0/0, receive
L FF00::/8 [0/0]
via Null0, receive
Step 3 – Add IPv6 Static Route on R1 and R2
Now let’s configure the static route on R1 to reach the 2001:DB8:2::/64
network behind R2.
R1# conf t
Enter configuration commands, one per line. End with CNTL/Z.
R1(config)# ipv6 route ?
X:X:X:X::X/<0-128> IPv6 prefix
We specify the destination prefix:
R1(config)# ipv6 route 2001:db8:2::/64 ?
Dialer Dialer interface
Ethernet IEEE 802.3
FastEthernet FastEthernet IEEE 802.3
GigabitEthernet GigabitEthernet IEEE 802.3z
Loopback Loopback interface
Serial Serial
Vlan Catalyst Vlans
X:X:X:X::X IPv6 address of next-hop
We then define the next-hop IPv6 address of R2:
R1(config)# ipv6 route 2001:db8:2::/64 2001:db8:10::2
The command ipv6 route 2001:db8:2::/64 2001:db8:10::2
means:
To reach the 2001:DB8:2::/64
network, forward packets to R2’s IPv6 address 2001:db8:10::2
on the shared link.
We can now verify the IPv6 Routing Table:
R1# show ipv6 route
IPv6 Routing Table - 6 entries
Codes: C - Connected, L - Local, S - Static, R - RIP, B - BGP
U - Per-user Static route, M - MIPv6
I1 - ISIS L1, I2 - ISIS L2, IA - ISIS interarea, IS - ISIS summary
ND - ND Default, NDp - ND Prefix, DCE - Destination, NDr - Redirect
O - OSPF intra, OI - OSPF inter, OE1 - OSPF ext 1, OE2 - OSPF ext 2
ON1 - OSPF NSSA ext 1, ON2 - OSPF NSSA ext 2
D - EIGRP, EX - EIGRP external
C 2001:DB8:1::/64 [0/0]
via GigabitEthernet0/1, directly connected
L 2001:DB8:1::10/128 [0/0]
via GigabitEthernet0/1, receive
S 2001:DB8:2::/64 [1/0]
via 2001:DB8:10::2
C 2001:DB8:10::/64 [0/0]
via GigabitEthernet0/0, directly connected
L 2001:DB8:10::1/128 [0/0]
via GigabitEthernet0/0, receive
L FF00::/8 [0/0]
via Null0, receive
The route to 2001:DB8:2::/64
is now visible and marked with an S
for static.
Reverse Configuration on R2
R2 also needs a static route to reach the 2001:DB8:1::/64
network behind R1.
R2# conf t
Enter configuration commands, one per line. End with CNTL/Z.
R1(config)# ipv6 route 2001:DB8:1::/64 2001:DB8:10::1
Verifying the IPv6 Routing Table on R2
R2# show ipv6 route
IPv6 Routing Table - 6 entries
Codes: C - Connected, L - Local, S - Static, R - RIP, B - BGP
U - Per-user Static route, M - MIPv6
I1 - ISIS L1, I2 - ISIS L2, IA - ISIS interarea, IS - ISIS summary
ND - ND Default, NDp - ND Prefix, DCE - Destination, NDr - Redirect
O - OSPF intra, OI - OSPF inter, OE1 - OSPF ext 1, OE2 - OSPF ext 2
ON1 - OSPF NSSA ext 1, ON2 - OSPF NSSA ext 2
D - EIGRP, EX - EIGRP external
S 2001:DB8:1::/64 [1/0]
via 2001:DB8:10::1
C 2001:DB8:2::/64 [0/0]
via GigabitEthernet0/2, directly connected
L 2001:DB8:2::10/128 [0/0]
via GigabitEthernet0/2, receive
C 2001:DB8:10::/64 [0/0]
via GigabitEthernet0/0, directly connected
L 2001:DB8:10::2/128 [0/0]
via GigabitEthernet0/0, receive
L FF00::/8 [0/0]
via Null0, receive
At this point, both routers can reach each other's networks using static routes.
Step 4 – Verify End-to-End IPv6 Connectivity
Now let's test the connectivity between PC1 and PC2 using IPv6.
From PC1 (Windows CLI)
C:\Users\PC1> ping -6 2001:DB8:2::20
Pinging 2001:DB8:2::20 with 32 bytes of data:
Reply from 2001:DB8:2::20: time=2ms
Reply from 2001:DB8:2::20: time=3ms
Reply from 2001:DB8:2::20: time=2ms
Ping statistics for 2001:DB8:2::20:
Packets: Sent = 4, Received = 4, Lost = 0 (0% loss),
IPv6 connectivity is now fully operational between both endpoints.
5. Summary
An IPv6 static route is a manually defined route used to reach a remote IPv6 network.
It’s essential when no dynamic routing protocol (like OSPFv3) is in use.
Static routes must be configured and updated manually by the network administr
Key Commands
Enable IPv6 routing:
R1(config)# ipv6 unicast-routing
Configure a static route with next-hop:
R1(config)# ipv6 route
R1(config)# ipv6 route 2001:db8:2::/64 2001:db8:10::2
Static routes are marked with
S
in the routing table.
Thave an Administrative Distance of 1 by default.
While it’s possible to configure routes using the outgoing interface, the CCNA exam focuses on the next-hop IPv6 address method.