In this lab, you are going to configure OSPFv3 in a multi-area environment.
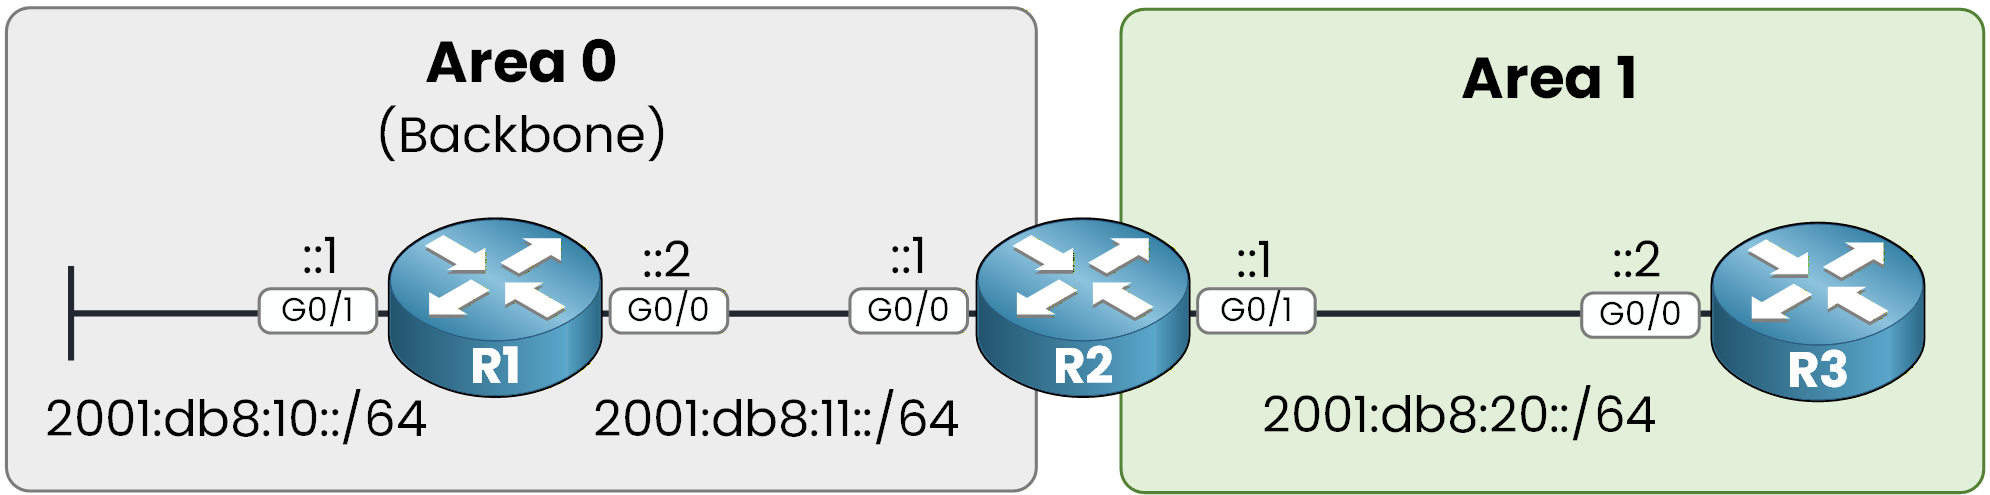
Figure 1 - OSPFv3 multi-area topology
In this topology, you have three routers.
The objective of this lab is to practice the configurations you must know for the CCNP ENCOR exam.We will not go extremely deep into every detail, but you will get solid hands-on practice.
Let’s begin.
Configure IPv6 on Interfaces
First, you need to configure IPv6 addresses on all router interfaces.
Start with R1:
R1# conf t
Enter configuration commands, one per line.  End with CNTL/Z.
R1(config)# int g0/1
R1(config-if)# ipv6 address 2001:db8:10::1/64
R1(config-if)# no shut
R1(config-if)# exit

R1(config)# int g0/0
R1(config-if)# ipv6 address 2001:db8:11::2/64
R1(config-if)# no shut
R1(config-if)# exit
Then move to R2:
R2# conf t
Enter configuration commands, one per line.  End with CNTL/Z
R2(config)# int g0/0
R2(config-if)# ipv6 address 2001:db8:11::1/64
R2(config-if)# no shut
R2(config-if)# exit

R2(config)# int g0/1
R2(config-if)# ipv6 address 2001:db8:20::1/64
R2(config-if)# no shut
R2(config-if)# exit
Finally, configure R3:
R3# conf t
Enter configuration commands, one per line.  End with CNTL/Z
R3(config)# int g0/0
R3(config-if)# ipv6 address 2001:db8:20::2/64
R3(config-if)# no shut
R3(config-if)# end
Verify IPv6 Connectivity
Now that IPv6 addressing is configured, you should verify it.
On R1:
R1# show ipv6 interface brief
GigabitEthernet0/0     [up/up]
    FE80::52CA:C4FF:FE00:1200
    2001:DB8:11::2
GigabitEthernet0/1     [up/up]
    FE80::52CA:C4FF:FE00:1201
    2001:DB8:10::1
GigabitEthernet0/2     [administratively down/down]
    unassigned
GigabitEthernet0/3     [administratively down/down]
    unassigned
As you can see, each active interface has:
A Global Unicast address
A Link-Local address
The link-local address is automatically generated using EUI-64 by default.
You must remember that link-local addresses are mandatory for OSPFv3 neighbor adjacency formation.Now verify the same on R2:
R2# show ipv6 interface brief
GigabitEthernet0/0     [up/up]
    FE80::52F7:B4FF:FE00:1300
    2001:DB8:11::1
GigabitEthernet0/1     [up/up]
    FE80::52F7:B4FF:FE00:1301
    2001:DB8:20::1
GigabitEthernet0/2     [administratively down/down]
    unassigned
GigabitEthernet0/3     [administratively down/down]
    unassigned
And finally on R3:
R3# show ipv6 interface brief
GigabitEthernet0/0     [up/up]
    FE80::523D:44FF:FE00:1400
    2001:DB8:20::2
GigabitEthernet0/1     [administratively down/down]
    unassigned
GigabitEthernet0/2     [administratively down/down]
    unassigned
GigabitEthernet0/3     [administratively down/down]
    unassigned
If all required interfaces show up/up and the IPv6 addresses are correctly configured, you are ready to move on to enabling OSPFv3.
Answer the question below
Which type of IPv6 address is mandatory for OSPFv3 neighbors to form an adjacency?
Now you are going to configure OSPFv3.
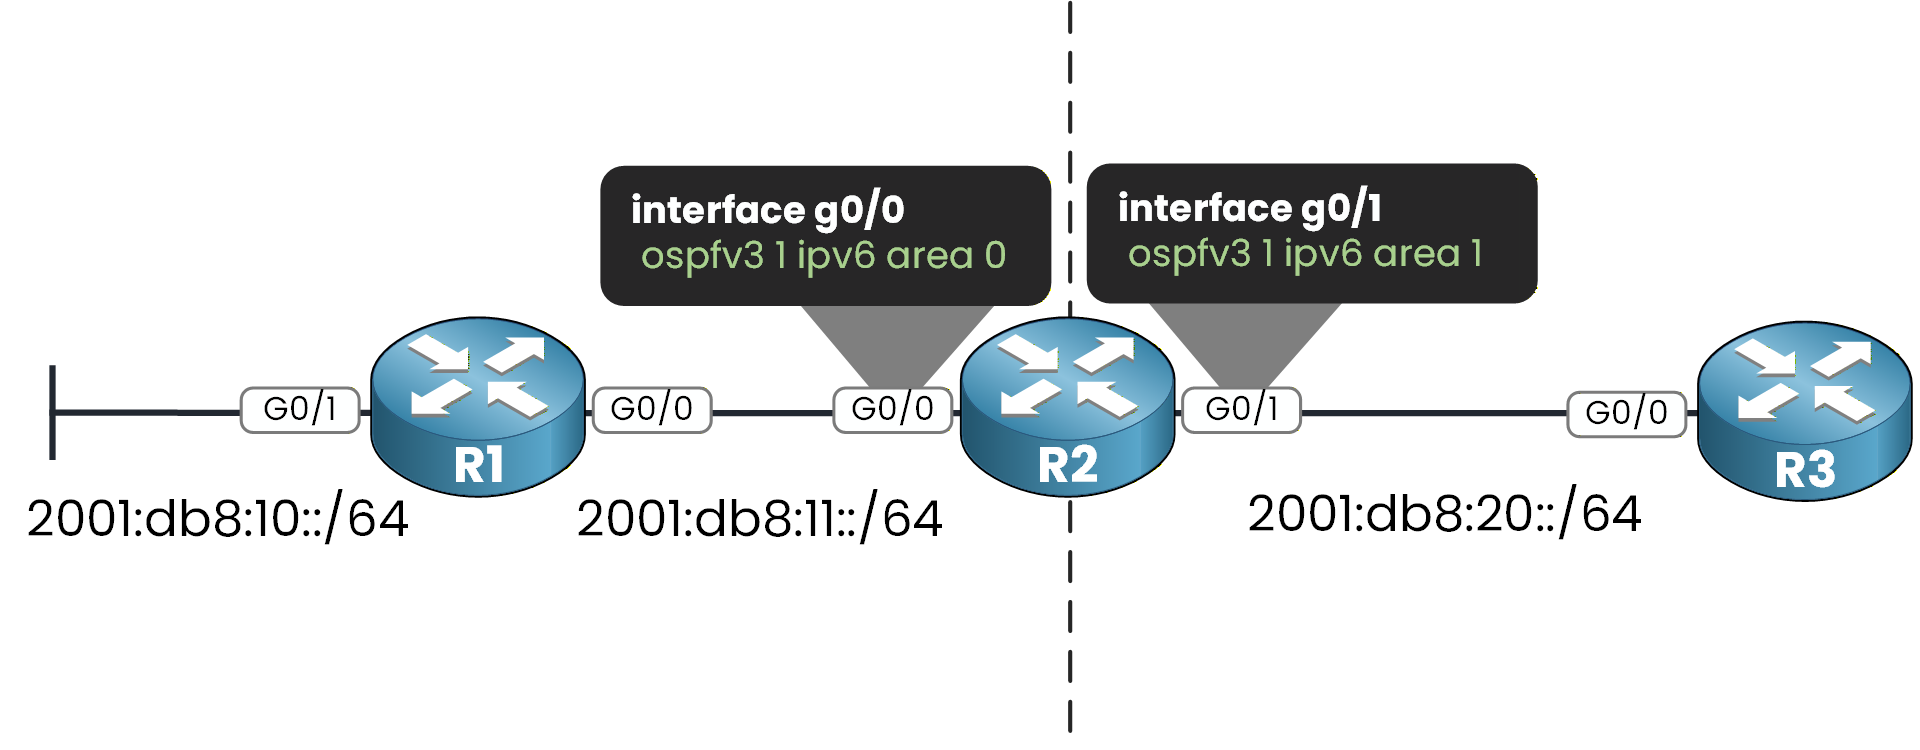
Figure 2 - OSPFv3 interface area assignment
Step 1 – Enable IPv6 Routing
Before you can run OSPFv3, you must enable IPv6 unicast routing.
On R1:
R1# conf t
Enter configuration commands, one per line.  End with CNTL/Z.
R1(config)# ipv6 unicast-routing
You must apply this command on every router.
On R2:
R2# conf t
Enter configuration commands, one per line.  End with CNTL/Z.
R2(config)# ipv6 unicast-routing
On R3:
R3# conf t
Enter configuration commands, one per line.  End with CNTL/Z.
R3(config)# ipv6 unicast-routing
Without this command, OSPFv3 will not operate properly.
Step 2 – Create the OSPFv3 Process
Now you will initialize the OSPFv3 routing process.
On R1:R1(config)# router ospfv3 1 R1(config-router)# router-id 1.1.1.1 R1(config-router)# exitHere you:
Create OSPFv3 process 1
Assign a router ID
The router ID:
Is a 32-bit value
Must be unique within the OSPF domain
If you do not manually configure a router-id, OSPFv3 selects the highest IPv4 address, and if none exists, adjacencies will not form.
Step 3 – Enable OSPFv3 on Interfaces
OSPFv3 is enabled directly on each interface.
It does not use the network statement like OSPFv2.On R1:
R1(config)# int g0/1
R1(config-if)# ospfv3 1 ipv6 area 0
R1(config-if)# exit

R1(config)# int g0/0
R1(config-if)# ospfv3 1 ipv6 area 0
R1(config-if)# end
You assign each interface to its appropriate area.
Now repeat the same process on R2.
R2(config)# router ospfv3 1
R2(config-router)# router-id 2.2.2.2
R2(config-router)# exit

R2(config)# int g0/0
R2(config-if)# ospfv3 1 ipv6 area 0
R2(config-if)# exit

R2(config)# int g0/1
R2(config-if)# ospfv3 1 ipv6 area 1
R2(config-if)# end
And finally on R3:
R3(config)# router ospfv3 1
R3(config-router)# router-id 3.3.3.3
R3(config-router)# exit

R3(config)# int g0/0
R3(config-if)# ospfv3 1 ipv6 area 1
R3(config-if)# end
Answer the question below
What must be enabled globally before OSPFv3 can operate?
Now you will verify that OSPFv3 is operating correctly.
Figure 3 - OSPFv3 Topology
Verify OSPFv3 Interfaces
To verify OSPFv3-enabled interfaces, use:
R1# show ospfv3 interface brief
Interface    PID   Area            AF         Cost  State Nbrs F/C
Gi0/0        1     0               ipv6       1     DR    1/1
Gi0/1        1     0               ipv6       1     DR    0/0
You can verify:
The Process ID
The Area assignment
The State (DR/BDR/P2P)
The number of neighbors
The Area column confirms which area each interface belongs to.
Now check R2:
R2# show ospfv3 interface brief
Interface    PID   Area            AF         Cost  State Nbrs F/C
Gi0/0        1     0               ipv6       1     BDR   1/1
Gi0/1        1     1               ipv6       1     DR    1/1
And R3:
R3# show ospfv3 interface brief
Interface    PID   Area            AF         Cost  State Nbrs F/C
Gi0/0        1     1               ipv6       1     BDR   1/1
You should confirm:
R1 and R2 share Area 0
R2 and R3 share Area 1
Verify OSPFv3 Neighbor Adjacency
Now move to the ABR (R2) and verify neighbor relationships:
R2# show ospfv3 ipv6 neighbor

          OSPFv3 1 address-family ipv6 (router-id 2.2.2.2)

Neighbor ID     Pri   State           Dead Time   Interface ID    Interface
1.1.1.1           1   FULL/DR         00:00:33    2               GigabitEthernet0/0
3.3.3.3           1   FULL/BDR        00:00:36    2               GigabitEthernet0/1
You can confirm:
R1 (1.1.1.1) is fully adjacent
R3 (3.3.3.3) is fully adjacent
The adjacency state is FULL
Remember, unlike OSPFv2, OSPFv3 forms adjacencies using link-local addresses instead of global IPs.
Verify the OSPFv3 Routing Table
Now verify learned routes using:
R1# show ipv6 route ospf
IPv6 Routing Table - default - 5 entries
Codes: C - Connected, L - Local, S - Static, U - Per-user Static route
       B - BGP, HA - Home Agent, MR - Mobile Router, R - RIP
       H - NHRP, I1 - ISIS L1, I2 - ISIS L2, IA - interarea
       IS - ISIS summary, D - EIGRP, EX - EIGRP external, NM - NEMO
       ND - ND Default, NDp - ND Prefix, DCE - Destination, NDr - Redirect
       RL - RPL, O - OSPF Intra, OI - OSPF Inter, OE1 - OSPF ext 1
       OE2 - OSPF ext 2, ON1 - OSPF NSSA ext 1, ON2 - OSPF NSSA ext 2
       la - LISP alt, lr - LISP site-registrations, ld - LISP dyn-eid
       lA - LISP away, a - Application
OI  2001:DB8:20::/64 [110/2]
     via FE80::52F7:B4FF:FE00:1300, GigabitEthernet0/0
You can see:
The remote network
2001:db8:20::/64It is marked as OI (OSPF Inter-Area)
The next hop is the link-local address of R2
This confirms Area 1 routes are being learned through the ABR.
On R2:
R2# show ipv6 route ospf
IPv6 Routing Table - default - 6 entries
Codes: C - Connected, L - Local, S - Static, U - Per-user Static route
       B - BGP, HA - Home Agent, MR - Mobile Router, R - RIP
       H - NHRP, I1 - ISIS L1, I2 - ISIS L2, IA - interarea
       IS - ISIS summary, D - EIGRP, EX - EIGRP external, NM - NEMO
       ND - ND Default, NDp - ND Prefix, DCE - Destination, NDr - Redirect
       RL - RPL, O - OSPF Intra, OI - OSPF Inter, OE1 - OSPF ext 1
       OE2 - OSPF ext 2, ON1 - OSPF NSSA ext 1, ON2 - OSPF NSSA ext 2
       la - LISP alt, lr - LISP site-registrations, ld - LISP dyn-eid
       lA - LISP away, a - Application
O   2001:DB8:10::/64 [110/2]
     via FE80::52CA:C4FF:FE00:1200, GigabitEthernet0/0
R2 learns the network behind R1.
On R3:
R3# show ipv6 route ospf
IPv6 Routing Table - default - 5 entries
Codes: C - Connected, L - Local, S - Static, U - Per-user Static route
       B - BGP, HA - Home Agent, MR - Mobile Router, R - RIP
       H - NHRP, I1 - ISIS L1, I2 - ISIS L2, IA - interarea
       IS - ISIS summary, D - EIGRP, EX - EIGRP external, NM - NEMO
       ND - ND Default, NDp - ND Prefix, DCE - Destination, NDr - Redirect
       RL - RPL, O - OSPF Intra, OI - OSPF Inter, OE1 - OSPF ext 1
       OE2 - OSPF ext 2, ON1 - OSPF NSSA ext 1, ON2 - OSPF NSSA ext 2
       la - LISP alt, lr - LISP site-registrations, ld - LISP dyn-eid
       lA - LISP away, a - Application
OI  2001:DB8:10::/64 [110/3]
     via FE80::52F7:B4FF:FE00:1301, GigabitEthernet0/0
OI  2001:DB8:11::/64 [110/2]
     via FE80::52F7:B4FF:FE00:1301, GigabitEthernet0/0
R3 learns the Area 0 networks as Inter-Area (OI) routes.
At this point, your multi-area OSPFv3 topology is functioning correctly:
Interfaces are in the correct areas
Neighbor adjacencies are FULL
Inter-area routes are installed
Now you are ready to explore additional OSPFv3 features such as passive interfaces, network types, and summarization.
Answer the question below
What neighbor state confirms that OSPFv3 adjacency is successfully formed?