In this lab, you will configure DHCP on a Cisco router so that devices in the LAN can automatically obtain their IP addressing information. You will also learn how to verify DHCP assignments and test the behaviour of the DHCP server.
Throughout this exercise, we will work directly inside Packet Tracer and apply each command step by step.

Figure 1 - DHCP Configuration Topology
This is the network topology we will use throughout the lab.
How to Begin
Download the Packet Tracer file at the top of the page and open it.
The topology is already prepared for you, your goal is to implement DHCP step by step.Lab Overview
Here’s the structure we’ll follow throughout this lab:
Step 1 – Create the LAN DHCP Pool
Step 2 – Test DHCP LAN Pool
Step 3 – Create ISP DHCP Pool
Step 4 – Test DHCP ISP Pool
Step 5 – Additional DHCP Checks
Each step includes explanations, Packet Tracer interactions, and the exact Cisco IOS commands you’ll need.
Let’s Get Started
Open the lab file and follow each step directly in Packet Tracer.
You don’t need to know DHCP commands yet — we will learn them together as we configure the network.Answer the question below
In this first task, you are the network administrator of the internal LAN.
Your objective is to configure a DHCP pool that will automatically assign IP addresses to users in the 192.168.1.0/24 network.Before we configure anything, look at the topology:
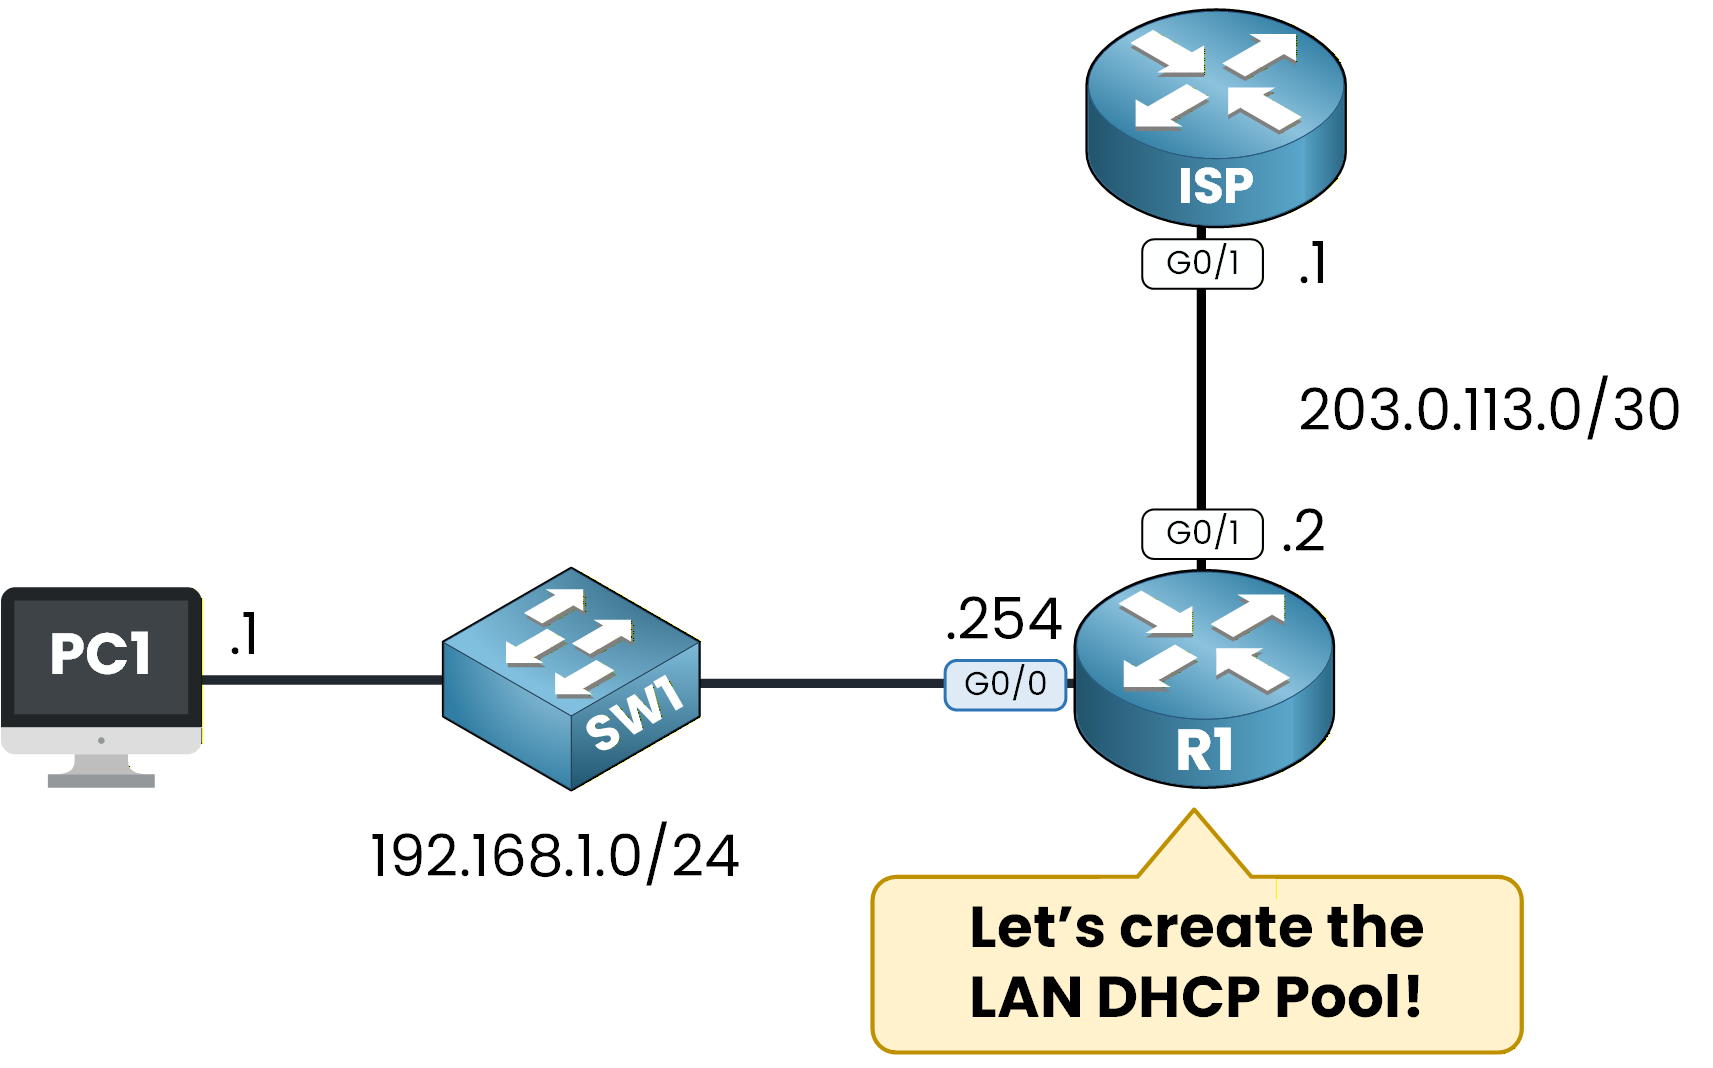
Figure 2 - DHCP Topology
The LAN has:
PC1 in the 192.168.1.0/24 network
SW1 acting as a Layer 2 switch
R1 acting as the default gateway (192.168.1.254)
We want R1 to serve as the DHCP server for this network.
Exclude Reserved IP Addresses
In every network, some IP addresses must remain reserved.
These addresses are used by devices that require static IPs, such as:routers
servers
printers
To prevent IP conflicts, these addresses must be excluded from the DHCP scope.
In our lab, the only reserved IP is the default gateway: 192.168.1.254.Here is how you define it:
R1# conf t
Enter configuration commands, one per line.  End with CNTL/Z.
R1(config)# ip dhcp ?
  excluded-address  Prevent DHCP from assigning certain addresses
  pool              Configure DHCP address pools
  relay             DHCP relay agent parameters

R1(config)# ip dhcp excluded-address 192.168.1.254
This ensures that 192.168.1.254 will never be assigned to a client.
Create the DHCP Pool
Now we create the DHCP pool that will assign IP addresses to clients.
A DHCP pool is simply a named configuration where you define the settings the router will provide to DHCP clients.Before creating it, let’s look at the available DHCP commands:
R1(config)# ip dhcp ?
  excluded-address  Prevent DHCP from assigning certain addresses
  pool              Configure DHCP address pools
  relay             DHCP relay agent parameters
To create a pool, you must give it a name.
The router guides you:R1(config)# ip dhcp pool ? WORD Pool nameWe will name it LAN_POOL, because this pool will serve our internal LAN:
R1(config)# ip dhcp pool LAN_POOLAt this point, you enter DHCP pool configuration mode, where all DHCP options can be configured:
R1(dhcp-config)# ?
  default-router  Default routers
  dns-server      Set name server
  domain-name     Domain name
  exit            Exit from DHCP pool configuration mode
  network         Network number and mask
  no              Negate a command or set its defaults
  option          Raw DHCP options
Define the Network Range
Next, you must tell the router which subnet this pool will serve.
This step defines the network from which IP addresses will be assigned to DHCP clients.In our case, the LAN uses the 192.168.1.0/24 network, so we link the pool to this subnet:
R1(dhcp-config)# network 192.168.1.0 255.255.255.0This tells the router that DHCP clients should receive addresses inside this subnet.
Configure the Default Router
DHCP clients also need a default gateway to reach external networks.
This is the IP address of the router interface connected to the LAN.Here, the default gateway is 192.168.1.254, so we configure:
R1(dhcp-config)# default-router 192.168.1.254This value will be automatically provided to clients when they obtain their IP address.
Configure the DNS Server
Clients must also know which DNS server to use to resolve domain names.
We configure Google’s public DNS server:R1(dhcp-config)# dns-server 8.8.8.8This ensures that clients can immediately resolve domain names after receiving their configuration.
Set the Domain Name (Optional but Recommended)
Setting a domain name is optional, but it is common practice in enterprise networks and helps identify the LAN.
We set the domain name to pingmynetwork.com:
R1(dhcp-config)# domain-name pingmynetwork.com
R1(dhcp-config)# end
Verify the Configuration
Now that the DHCP pool is configured, you can verify it using:
40 % Complete: you’re making great progress
Unlock the rest of this lesson
If you’d like to continue your CCNA journey, simply create your free account.
Access all CCNA lessons
Practice with hands-on labs
Train with Practice exams and Quizzes
Progress tracking in your dashboard
Made by network engineers - CCNP certified
learners globally