Static NAT
Course Contents
1. Introduction to Static NAT
Static NAT (Network Address Translation) is the first IP address translation method you’ll discover.
In your internal network, you use private IP addresses defined by RFC 1918.
These addresses are only valid locally and cannot be routed over the Internet.

For a private host to communicate with the outside world, it needs a public IP to communicate with devices outside your internal network.
2. Why use Static NAT?
Static NAT is used when you want to establish a 1-to-1 correspondence between a private IP address and a public IP address.
Let’s take an example:
A server in your local network has the address 192.168.1.5.
It wishes to contact the Google DNS server: 8.8.8.8.
When the packet reaches the router, it is blocked.

Why is this? Because the source address is private, and therefore not routable on the Internet.
The router needs to apply address translation (NAT) to enable communication.
To solve this, we implement a Static NAT rule:
The private address 192.168.1.5 is associated with a public address 37.5.55.103.

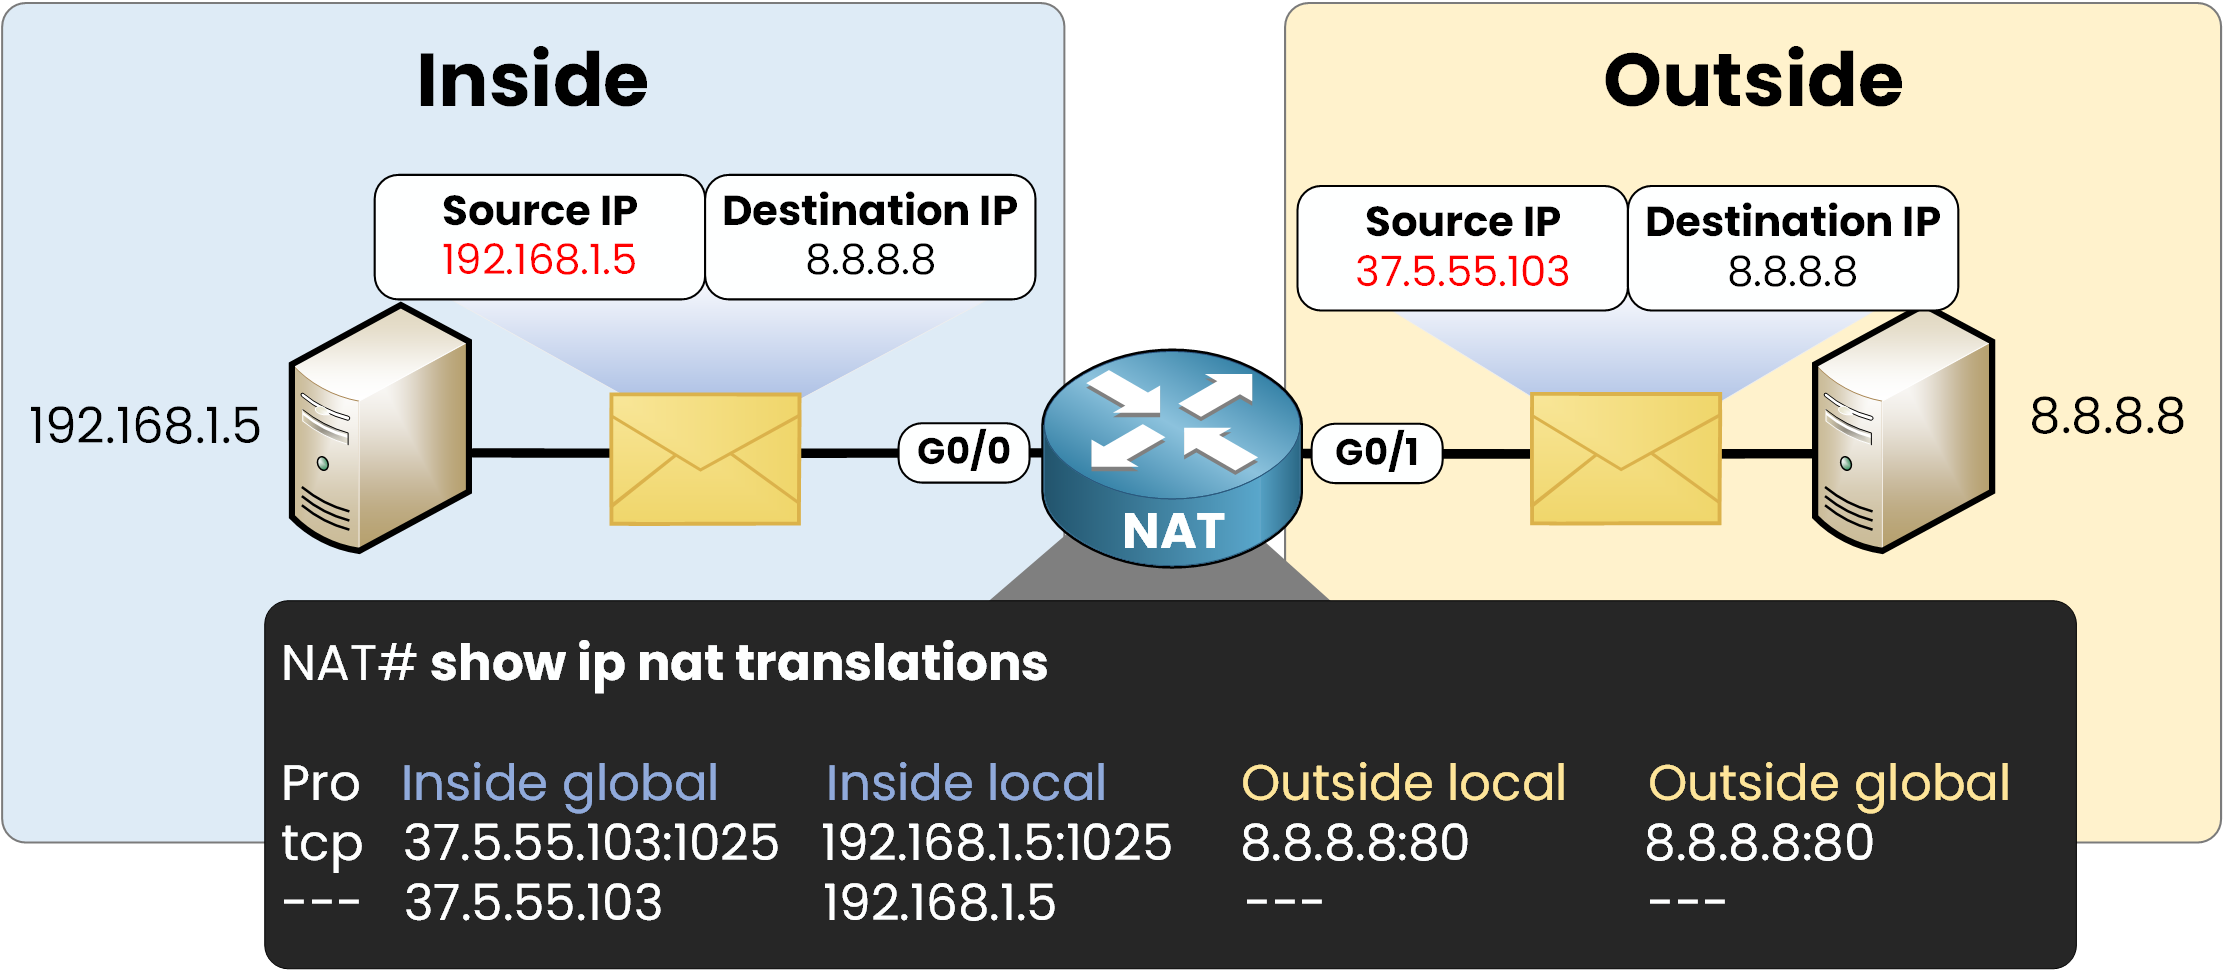
As shown in this diagram, the router configures a static NAT table with :
- Inside Local : 192.168.1.5 (the internal private IP address)
- Inside Global : 37.5.55.103(the public IP address used on the Internet)
Let’s move on and see what happens in practice during a transmission!
3. Static NAT in Action
Let’s assume that Static NAT is already configured.
When the packet is sent from server 192.168.1.5 to DNS server 8.8.8.8, the following happens:

- The router identifies the source address as 192.168.1.5 (private address).
- It applies the configured Static NAT rule.
- It replaces this address with the public address 37.5.55.103.
- The packet is then transmitted over the Internet.
When the DNS server responds, the router performs the reverse operation:
it replaces the destination address 37.5.55.103 with 192.168.1.5, and the packet correctly returns to the original sender.
4. Configure Static NAT
Now let’s take a step-by-step look at how to configure Static NAT.
Defining Inside and Outside interfaces
First step: you need to tell the router which interfaces correspond to the internal (private) network and which to the external (Internet) network.

- Use the ip nat inside command on the interface connected to the LAN.
- And the ip nat outside command on the interface connected to the Internet.
These commands enable the router to distinguish between private and public traffic, a prerequisite for NAT operation.
Configure translation rule
Once the interfaces have been configured, the address translation rule can be created.

Take your time to understand this command, and we’ll look at a practical example below.
Putting it into practice
In our case :
- 192.168.1.5 is the private IP address of the internal server (Inside Local)
- 37.5.55.103 is the public IP address used for translation (Inside Global)

When the answer comes back, the router performs the reverse translation using its static table.

It recognizes that the address 37.5.55.103 is linked to 192.168.1.5 and modifies the IP destination to forward the traffic to the right machine in the private network.
5. Check NAT translation
To make sure that Static NAT is up and running correctly, you can use the following command on the router:

As you can see in the image above, the router displays the NAT translations currently active.
- The first line shows an active TCP session:
Private IP 192.168.1.5 is translated into public IP 37.5.55.103, and communicates with 8.8.8.8 on port 80.
- The second line corresponds to a persistent static rule:
All traffic from 192.168.1.5 is always translated into 37.5.55.103, whatever the protocol.
Understanding the 4 types of NAT addresses
To fully understand the show ip nat translations command, it’s essential to know the four types of address used by NAT.
Let’s take a look at the example below:

Here’s what these 4 terms mean:
- Inside Local
This is the private IP address of the equipment on your internal network.
→ In our example, it’s 192.168.1.5.
- Inside Global
This is the public IP address that the router uses to represent the internal host on the Internet.
→ Here, the router translates 192.168.1.5 into 37.5.55.103.
- Outside Global
This is the real IP address of the remote resource on the Internet.
→ In this case, it’s the Google server: 8.8.8.8.
- Outside Local
This is the address the router uses to represent the remote resource from the point of view of the internal network.
→ It is very rarely used in simple cases like here, but may appear in more complex enterprise environments.
You can ignore it for now if you’re just starting out.
6. The limits of Static NAT
Static NAT is useful in two common cases:
- When a private IP address needs to access the Internet via a fixed public IP.
- When an internal server, such as a web server, needs to be accessible from the outside.
However, this solution has several limitations:
- It requires a public IP address for each internal host, which is not viable on a large scale.
- It cannot be used to share a public IP between several internal devices.
What next? Towards Dynamic NAT
To overcome these limitations, Dynamic NAT offers a more flexible approach. It translates several private addresses into a set of public addresses, depending on the active connections.
In the next lesson, you’ll learn in detail how Dynamic NAT works
